Color Monitor
Do Not Expose This Equipment To Rain or Moisture
Graphic Symbol Explanation
Eng-2
Contents
Names and Functions of Parts
Functions and Features
Overview
Overview
Rear Panel
Eng-5
Installation
Basic Operation
When you want to watch the Event Replay screen
When you want to watch on Zoom Screen Mode
When you want to watch on PIP Screen Mode
When you want to watch the VCR output
Eng-9
Setup Menu Settings
View Setting
CLOCK/DISPLAY SET
Eng-10
Camera Setup
Motion Detect
Eng-11
Shutter
Special
Alarm Buzzer
System Setting
Alarm
Alarm Hold Time
Eng-13
Door Bell List
Alarm, Motion, Loss and Door Bell
Recording
Event List
Loss Occurrence
Motion Occurrence
Eng-15
Eng-16
Specifications
Appendix
Door Bell Occurrence
Eng-17
Troubleshooting
Mode d’emploi
Fra-2
Explication des symboles graphiques
Dans la documentation accompagnant l’appareil
Fra-3
Table des matières
Nom et fonctions des éléments
Présentation
Présentation
Fonctions et caractéristiques
Avertissement
Fra-5
Panneau arrière
Number Key Pavé numérique 0 ~
Scope standard
Environnements de l’installation
Connexion du capteur d’alarme
Déballage
Fonctionnement de base
Pour une visualisation en mode Freeze Screen GEL l’écran
Fonctionnement de base
Connexion du moniteur standard
Pour une visualisation de la sortie magnéto- scope
Pour une visualisation en mode Zoom Screen Ecran Zoom
Fra-8
Fra-9
Pour la visualisation de l’écran Appels
Reglage Moniteur
Reglage Horloge
Type DE Date AA/MM/JJ ↔ MM/JJ/AA ↔ JJ/MM/AA. Date AA/MM/JJ
Reglages Cameras
Fra-10
Couleur DE Bord Gris ↔ Noir
Balance DES Blancs ATW, AWC, Manuel
Fra-11
Shutter Obturateur
Appuyez sur le bouton SET pour afficher l‘écran suivant
Detection DE Mouvement
Fra-12
Detection DE Mouvement
’ENREGISTREMENT
ALARME…
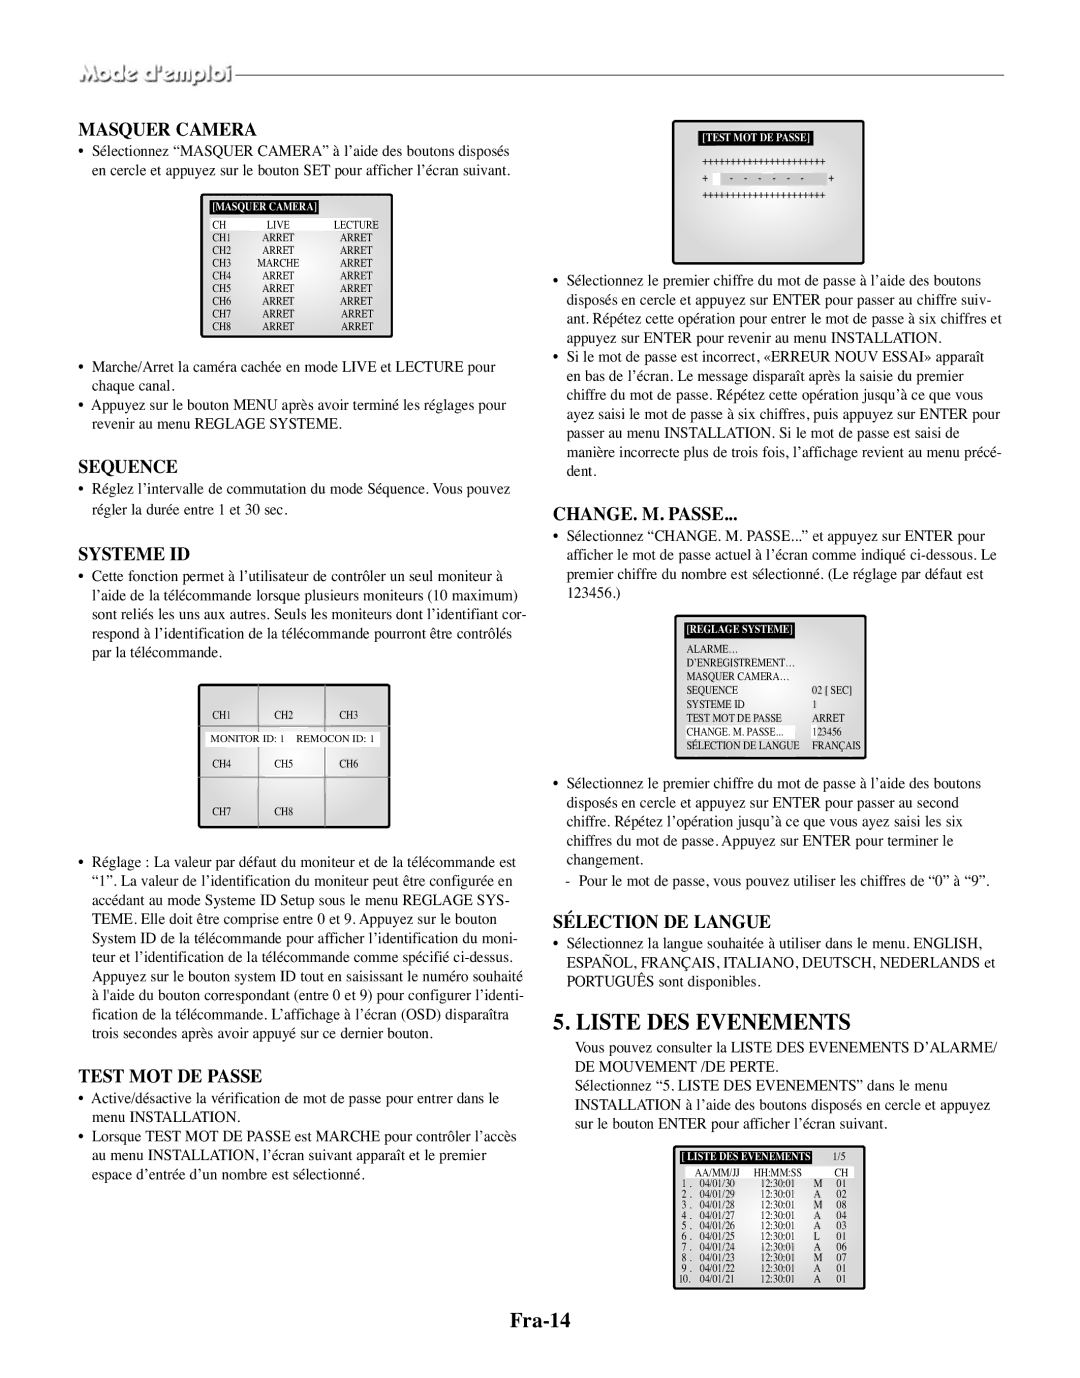
Reglage Systeme
Fra-13
Fra-14
Liste DES Evenements
Liste DES Appels
Enregistrement en mode Par intervalles ou Normal
Déclenchement d’une alarme
Enregistrement
Fra-16
Déclenchement d’un mouvement
Déclenchement d’une Perte
Déclenchement d’une apples
Caractéristiques techniques
Annexe
Fra-17
Bedienungsanleitung
Warnhinweise
Erklärung der grafischen Symbole
Deu-2
Bedienung, Wartung und Reparatur enthält
Funktionen und Leistungsmerkmale
Inhalt
Abschnitt 1 Übersicht
Übersicht
Deu-4
Bezeichnungen und Funktionen der Teile
Vorderseite/Fernbedienung
Rückseite
Abschnitt 2 Installation
Installationsumgebung
Deu-5
Abschnitt 4 Grundfunktionen
Bilder im ZOOM-Modus anzeigen
Bilder im Vollbildmodus anzeigen
Bilder im Sequenzbildmodus anzeigen
Bilder im Standbildmodus anzeigen
Klingelbild anzeigen
Bilder im PIP-Modus anzeigen
Bilder vom Videorekorder anzeigen
Ereigniswiedergabe anzeigen
Deu-9
Bildeinstellungen
UHR/ANZEIGE Menue
Kameramenue
Deu-10
Preset Bereich
Benutzer Bereich
Manuell
Deu-11
Shutter Verschluss
Spezial…
VIDEOSENSOR-MENUE
ALARM…
Systemmenue
Deu-12
AUFNAHME…
Deu-13
Kamera verbergen
Sequenz
Aufzeichnen im Langzeit- oder im Normalmodus
Abschnitt 6 Aufzeichnung
Ereignisprotokoll
Türglocken Liste
Bewegungsmeldung
Doppelte Aufzeichnung bei Alarm oder Bewegungsmeldung
Alarmauslösung
Türgong
Technische Daten
Signalverlust
Anhang
Betätigung der Klingel
Deu-17
Fehlersuche
Hinweis
Deu-18
Manuale dellutente
Attenzione
Descrizione dei simboli
Ita-2
Sulla manutenzione e sul funzionamento
Funzioni e caratteristiche
Sommario
Capitolo 1 Panora
Panoramica
Focus FAR/NEAR
Nomi e funzioni delle parti
Ita-4
Pannello anteriore/Telecomando
Ita-5
Capitolo 2 Installazione
Ambienti di installazione
Apertura della confezione
Capitolo 4 Operazioni di base
Capitolo 3 Collegamento a dis- positivi esterni
Triplex
Visualizzazione dello schermo Event Replay
Capitolo 5 Impostazioni del menu Setup
Visualizzazione dell’uscita del videoregistra- tore
Visualizzazione dello schermo suoneria
Ita-9
Regolazione Vista
OROLOGIO/IMPOSTAZIONE Display
Regolazione Camera
Manuale
Area Preset
Ita-10
Shutter Otturatore
Rilevatore dl movimento
Ita-11
Bilanciamento Bianco ATW, AWC, Manuale
Speciali
Registrazione
Impostazione Sistema
Ita-12
Allarme
Ita-13
Lista Eventi
Capitolo 6 Registrazione
Lista Suoneria
Evento Perdita
Evento Movimento
Ita-15
Ita-16
Appendice
Evento Suoneria
Specifiche tecniche
Ita-17
Risoluzione dei problemi
Nota
Guía del usuario
Precaución
Explicación de símbolos gráficos
Esp-2
Paña al aparato
Funciones y características
Índice
Capítulo 1 Aspectos generales
Aspectos generales
Esp-4
Nombres y funciones de las piezas
Panel delantero/Mando a distancia
Esp-5
Capítulo 2 Instalación
Entornos de instalació
Desembalado
Conexión del monitor principal
Conexión del sensor de alarmas
Capítulo 4 Funcionamiento básico
Conexión del decodificador de timbres
DIRECTO/ DIFERIDO/TRIPLEX
Esp-8
Capítulo 5 Ajustes del menú de configuración
Para ver la salida del vídeo
Para ver una pantalla de Timbre
Esp-9
Configuracion DE LA Camara
VER Ajustes
RELOJ/AJUSTE DEL Display
Area Usuario
Esp-10
Area DE Fabrica
Balance DE Blancos ATW, AWC, Manual
Esp-11
Especial
Detteccion de movimiento
Grabción
ALARMA…
Ajustes DEL Sistema
Esp-12
Esp-13
Lista Eventos
Capitolo 6 Grabación
Lista DE Timbre
Incidencia de pérdida
Incidencia de movimiento
Esp-15
Esp-16
Apéndice
Incidencia de timbre
Especificaciones
Esp-17
Solución de problemas
Gebruikershandleiding
Raat
Verklaring van grafische symbolen
Ned-2
Gevaarvoorelektrischeschokken
Ned-3
Hoofdstuk 1 Overzicht Inhoud
Overzicht
Functies en mogelijkheden
Draaischijf LINKS, RECHTS, Enter
Namen en functies van de onderdelen
Ned-4
Voorpaneel/afstandsbediening
Ned-5
Hoofdstuk 2 Installatie
De installatieomgeving
Uitpakken
Een gewoon beeldscherm aansluiten
Een alarmsysteem aansluiten
Hoofdstuk 4 Normaal gebruik
Een deurbeldetector aansluiten
Als u wilt kijken in zoomschermmodus
Als u wilt kijken in volledig schermmodus
Als u wilt kijken in sequentiële modus
Als u wilt kijken in FREEZE-schermmodus
Wanneer u het gebeurtenisherhalingwilt bekijken
Hoofdstuk 5 Instellingen in het optiemenu
Als u wilt kijken in Beeld In Beeld-scher- mmodus
Wanneer u de uitvoer van de video- recorder wilt bekijken
Ned-9
Monitor
KLOK/DISPLAY
Camera Instellingen
Gebruiker Gebied
Preset Gebied
Ned-10
Instelling Camera
Beweging Detectie
Ned-11
Sluiter
Speciaal
Ned-12
Alarmtijd
Alarmzoemer
Systeem Instellingen
Ned-13
Geheugen Lijst
Hoofdstuk 6 Opnemen
Deurbel Lijst
Bij het optreden van camerauitval
Bij het optreden van beweging
Ned-15
Specificaties
Wanneer de deurbel gaat
Ned-16
Energieverbruik
Problemen oplossen
Ned-17
Afmetingen B x D x H mm
Manual do utilizador
Cuidado
Explicação dos símbolos gráficos
Por-2
Acompanha o monitor
Funções e características
Capítulo 7 Alarme, movimento
Capítulo 1 Descrição geral Conteúdo
Descrição geral
Painel frontal/Telecomando
Interruptor Power
Nomes e funções de peças
Por-4
Por-5
Capítulo 2 Instalação
Ambientes de instalação
Desembalar
Capítulo 4 Funcionamento básico
LIVE/P.B./TRIPLEX
Quando quiser ver no ecrã de reprodução de eventos
Capítulo 5 Programações do menu Setup
Quando quiser ver a saída do videogravador
Quando quiser ver um ecrã de campainha da porta
Por-9
VER Configuração
Configuração Relógio
Configuraçnão Câmaras
Área POR Defeito
Por-10
Shutter Electrónico
Desl
POR Defeito
Por-11
Detecção DE Actividade
Balanço Brancos ATW, AWC.., Manual
Gravação
Configuração Sistema
Alarme
Por-12
Por-13
Lista DE Eventos
Capítulo 6 Gravação
Capítulo 7 Alarme, movimento, perda e campainha da porta
Lista DE Campainha
As informações de ocorrência de movimento são guardadas na
Ocorrência de perda
Ocorrência de movimento
Por-15
Por-16
Anexo
Ocorrência de campainha da porta
Especificações
Por-17
Resolução de problemas
Brugervejledning
Forsigtigt
Forklaring på grafiske symboler
Dan-2
Som følger med produktet
Funktioner
Indhold
Kapitel 1 Oversigt
Oversigt
TÆND/SLUK-KNAP Slår strømmen til/fra
Navne og funktioner for dele
Dan-4
Frontpanel/fjernbetjening
Dan-5
Kapitel 2 Installation
Installationmiljøer
Udpakning
Kapitel 4 Grundlæggende drift
Kapitel 3 Tilslutning til eksterne enheder
Dan-7
Når du ønsker at se i Full Screen Mode
Når du ønsker at se i Freeze Screen Mode
Når du ønsker at se i Zoom Screen Mode
10. Når du ønsker at se en Door Bell skærm
Kapitel 5 Setup Menu indstill- inger
Når du ønsker at se VCR output
Når du ønsker at se Event Replay skærm
Border Color Kantfarve Gray ↔ Black
Tint emnet findes kun i Ntsc System mode
Dan-9
All Alle Alle emner vil blive vist undtagen DATE/TIME og
Shutter Lukker
Dan-10
Dan-11
Presetarea
Dan-12
Når alarmen lyder, er alarmsummeren slået Off fra
Dan-13
Setup Menu
Sådan kontrolleres Event List fra Door Bells
Kapitel 6 Optagelse
Kapitel 7 Alarm, Motion, Loss og Door Bell
Alarm/Motion Channel intensiv optagelse
Signaler ændrer sig, når alarmen starter og senere afbrydes
Dan-15
Dan-16
Appendiks
Specifikationer
Fejlfinding
Bemærk
Dan-17
Användarhandbok
Varning
Symbolförklaring
Swe-2
Jer apparaten
Funktioner och egenskaper
Innehåll
Kapitel 1 Översikt
Översikt
Ratt VÄNSTER, HÖGER, Enter
POWER-KNAPP
Swe-4
Baksida
Swe-5
Installationsmiljö
Kapitel 3 Ansluta till externa enheter
Uppackning
Kapitel 4 Grundläggande användning
När du vill titta på video
När du vill använda skärmläget Freeze
När du vill använda skärmläget Zoom
När du vill använda skärmläget BIB
Visa språkvalsskärmen genom att trycka på MENU-knappen
Kapitel 5 Inställningar i menyn Setup
10. När du vill titta på en dörrklocksskärm
Swe-8
OFF
Swe-9
Ställa in värden
Swe-10
Swe-11
Swe-12
Alarm Record
Inspelning med tidsförkortning eller nor- malt läge
Kapitel 6 Inspelning
Swe-13
Swe-14
Intensiv inspelning av alarm-/rörelsekanal
Alarmhändelse
Rörelsehändelse
Swe-15
Bilaga
Förlusthändelse
Dörrklockshändelse
Swe-16
Felsökning
Swe-17
Anteckningar
Color Monitor
Rus-2
Объяснение графических символов
Жение
Жание
Rus-3
18. части
Rus-4
Лава 1 Обзор
Обзор
Жности
Tiscreen
Rus-5
Uence
Аспаковка
Лава 2 Установка
Лава 3 одсоединени внешних Устройств
Ребования к месту установки
Лава 4 Основные действия
Rus-8
Тр в режиме А
Тр в режиме У экрана
Тр в режиме PIP
Rus-9
Тр сигнла с видеомагнитофона
Тр повтора события
10. тр площадки перед входом
Rus-10
УАА
CH1----- обозначает
Rus-11
Camera IDО
Loss Detect ОУ
Focus Усировка
Rus-12
Shutter А
Whitebalance
Rus-13
ALARM... А
Alarm Hold Time А
Alarm Buzzer УО
Sequence А
Rus-14
RECORD...А
Hidden Camera АЯ А
Rus-15
Лава
Режиме
Тревоги/движения
Rus-16
Лава 7 ревога,движение, потеря канала и звонок в дверь
Ревога
Ение
Rus-17
Жение
Отеря канала
Ехнические характеристики
Rus-18
Устранение неполадок
Rus-19
Амятка