
SMX-F50RP/XIL, SMX-F54BP/XIL, SMX-F50RP/XER, SMX-F500RP/EDC, SMX-F54BP/MEA specifications
The Samsung SMX-F50BP/EDC, SMX-F54BP/EDC, SMX-F50RP/EDC, SMX-F54SP/MEA, and SMX-F500BP/EDC are part of Samsung’s compact and user-friendly camcorder lineup, showcasing advanced features and innovative technologies tailored to cater to both amateur and semi-professional videographers. These models combine cutting-edge imaging technology with user-centered design to deliver high-quality video recording experiences.One of the key highlights across these models is the incorporation of a 1/6-inch CCD sensor. This component ensures excellent image quality, producing vibrant colors and sharp detail even in low-light conditions. The powerful 34x optical zoom feature enables users to capture distant subjects with remarkable clarity, while the digital zoom functions further enhance versatility for varied shooting requirements.
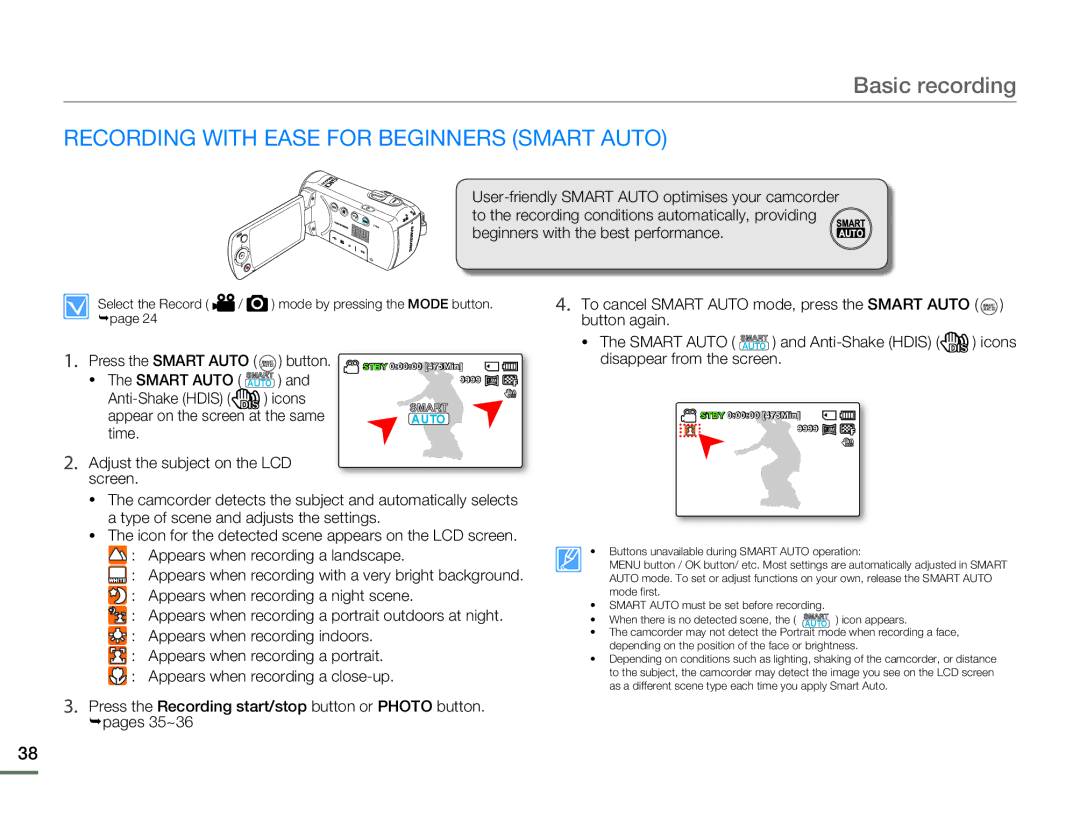
Each camcorder is equipped with a Smart AUTO feature that intelligently analyzes the shooting environment and automatically adjusts the settings for optimal results. Whether capturing family gatherings or scenic landscapes, users can enjoy the convenience of automatic adjustments without needing extensive manual intervention.
Additionally, the Samsung range boasts a high-quality, anti-shake technology designed to stabilize footage, significantly reducing the risks of shaky videos even during handheld shooting. This feature is essential for creating smooth, professional-looking recordings.
Another significant aspect is the one-touch recording capability, allowing for quick access to capturing moments as they unfold. The intuitive interface simplifies operation, making it accessible for users of all skill levels.
Video recording is complemented by the ability to capture high-resolution still images, providing a practical dual-functionality for users who want versatility in their shooting devices. The built-in flash and various scene modes enhance this further, ensuring great-looking photos in different environments.
For connectivity, these camcorders are equipped with USB ports that facilitate easy file transfers to computers or external devices, contributing to a streamlined workflow for editing and sharing videos online.
In conclusion, Samsung's camcorders, including the SMX-F50BP/EDC, F54BP/EDC, F50RP/EDC, F54SP/MEA, and F500BP/EDC, are a testament to quality, ease of use, and advanced features. They are ideal for anyone looking to capture life’s moments with efficiency and style, blending innovative technology with practical design.