Main
Connections and Source Setup
Preparation
Preparation
Table of Contents
Setup
Picture Adjustment
Page
Preparation
Features and Design
Optical engine adopting advanced DLP technology
User adjustments
Vivid colors
Minimized fan noise and light leakage
Caution on Lamp Use and Replacement
Preparation
Caution on Lamp Use
Projector Lamp
Caution on Lamp Replacement
Page
Page
Front/Upper Side
Front/Upper Side and Accessories
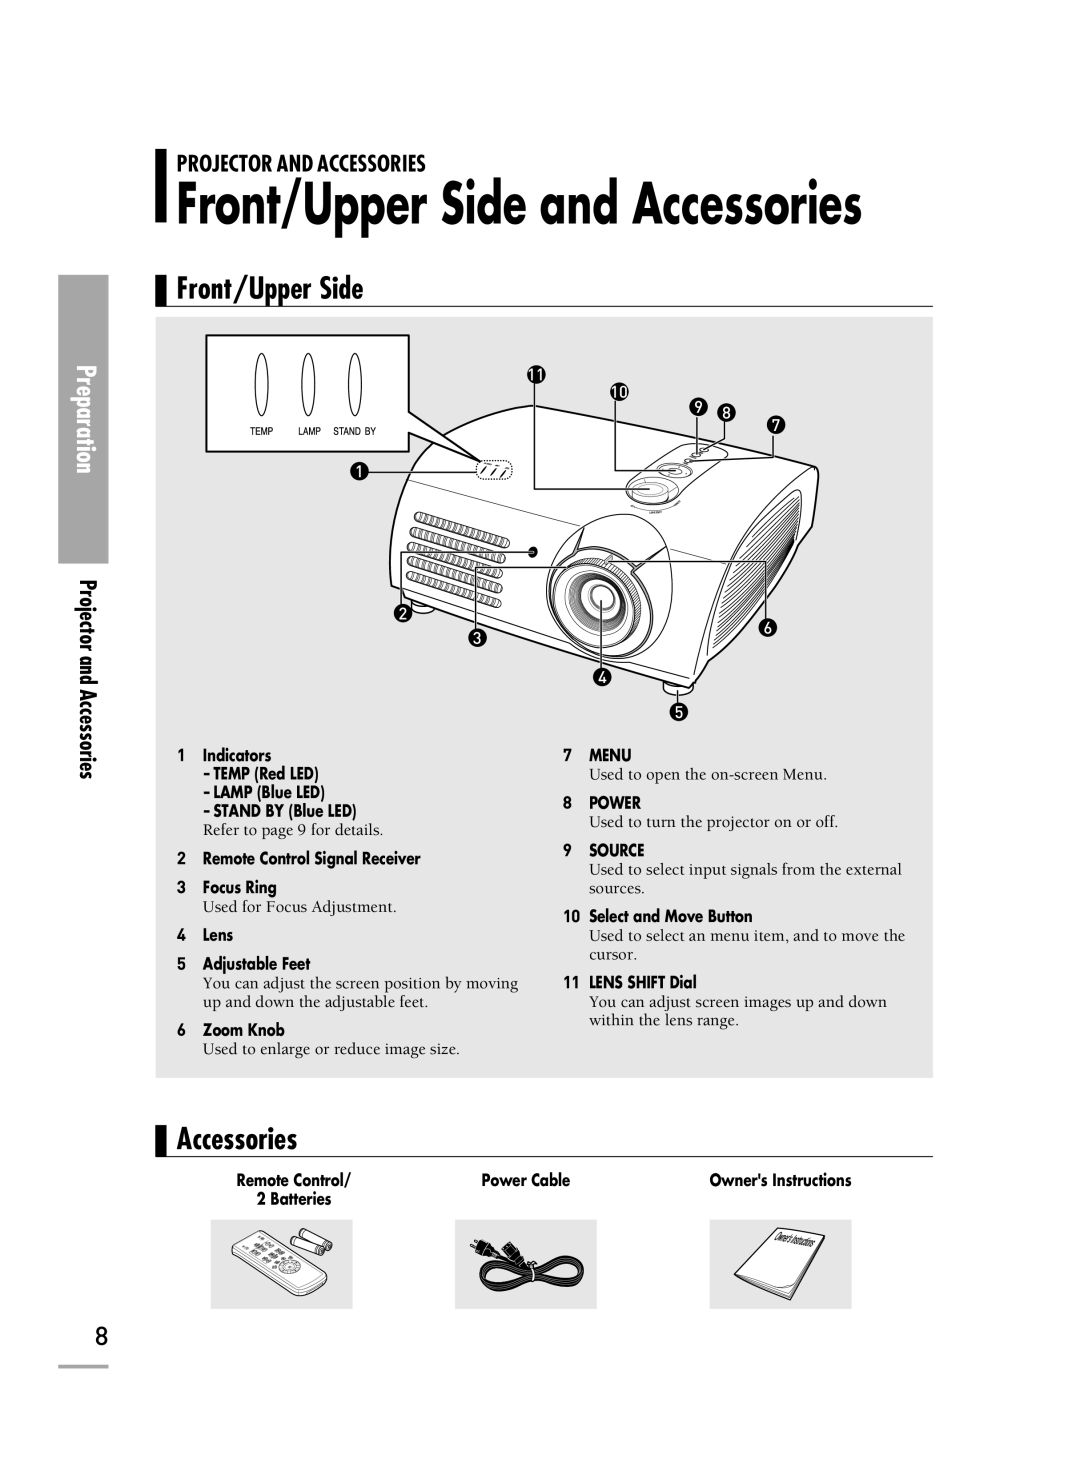
Accessories
: Turned On : Flashing : Turned Off
Indicator Information
Clearing Indicator Problems
Rear Side and Cables
Rear Side
Cables
Remote Control Buttons
Operating the Remote Control
Operating Move/Select Button
Inserting Batteries into Remote Control
Allowable range & angle of receiving the remote control signal
Using Remote Control in Dark Place (LIGHT)
Installation and Turning On
To Install the Projector
Installing Projector in Front of the Screen
Installing Projector on Backside of Screen
Turning On Projector
Zoom and Focus Adjustment
Using the Zoom Knob and the Focus Ring
Leveling with Adjustable Feet
Using Adjustable Feet
Using the Lens Shift Dial
This projector is designed to show images optimally on a 80 to 150 inch sized screen.
Y
X
Screen Size and Projection Distance
Check the following before reading this manual.
SP-H700/SP-H710
Screen Size and Projection Distance
SP-H500
This projector is designed to show images optimally on a 80 to 150 inch sized screen.
X
Y
Page
Check the following Before Connecting
Before Connections
Connecting to VCR/Camcorder/Cable Box
Connecting to DVD
1
Connecting to the Digital TV Receiver
Connections and Source Setup
Press the desired source button (COMP.1/ COMP.2/ S-VIDEO/COMPOSITE/ PC/DVI).
The Source List menu is displayed.
The Input menu is displayed.
Setting up the External Input Source
You can select a device connected to the projector to display.
Press the button to select Input.
Press the button to select Source List.
Press the or button to move to desired input
Naming the External Connections
You can select and set up the type of device you want to connect to the projector.
Setup is switched to the selected device.
The Edit Name menu is displayed.
The Input menu is displayed.
Page
Picture Adjustment
Selecting Picture Mode
Picture Adjustment
Press the P.MODEbutton.
Custom Settings of the Picture
Picture Adjustment
Custom Picture Menu
Press the CUSTOM button.
Press the or button to move to desired item,
Changing the Color Standard
Color Standard
Press the or button to move to Color Standard, then press the button.
Press the or button to adjust the selected item.
Selecting and Adjusting Color Temperature
Picture Adjustment
7
Press the or buttons to select an option then
Color Temperature Menu
Gamma Correction
The Custom Picture menu is displayed.
Gamma is used to improve the picture quality with color balance.
Refer to page 30 for information on Gamma Mode1, 2, and 3.
Press the or button to move to Gamma,
Saving Custom Picture Settings
The Save menu is displayed.
7
The Custom Picture menu is displayed.
7
Setting up DNIe
DNIe Mode
Press the or button to move to DNIe, then
Off DNle Mode Off Demo DNle On/Off Picture Comparison Mode On DNle Mode On
Picture Adjustment
Selecting Picture Size
Press the P.SIZEbutton.
Each press of the button, picture size is switched to Full, Zoom1, Zoom2 and 4:3.
Press the or button to move to Picture Size,
Page
Picture Adjustment
Screen Position Adjustment
Press the or button to move to Position,
Press the , , , or buttons to adjust the position.
Film Mode
Supports enhanced screen quality for films of 24 frames.
Picture Adjustment
Press the or button to move to Film Mode,
Overscan
Picture Adjustment
Press the or button to move to Overscan,
Page
Page
Flipping/Reversing the Projected Image
Setup
Install Menu
Press the INSTALL button.
Light Setting
Light Setting Mode
Press the or button to move to Light Setting, then press the button.
Correcting Vertical Keystone
Setup
Press the or button to adjust.
Press the V.KEYSTONEbutton.
Press the or button to move to V-Keystone,
Test Patterns
Setup
Test Pattern Menu
Press the or button to move to Test Pattern,
pattern, then press the button.
Restoring the Factory Default Settings
Used to restore setting values to factory defaults.
Setting values are returned to factory defaults.
Setup
///
Information
You can check external source signals, picture setup, PC picture adjustment and lamp use time.
OK
Setup
Press the INFO button.
Page
Page
Setting the Language
You can select the language used for the menu screen.
Setup is switched to the selected language.
The Language is selected.
Menu Option
Setting the Menu Position
Menu Option
Setting the Menu Translucency
You can set the translucency of menu.
Press the button.
Menu Option
Press the or button to move to Menu Translucency, then press the button.
Setting Up the Menu Display Time
You can set the display time of the menu.
Setup is switched to the selected time.
Press the button.
Menu Option
Page
Connecting to PC
Before Connecting to PC
Check the following before connecting the projector to a PC.
Display modes supported by this projector
The table complies to IBM/VESA requirements and is based on analog signal input.
Refer to "Rear Side and Cables" on page 10 for cables used for connection.
Setting up the PC Environment
Connecting to PC
Connecting to PC Connecting to PC
Viewing the PC Screen
Using PC Video Cable or DVI Cable
Connecting to PC Connecting to PC
CAUTION
DVI-D cable does not support analog RGB signals.
VESA Plug & Play
PC Video Cable (15-pin signal) DVI-D
Automatic Picture Adjustment
Used to adjust frequency and phase of PC screen automatically.
The Auto Adjustment is selected.
Connecting to PC
Before adjusting!
Frequency Adjustment
Fine Tuning with the Phase Adjustment
Connecting to PC
Zooming the Screen
Connecting to PC
Reset the PC
Page
Troubleshooting
Installation and Connection
Menu and Remote Control
Before Contacting Service Personnel
Troubleshooting
Screen and External Source
Page
Page
Storage and Maintenance
Other Information
Cleaning the Projector and Lens
Cleaning the Inside of the Projector
Purchasing Optional Parts
Optional Parts
Structure of Screen Menu
Buttons used for Screen Menu
Select Composite/S-Video/Component Input Mode
Page
Structure of Screen Menu
Lamp Replacement
Other Information
123
5 4
Cautions on Lamp Replacement
RS-232C Connection and Control
Connecting the Projector to a PC
Other Information
Structure for Variables (8 bytes)
Communication Format (Complies with the RS232C Standard)
Commands
Other Information
: Range is 50 ~ 50, use the Boolean Complementary for negative values.
Specifications
Other Information
Remote Control Specifications