Online User’s Guide
Important Information Regarding the Local Serial Connection
Thank you for choosing Sprint
Welcome to Sprint
Introduction to this Online User’s Guide
Table of Contents
Setting Your Phone’s Security
Managing Call History
Computer
To Do List
Using PCS Service
Safety Guidelines Warranty Information
LMI330103002F3
Getting Started
This Section
Setting Up Service
Activating Your Phone
Getting Started With PCS Service
Determine If Your Phone Is Already Activated
Unlocking Your Phone
Select Messages and tap Voicemail
Setting Up Your Voicemail
To set up voicemail From the Phone main menu, tap
Getting Help
PCS Directory Assistance
PCS Operator Services
Press
Understanding Your Phone
Your PCS Phone The Basics
Front View of Phone
2A Your PCS Phone The Basics
2A Your PCS Phone The Basics
Main LCD
Viewing the Display Screen
Graffiti Writing
Entering Data in the Graffiti Writing Area of your Phone
Using the Applications Launcher
Features of Your
Turning Your Phone OFF
Adjusting the Brightness & Contrast
Turning Your Phone on and OFF
Turning Your Phone on
Date Book Address Book To Do List Memo
Tap when finished to save and exit
Software Version
Using the Battery
Gently push the battery down until it snaps into place
Charging the Battery
Connecting the Cradle to a Desktop Computer
Connecting the Cradle
PC System Requirements for the Palm Desktop Software
Installing the Palm Desktop Software
Turn the desktop computer back on
Insert the Palm Desktop CD into the desktop computer
Making Calls
Displaying Your Phone Number
Making and Answering Calls
To Silence Ringer
When you’re finished, tap
One-Handed Dialing
Answering Calls
Calling Emergency Numbers
Using One/Two Touch Speed Dialing
Missed Call Notification
Save to save the phone number in your Internal Phone Book
Dialing Options
In-Call Options
To select an option press
Tap Deactivate Key Tones Dtmf Tone
Mute
Deactivate Key Tones
Tap Dtmf Tones
End-of-Call Options
Add or adjust the settings that are right for you
Controlling Your Phone’s Settings
Select Options and tap Preferences
Adjusting the Phone’s Volume Settings
Ringer Types
Selecting Ringer Types for Voice Calls
Tap the drop down menu and select Sounds Tap the Tone box
Selecting a Tone Length
Selecting Ringer Types for Messages
Selecting a Roam Ringer
Changing the Greeting
Silent Mode
Minute Beep Service Area Connect Tone Disconnect Tone
Alert Notification
Seconds, 1 minute, 2 minutes, or 3 minutes
Changing the Backlight Time Length
Changing the Display Screen
Tap for Preferences
Wake Up Feature
Can customize your phone to meet your personal needs
Setting Your Phone’s Security
Locking Your Phone
Accessing the Security Menu
To unlock your phone Enter your lock code and tap
Calling in Lock Mode
Unlocking Your Phone
Changing the Lock Code
Numbers
Using Special Numbers
Resetting Your Phone
To add or replace a special number
Controlling Your Roaming Experience
Roaming on Analog Networks
Understanding Roaming
Recognizing Icons on the Display Screen
Roaming on Other Digital Networks
Service Mode
Setting Your Phone’s Roam Mode
Set Mode
To Place Roaming Calls With Call Guard On
Controlling Roaming Charges Using Call Guard
No Call Guard is OFF Yes Call Guard is on
Call Guard
Application Menus and Entering Text
Opening an Application
Using the stylus, tap the icon Application is started
Application Launcher
Application Categories
Deleting a Category
Creating a New Category
Tap Edit Categories
Changing the View
Applications Display
Elements of the Application Screen
Functional calculator
Menu Launcher
Menus
Online Help
Marking a Record Private
Finding Records
Sorting Records
Private Records
Tap the Applications Launcher Tap the Security icon
Enter your password and tap Show
Attaching Notes
Shown These records are always displayed
Tap Yes to confirm the deletion of the note
Choosing Fonts
To review a note, tap the note icon
Tap the note icon
To Display the About Box
Getting Application Information
Beaming Information
Message Types New Message Alerts Message Options
Managing Call History
Your Call History
Outgoing Calls Incoming Calls Missed Calls
Viewing History
Making a Call From Call History
Select the desired entry from the list and tap Call
Prepending a Phone Number From Call History
Saving a Phone Number From Call History
Outgoing Calls Incoming Calls Missed Calls Tap Delete All
Erasing Call History
Tap Yes to confirm the deletion
Using the Address Book
Creating a New Entry
Creating an Address Book Entry
Entering Pauses
There are two different types of pauses. They are
Show in List
Address Details
To make entries private
To assign a category
To set the special ringer
Tap Done to exit
Speed Dial
To set Speed Dial
Play or Erase Recorded Voice Names
To setup Voice Dialing
Voice Dial
Tap the Set Voice Dialing button
Making Calls from the Address Book
Calls, and tap Address
Viewing Address Book Entries
Editing an Address Book Entry
To Look Up an Address
Looking up an Address Book Entry
Deleting an Entry
Tap Details Tap Delete
Beaming Address Book Entries
Sorting the Address Book
Beaming a Business Card
Address Book Menu Options
Records Menu Options Menu
Following choices are available in the Records menu
Options Menu
Date Book
Scheduling Timed Events
Scheduling Events
Tap OK to confirm your selection and exit
Scheduling an untimed event
Scheduling Untimed Events
Tap New Set Time dialog box, tap No Time
Scheduling a timed event for another date
Rescheduling
Rescheduling an Event
You can easily change scheduled events in the Date Book
Tap the desired event
Setting an Alarm for an Event
Dismissing an Alarm
Marking an Event As Private
View Ic o ns Week View
Changing the Date Book View
Day View Week View Month View Agenda View
Displaying Different Views
Event Conflicts
Tap an event to display the event description
Agenda View
Month View
Tips for Month View
Scheduling a Repeating Event
Scheduling Repeating Events
Tips for Agenda View
Tips for Scheduling Repeating Events
Editing Repeating Events
Deleting an Event
Edit Menu
Date Book Menus
Options Menu
Calls and record memos
Using Your Phone’s Voice Services
Using Voice-Activated Dialing Recording Memos
Placing Voice Dialing Calls with the Voice Dial Button
Using Voice-Activated Dialing
Setting up Voice Dial
Tap Record
Managing the Voice Dial List
From the Phone Menu, tap and select Calls
Placing a Voice Dial Call from the List
Tap Voice Dial
Playing a Memo
Recording Memos
Erasing an entry From the Phone Menu, tap and select Calls
Message and tap
Deleting all Memos
Deleting a Memo
Getting to Know the Handheld Computer
Front View of the Handheld Computer
What is a Handheld Computer
Typing
Tapping and Typing
Opening an Application
Customizing your Handheld Computer
Setting the Time and Date
Enter the correct date
Setting other Preferences
Performing a Soft Reset
Troubleshooting
Resetting Your Handheld
Performing a Hard Reset
Entering Information into the Handheld Computer
When finished, tap
Using the On-Screen keyboard
Graffiti Writing
To start using Graffiti Remove the stylus from your phone
104
Here is the Graffiti alphabet
Capital Letters
Writing Punctuation Marks
Here is a chart of how to write Graffiti numbers
Cap Lock
Writing Symbols and Extended Characters
Writing Accented Characters
Here is a chart of how to write Graffiti symbols
Graffiti Shortcuts
Command Bar
Comma delimited .csv, .txt Address Book and Memo Pad only
Using a Shortcut
Importing Data
Lu Lunch Di Dinner
Importing Data
Expense Manager
Creating a New Expense
Creating Expense Items
Changing the Date
Changing the Expense Date
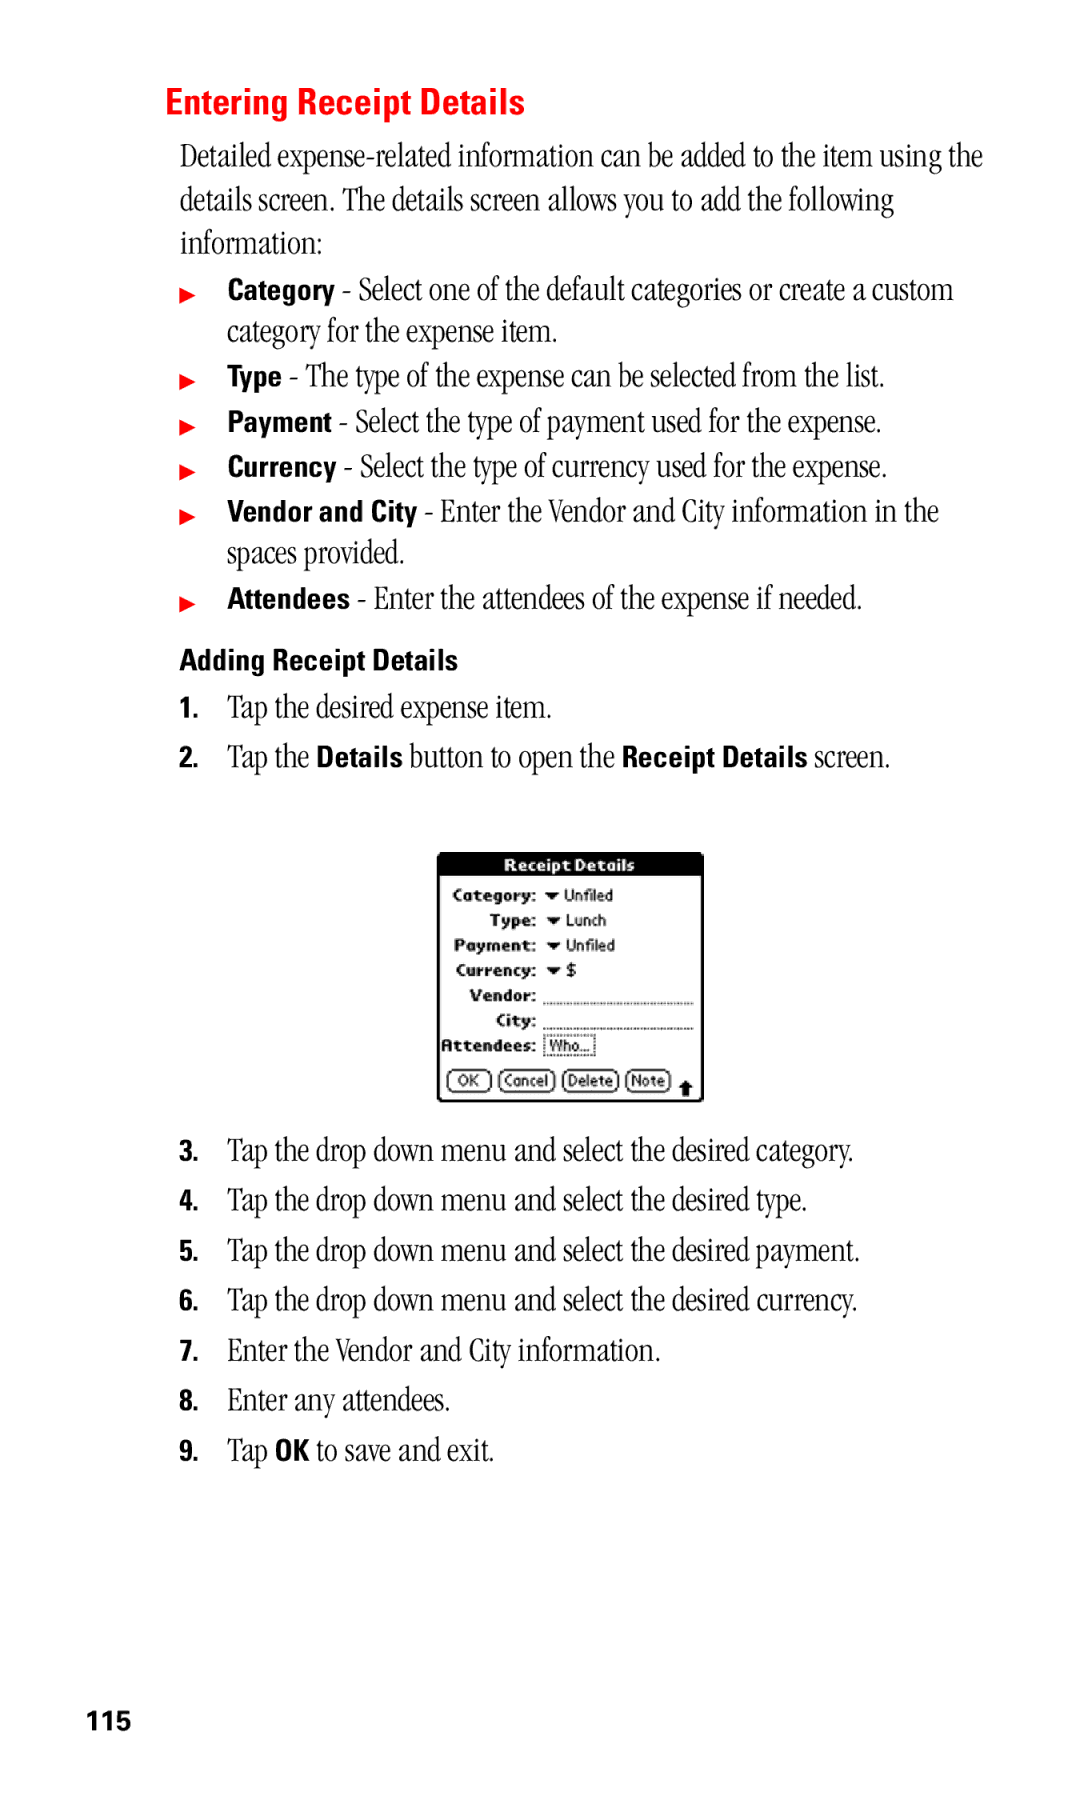
Adding Receipt Details
Entering Receipt Details
Filling in the Expense Automatically
Entering the Expense Type Automatically
Expense List Display Options
Change the Currencies in the Drop Down Menu
Changing Currency and Symbol Display
Expense List, tap an Expense item
Tap OK to exit the Select Currencies dialog box
Creating and Printing an Expense Report
Importing Data into Microsoft Excel
2L Expense Manager
Using Expense Report Templates
Viewing Expense Data using Excel
Following options are available in the Options menu
Expense Menus
Creating a New Memo Reviewing/Editing Memos Memo Pad Menus
Memo Pad
Create a New Memo
Creating a New Memo
Making a Memo Private
Choosing a Memo Category
Making a Memo Private
Tap the Menu Launcher icon from the memo screen
Reviewing or Editing Memos
Sorting Memos
You can sort the memos alphabetically or in any order
Tap OK to confirm the deletion of the memo
Deleting a Memo
Beaming a Memo
Tap the memo that you want to delete
Option Menu
Memo Pad Menus
Select the Record menu and tap Beam Memo
To Do List
Creating a To Do List Task
Creating a To Do List Item
Press the To Do List button on the front of the phone
Setting the Priority Level
Setting Priorities
Changing the Priority, Due Date and Category
Checking OFF To Do List Items
Changing Priorities and Due Dates
Checking off a Completed Item
Sorting To Do Items
From the To Do List, tap the Show button
To Display Completed and Due Items
Deleting a To Do List Item
Displaying Completed and Due Items
Deleting an Item
To Do Menus
Breeze
Calculator
Opening the Calculator
Using the Calculator Buttons
Tap Options, and then tap Recent Calculations
Displaying Recent Calculations
Calculator application, tap the Menu icon
To display recent calculations
When you have finished reviewing the calculations, tap OK
Managing Handheld Computer Software
Categorizing an Application
Applications Launcher
Tap Options, then Preferences
Tap the Applications Launcher Tap the Menu Launcher
Changing the Launcher Display
Perform a HotSync operation
Installing Palm Applications
To Install Software on your phone
Deleting Handheld Computer Applications
To Beam a Record, Business Card, or Category
Checking Memory Usage
Beaming Capabilities
Receiving Beamed Information
To Beam an Application
2P Managing Handheld Computer Software
HotSync Operations
Perform a HotSync the First Time
HotSync Manager and Technology
Performing Your First HotSync Operation
2Q Advanced HotSync
Creating a User Profile
Using a Profile for the First Time
Performing a Local HotSync Operation
Selecting HotSync Setup Options
Setting Options
Performing a Local HotSync Operation
Available only when the Palm Desktop is running Starts
Customizing the HotSync Operation
Customizing Settings
Performing a Network HotSync Operation
Click Done to activate the settings
Your computer has TCP/IP support installed
Performing a HotSync Operation via a Network
Tap the Applications Launcher icon
Using File Link
Setting up your phone for Network HotSync
Click OK Perform a HotSync operation as normal
Double-click Infrared Click the Options tab
Windows task bar, click Start, choose Settings, and then
IR HotSync Operations
To perform an IR HotSync operation
Configuring HotSync Manager for infrared communication
Performing an IR HotSync operation
Changing the Custom Phone Off Screen
Changing the Phone Off Screen
PC/Handheld
Returning to cradle HotSync operations
Adding Keypad Skins
Adding Custom Keypad Skins
Using PCS Service Features
PCS Service Features Basics
Message Types
Using Voicemail
Setting Up Voicemail
Knowing When You Have Messages
Voicemail screen is displayed
New Voicemail Message Alerts
Retrieving Your Voicemail Messages
From the phone main menu, tap the Menu Launcher
Clearing the Voicemail Message Icon
Using Caller ID
Answering a Waiting Call
Responding to Call Waiting
Three-Way Calling
To Deactivate Call Forwarding
Forwarding Your Calls
To Activate Call Forwarding
Web Messaging PCS Business ConnectionSM
PCS VisionSM
Your User Name
Browsing the Web on Your Phone
Launching the Web
Tap the back arrow located on the bottom of the display
Net Guard
Browsing the Web
Tap to save and exit
Deleting a Bookmark
Accessing a Bookmark
Tap and select Page and tap Refresh
Creating a Bookmark
Restarting the Web Browser
PCS Business ConnectionSM Personal Edition
When is my data connection dormant?
PCS Vision FAQs
Indicator flashes on your phone’s display screen
When is my data connection active?
3B PCS Vision
PCS Voice CommandSM
PCS Voice CommandSM
Ith Sprint, the first wireless provider to offer innovative
PCS Voice Command
Creating Your Own Address Book
Getting Started With PCS Voice Command
With PCS Voice Command
There are four ways to update your address book
Number will automatically be dialed. Keep in mind that
Making a Call With PCS Voice Command
Accessing Information Using PCS Voice Command
Safety Guidelines and Warranty Information
Safety
Getting the Most Out of Your Reception
Keeping Tabs on Signal Strength
Understanding the Power Save Feature
Knowing Radiofrequency Safety
Maintaining Your Phone’s Peak Performance
Maintaining Safe Use of and Access to Your Phone
Using Your Phone While Driving
Do not take notes or look up phone numbers while driving
Turning Off Your Phone Before Flying
Following Safety Guidelines
Using Your Phone Near Other Electronic Devices
Turning Off Your Phone in Dangerous Areas
Restricting Children’s Access to your Phone
Disposal of Lithium Ion LiIon Batteries
Caring for the Battery
Protecting Your Battery
Body-Worn Operation
Acknowledging Special Precautions and the FCC Notice
FCC Notice
FCC Radiofrequency Emission
Specific Absorption Rates SAR for Wireless Phones
Model PCS Phone SPH-I330 Serial No
Owner’s Record
User Guide Proprietary Notice
Manufacturer’s Warranty
Manufacturer’s Warranty
Standard Limited Warranty
Manufacturer’s Warranty
·WARRANTIES of Title or NON-INFRINGEMENT
4B Manufacturer’s Warranty
Calculator 137
Controlling Your Phone’s Settings 34 current
HotSync Manager and Technology
LMI330103102F4
Roaming
LMI330103102F4
Your PCS Phone The Basics
LMI330103102F4
LMI330103102F4