AR-FX13
Telecommunication Line cable
Important safety information
Page
Table of Contents
TWO-SIDED Reception AR-M201 only
HOW to USE the FAX Function
Memory transmission mode Direct transmission mode
Using the Rspf p.51 Using the document glass p.52
Quick Reference Guide
Sending a fax
Dialing methods
Storing a fax job while another job is in progress
Selecting the reception mode
To set up a timer transmission, see Timer Operations p.78
Sending a fax to multiple destinations Broadcasting p.70
List of FAX Functions
Menu item Settings factory default setting appears in bold
SEC
Hour
Auto
M. Mode
Press the Menu key
Selecting Settings for the Function
Press the Mode Select key to select fax mode
Select a setting or enter information
Connecting the Telephone Line Cord
Connections
For other countries
Comments
Connecting Other Devices
Final Preparations
Online Manual on the CD-ROM
Following illustration shows the part names of the AR-FX13
Part Names
Rspf Option
Bypass tray
Shift key / indicator
Memory key / indicator
Reception Mode key
Resolution key
Error indicator
Line Status indicator
Mode Select key / Mode indicators
Rspf indicator
Pressed, the item is selected or entered
Using the Arrow Keys
Adjusting the Beep Volume
Example
Press the Menu key Press the OK key
Adjusting the Ringing Volume
18RINGER Volume
Press the key or key to set the ringer volume
Selections are as follows 13SEC
17BEEP Length
Press the key or key to set the alarm volume
19BEEPER Volume
HOW to Enter Characters
FAX Setup
2ENTRY Mode
Entering Your Name and FAX Number
3OWN Passcode SET
Ange Datum 2008- 02/01/2008
Setting the Date and Time
Press the OK key Press the Menu key
2DATE&TIME SET
Selection Exit
21DATE&TIME Format
1TIME Format
Press the key or key to select 112HOUR or 224HOUR
Selections are as follows 1MMDDYYYY 2DDMMYYYY 3YYYYMMDD
2DATE Format
Press the key or key to select 1ON or 2OFF
Daylight Saving Time Setting
Follow these steps to enable Daylight Saving Time
5DAY Light Saving
Transmission takes place as follows in each mode
Selecting the Transmission Mode
Memory transmission the Memory indicator is lit
Direct transmission the Memory indicator is off
Selecting the Reception Mode
Select the number of rings you would like to use 0 to
Setting the Number of Rings for Auto Reception
# of Rings Auto
Press a numeric key to select the number of rings
Selecting the Reception Paper Size
# of Rings Manual
Select the number Rings you would like to Use 0 to
Setting the Tray Selection
24TRAY Selection
Press the key or key to select the tray selection
Press the Menu key to Exit
Setting the Number of Recall Times
When the line is busy
8RECALL Times Busy
9RECALL Times ERR
When a communication error occurs
Selected
Setting the Recall Interval
10RECALL INT. Busy
Press the numeric keys to select the recall interval
Enter the recall interval 00 to
11RECALL INT. ERR
20INDEX Print
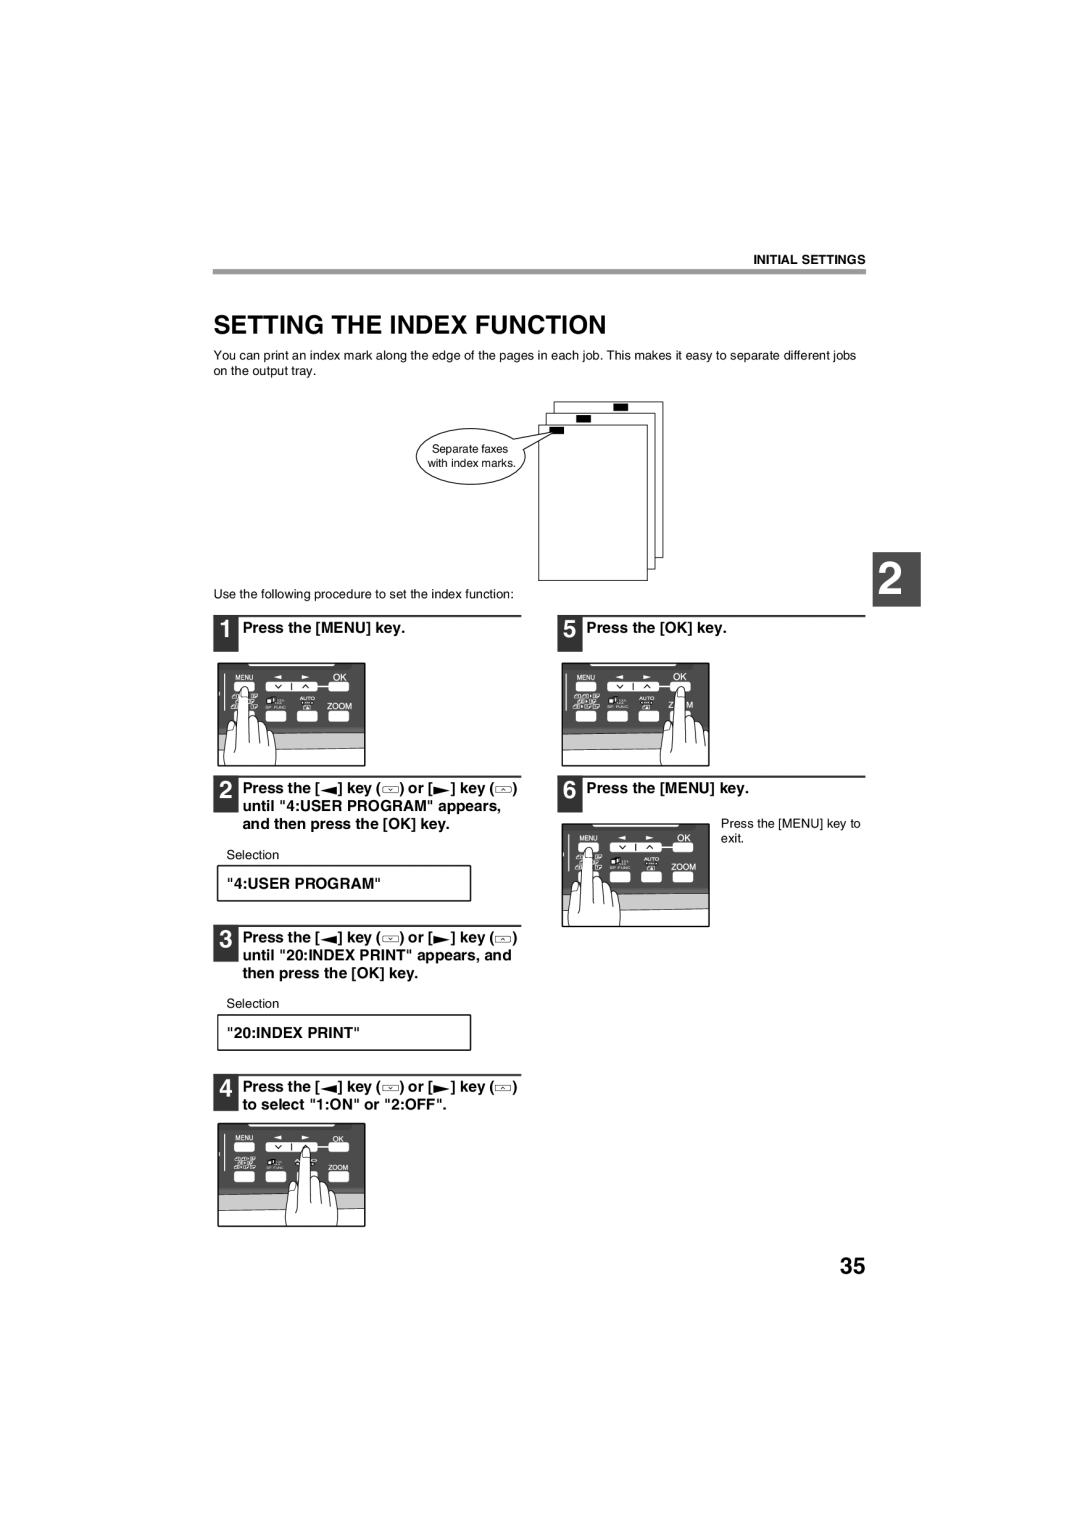
Setting the Index Function
Selections are as follows 1STANDARD
Setting Resolution Priority
Press the key or key to select the transmission resolution
3RESO. Priority
Setting UP the Machine for USE with a PC Modem
15FAX Signal RCV
Press the Menu key.5 Press the OK key
Using the Remote Reception Function
14REMOTE Reception
Turning on Remote Reception
Setting a Fax Remote Number
13FAX Remote Number
Press a numeric key to enter the Fax Remote Number
PBX Setting
PBX setting
22PBX Setting
Enter the fax number with the numeric keys
Storing Numbers for Automatic Dialing
Storing numbers
1FAX Number
Enter the name of the destination with the numeric keys
Press the key or key to select a Chain Dial setting
Press the Menu key a number of times until you exit
Use the following procedure to clear numbers
2CLEAR
Return to to clear Another number
Storing Numbers Under Group Keys
3GROUP KEY
Enter the numbers that you wish to store in the Group Key
Enter a name for the Group Key with the numeric keys
Numeric keys as Described in HOW to
Return to to program another Group key
Deleting numbers from Group Keys
Enter the numbers that you wish to delete
To exit, press the key or key to select 2END
2END
1QUIET Detect Time
Using the Machine with AN Answering Machine
To 10. setting 00 turns 2 off Quiet Detect Time
Quiet Detect Time
Answering Machine Backup
If Quiet Detect Time is not working properly
2AUTO Receive
Originals Suitable for Faxing
Size and Weight
When using the Rspf
When using the document glass
Unsuitable Originals
Sending Originals
Setting the Original
Press the # key
Gently close the Rspf
Press the key or key to select the original size
Optional Transmission Settings
Original Size
1DOC. Glass Size
Contrast
Resolution
One of five messages can also be added to the cover sheet
Cover Sheet
Press the Cover Sheet key Press the OK key
1COVER Sheet SET
If you do not wish to add a message, select 1NO Message
Message Function
2TX Message SET
Press the key or key to select a message
Place the originals in the Rspf
Press the 2-SIDED TX key until the desired setting appears
To cancel this function, select OFF
TWO-SIDED Original Transmission Function
Speed Dialing
Dialing and Transmitting
Direct Keypad Dialing
Rapid KEY Dialing
Dial the fax number of the receiving machine
Normal Dialing Using the Speaker KEY
To adjust the volume, press the left and key or key
Chain Dialing
Using the Search KEY
Redialing
Press the REDIAL/PAUSE key Press the Start key
Canceling Deleting a Stored FAX JOB
If the Memory Becomes Full While Scanning AN Original
3MEMORY Status
Receiving Faxes
Using Auto Mode
Using MAN. Mode
Using A.M. Mode
Sided RX Press the key or key to select 1ON or 2OFF
Optional Reception Settings
16RCV Reduce
Receive Reduce
When Using Manual Sending and Receiving
Substitute Reception into Memory
Memory
Digits by pressing Numeric keys
Data Transfer
0RX Data Transfer
2FAX Number
If not Stored FW.# appears
1DATA Transfer
1YES
Follow these steps to use the fax transfer function
Transmission Reservation
Adjust the resolution and/or contrast settings if desired
Broadcasting
Press the Broadcast key Press the OK key
Transmission will begin
Press the appropriate Group key. Transmission will begin
Broadcasting using a Group key
Follow these steps to use the polling function
8POLLING Mode
Polling
Polling
9SERIAL Poll Mode
Serial Polling
Follow these steps to use the serial polling function
Setting up polling transmission
7MEMORY Poll Mode
Polling Transmission Memory Polling
Deleting originals from polling memory
Adding a original to polling memory
11SECURITY Select
Restricting Polling Machines Polling Security
Press the key or key to select 1ON
1ON
Select 2CLEAR and press the OK key
4PASSCODE # Mode
Programming/deleting passcode numbers
To delete a passcode number
Timer Operations
1TIMER Mode
Press the key or key to select 1SET
Canceling a Timer Transmission JOB
Anti Junk FAX
5ANTI Junk FAX
1ANTI Junk Select
If you wish to store another fax number, return to step
To store junk fax numbers, use the following procedure
To clear junk fax numbers, use the following procedure
Operation in COPY, PRINTER, SCANNER, and FAX Modes
You can print out a list of group dialing numbers
Printing OUT Reports
Fax numbers designated as Anti Junk Fax numbers
Passcode List
Currently activated User Program settings
Use the following procedure to print out reports
Press the Report key Press the OK key
Activity Report Auto Listing
6AUTO Listing
Press the key or key to select 1ON and press the OK key
7PRINT Selection
Printing Transaction Reports
Troubleshooting
Messages and Signals
Audible Signals
Display Messages
Specifications
Index
Storing numbers
Reception mode
Transmission mode
Reports
Sending originals
Fax setup
Storing/settings
Faxes, sending and receiving
Memo
Memo
Memo
AR-FX13v1
Sharp Electronics Europe GmbH

 ] key (
 ) or [
 ] key (
 ) to select "1:ON" or "2:OFF".