HDD Digital Recorder operation
Navigating the Digital recorder menu
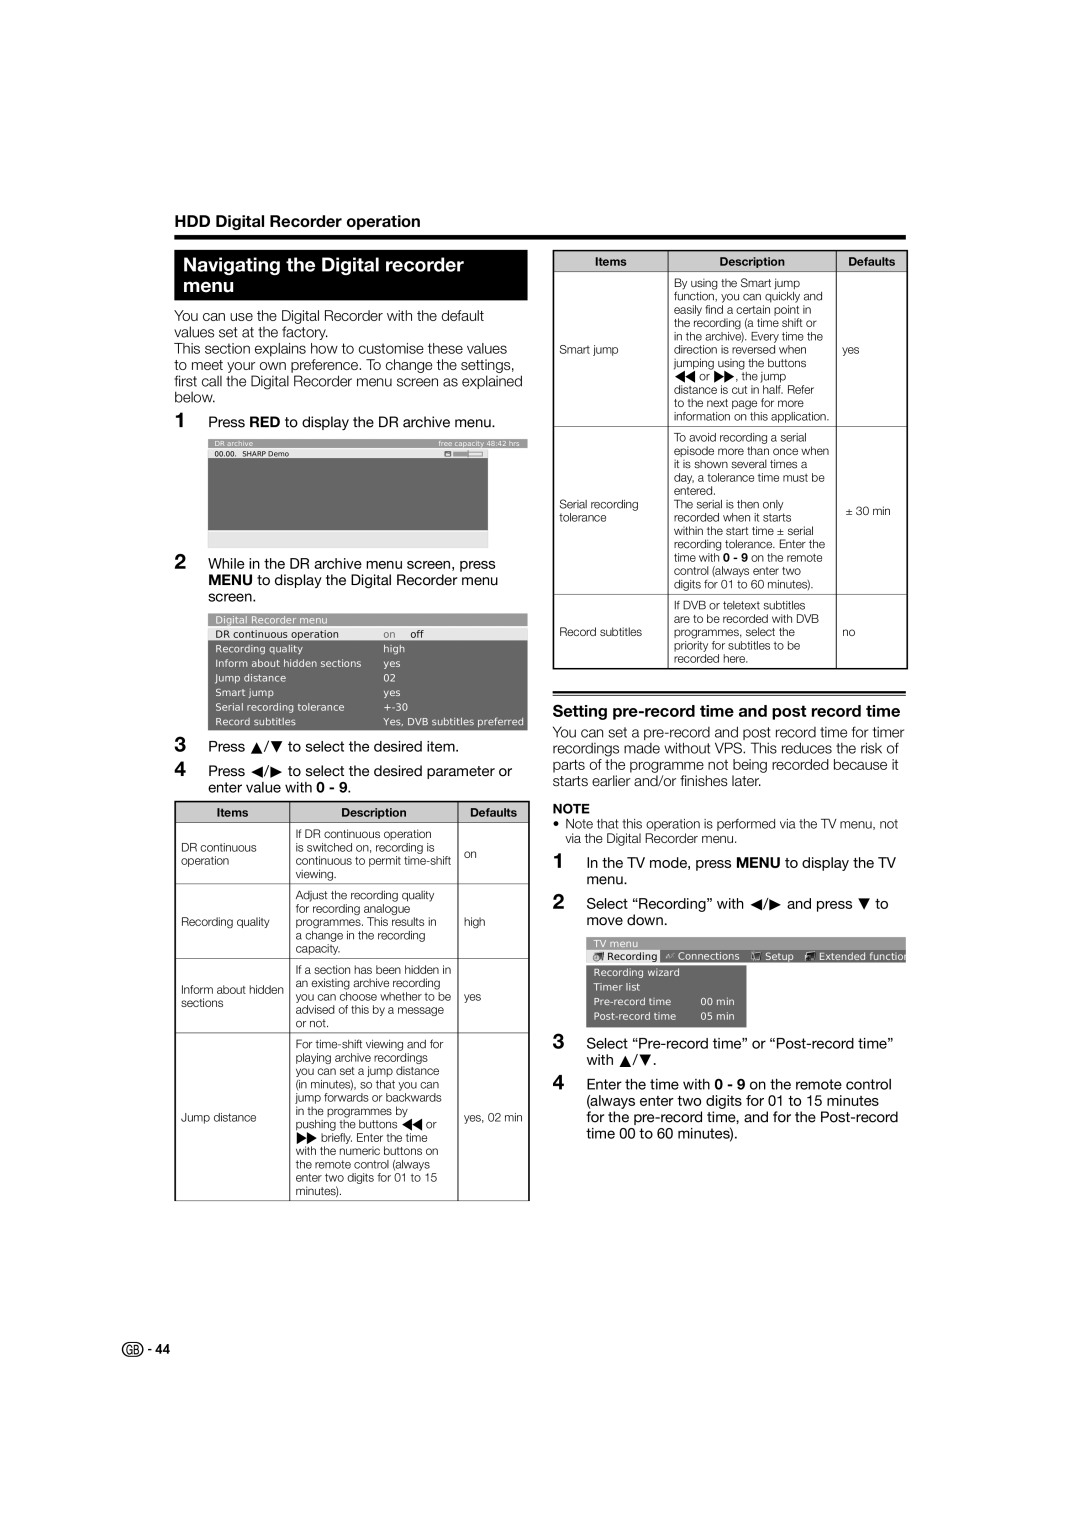
You can use the Digital Recorder with the default values set at the factory.
This section explains how to customise these values to meet your own preference. To change the settings, first call the Digital Recorder menu screen as explained below.
1Press RED to display the DR archive menu.
DR archive | free capacity 48:42 hrs | ||||
|
|
|
|
|
|
SHARP Demo |
|
|
|
|
|
|
|
|
|
|
|
|
|
|
|
|
|
2While in the DR archive menu screen, press MENU to display the Digital Recorder menu screen.
Digital Recorder menu
DR continuous operation | on off |
Recording quality | high |
Inform about hidden sections | yes |
Jump distance | 02 |
Smart jump | yes |
Serial recording tolerance | |
Record subtitles | Yes, DVB subtitles preferred |
|
|
3Press a/b to select the desired item.
4Press c/d to select the desired parameter or enter value with 0 - 9.
Items | Description | Defaults | |
|
|
| |
| If DR continuous operation |
| |
DR continuous | is switched on, recording is | on | |
operation | continuous to permit | ||
| |||
| viewing. |
| |
|
|
| |
| Adjust the recording quality |
| |
| for recording analogue |
| |
Recording quality | programmes. This results in | high | |
| a change in the recording |
| |
| capacity. |
| |
|
|
| |
| If a section has been hidden in |
| |
Inform about hidden | an existing archive recording |
| |
you can choose whether to be | yes | ||
sections | advised of this by a message |
| |
|
| ||
| or not. |
| |
|
|
| |
| For |
| |
| playing archive recordings |
| |
| you can set a jump distance |
| |
| (in minutes), so that you can |
| |
| jump forwards or backwards |
| |
Jump distance | in the programmes by | yes, 02 min | |
pushing the buttons Gor | |||
|
| ||
| Jbriefly. Enter the time |
| |
| with the numeric buttons on |
| |
| the remote control (always |
| |
| enter two digits for 01 to 15 |
| |
| minutes). |
| |
|
|
|
Items | Description | Defaults | |
|
|
| |
| By using the Smart jump |
| |
| function, you can quickly and |
| |
| easily find a certain point in |
| |
| the recording (a time shift or |
| |
| in the archive). Every time the |
| |
Smart jump | direction is reversed when | yes | |
| jumping using the buttons |
| |
| Gor J, the jump |
| |
| distance is cut in half. Refer |
| |
| to the next page for more |
| |
| information on this application. |
| |
|
|
| |
| To avoid recording a serial |
| |
| episode more than once when |
| |
| it is shown several times a |
| |
| day, a tolerance time must be |
| |
| entered. |
| |
Serial recording | The serial is then only | ± 30 min | |
tolerance | recorded when it starts | ||
| |||
| within the start time ± serial |
| |
| recording tolerance. Enter the |
| |
| time with 0 - 9 on the remote |
| |
| control (always enter two |
| |
| digits for 01 to 60 minutes). |
| |
|
|
| |
| If DVB or teletext subtitles |
| |
| are to be recorded with DVB |
| |
Record subtitles | programmes, select the | no | |
| priority for subtitles to be |
| |
| recorded here. |
| |
|
|
|
Setting pre-record time and post record time
You can set a
NOTE
•Note that this operation is performed via the TV menu, not via the Digital Recorder menu.
1In the TV mode, press MENU to display the TV menu.
2Select “Recording” with c/d and press b to move down.
TV menu |
|
|
|
| |
Recording |
| Connections | Setup | Εxtended function |
|
|
|
|
|
|
|
Recording wizard |
|
|
| ||
Timer list |
|
|
|
| |
00 min |
|
|
| ||
05 min |
|
|
| ||
|
|
|
|
|
|
3Select
4Enter the time with 0 - 9 on the remote control (always enter two digits for 01 to 15 minutes for the
![]()
![]() 44
44
