PN-SS01 PN-SS02 PN-SV01
Contents
Distributing schedules
Creating/Editing Schedules
Panel Management and Option
Schedule Management
Schedule Reception/Program Display
Key/Mouse Monitoring
Monitoring status
Precautions on use
Introduction
Model No Serial No
Icons
How to read this manual
Trademarks
Notation
This chart provides defnitions of terms used in this manual
System operation precautions
Points to note when creating content and programs
Definitions
Continuous operation of target PC
Backups
Daisy chain configuration
PC internal clock
Features of Sharp Digital Signage Software
Program distribution workflow
FTP Server
Network Version Program Editor
Status Monitoring Tool
Server Scheduler
Installing/Launching
Required operating environment
Description
If using the Sharp Digital Signage Software CD-ROM
Installing Sharp Digital Signage Software
Installing Sharp Digital Signage Software
Welcome to the Install Shield wizard... window, click Next
Click Next
Click Install
Installation will start
Click Finish
Command Prompt window will appear
Setting the environment of the target PC
Auto login settings
User Accounts dialog box will appear
Welcome Center settings Windows Vista only
Screen saver settings
Power Options Properties dialog box will appear
Power control
Screen Saver Settings dialog box will appear
Select None from the Screen saver list Click OK
Windows Sidebar Gadget settings Windows Vista Only
Power Options dialog box will appear
Return to the Power Options dialog box
Active desktop settings Windows XP Only
IME Toolbar settings
Taskbar settings Windows XP/Vista only
Windows Update settings
System Properties dialog box will appear
Resident application settings
Change settings dialog box will appear
Personal firewall settings
New Inbound Rule Wizard dialog box will appear
Top right of each window
Button at
Uninstalling Sharp Digital Signage Software
Select the Remove option button, and click Next
Uninstallation is now complete
Click Yes
Closing the Launcher window
Launching and closing the Launcher window
Launching the Launcher window
Launcher window
Schedule distribution Fp.84
Timetable creation/editing Fp.60
Schedule creation/editing Fp.70
Panel control Fp.78
Launching Program Editor
Program Creation/Editing
Main Program Editor window
Main Program Editor window
Toolbar
Settings window
Menus
Tabs
Content name File type
Valid content files
File types that can be used as content are as follows
File extension Content type Required software
Positioning content Layout
Set a Screen Top-Left Position
Set the Screen Size
Set Frame Layout
Frame2 Width =
Message1 Width =
Display priority order
Using the grid
Using a layout you have created
Set the Interval for the grid
Setting the background/frames
URL tab
Viewer Path tab
Content preview
Playlists
Icon Menu option Description
Background color when content is not displayed
Properties of content
Picture Transition
Setting the scroll message
Layout
Parameters for EXE file Displays parameters for EXE fles
For more details about Scroll Message Editor, refer to p.40
Create a message to be displayed in a scroll message
Title bar Menus Toolbar Settings window
Creating scroll message files
Title bar
Toolbar
Settings window
Menus
Toolbar buttons icons perform the following actions
Set the Message Format
Set Background
Tag Explanation
Click Save Scroll Message from the File menu. Or click
Set Scrolling
Set the scroll direction and speed of scroll messages
Save As dialog box will appear
Setting audio and music
Saving a program
Setting the PIP window
If using a PN-655 monitor
Save program
Save program as
Program thumbnails
Program Folder
Open Program dialog box will appear
Opening a program
Checking a program
You can also preview a program by clicking
Preview Program Display Settings
Deleting a program
Click Close
Properties of Program dialog box will appear
Displaying program properties
Change program names and program colors
Duration may be different from the actual duration
Select the folder to export dialog box will appear
Importing/exporting a program
Exporting a program
Export Program dialog box will appear
Importing a program
From the File menu, click Import Program
Select the program to import dialog box will appear
Conditional Content
This will launch Conditional Content Editor
Conditional Content Editor
Function of each button icon is as follows
Tabs
Set details for the tab that you selected
Creating Conditional Content
Compatible Content File Formats
Configuring Conditional Contents
Coordinate of top left corner of frame
Preview Content
Conditional Content
Click the icon
Properties of content
Parameters
Displays parameters for EXE fles
Condition Name
Play Condition Setting
Conditional Content and Total Duration
Term
Launching Timetable Editor
Creating/Editing a Timetable
Main Timetable Editor window
Main Timetable Editor window
Program/Panel Control list
Timetable
Displays a timetable
Select the program folder containing the program
Creating a timetable
Registering a program in the timetable
Or alternatively, double-click the program
Command Description
Registering panel control in a timetable
Click the Panel Control tab
Set the Time
New times will be reflected in the timetable
Adjusting a timetable
Changing the timetable span
Set the Start and End times. Specify times between 0000
Opening a timetable
Adjusting the scale
Saving a timetable
Save timetable
Changing timetable name and timetable color
Checking a timetable
Deleting a timetable
From the File menu, click Preview Timetable
Export Timetable dialog box will appear
Importing/exporting a timetable
Exporting a timetable
Timetable export is now complete
Importing a timetable
From the File menu, click Import Timetable
Select the timetable to import dialog box will appear
Launching Schedule Editor
Creating/Editing Schedules
Main Schedule Editor window
Main Schedule Editor window
Timetable list
Calendar
Set a Span
Edit menu, click Add Timetable to Schedule
Add Timetable to Schedule dialog box will appear
Timetable folder
Month
Save schedule
Saving a schedule
Opening a schedule
Save schedule as
Delete unnecessary schedules
Deleting a schedule
Changing schedule name
Selected schedule will be deleted
Export Schedule dialog box will appear
Importing/exporting a schedule
Exporting a schedule
Schedule export is now complete
Importing a schedule
From the File menu, click Import Schedule
Select the schedule to import dialog box will appear
Launching Panel Control Management
Panel Management and Option
Managing panels
Main Panel Management window
Click Edit to edit an existing panel
Adding/editing a panel
Buttons
Set the options
Select the parent group Enter a Group name
Click Add or Cancel
Adding/editing a group
Names must be within 50 characters
Controlling a panel manually
Deleting a panel or group
Checking version information
Option
Launching Option
Registering a license code
Adding default panel settings for panels
Click the FTP Setting tab Set the Default to Add the Panel
Launching Schedule Distribution Tool
Distributing schedules
Main Schedule Distribution Tool window
Main Schedule Distribution Tool window
Click Distribute schedule or program to the panel
Distributing schedules
Distributing via a network
Select a schedule
Select a Distribution Date Time
Set Distribution Options
Button Name Description Relevant
Distributing to your own PC
These instructions only apply to the Standalone Version
Click Distribute schedule or program to the panel
Selection of the Drive to Transfer dialog box will appear
Confrmation dialog box will appear again
Selection of the Break-in Program dialog box will appear
Displaying break-in programs
Distributing via a network and making a break-in display
Select a program, and click Next
Check the distribution settings, and click Finish
Set the Display Time of Break-in Program area
Confrmation dialog box will appear. Proceed to step
Distributing to your own PC and making a break-in display
This function is only available with the Standalone Version
Set a Display Time
Schedule Distribution Tool
List of Distribution Log
List of Reserved Distribution/List of Distribution Log
List of Reserved Distribution
Deleting reserved distributions
Distribution log can be output as a CSV fle
Deleting the entire distribution log
Outputting CSV File of Distribution Log
Enter a File Name, and click Save
Schedule Management
Server Scheduler
Launching the FTP Server
Services window will appear
FTP Server
Windows Task Manager dialog will appear
Launching Client Scheduler
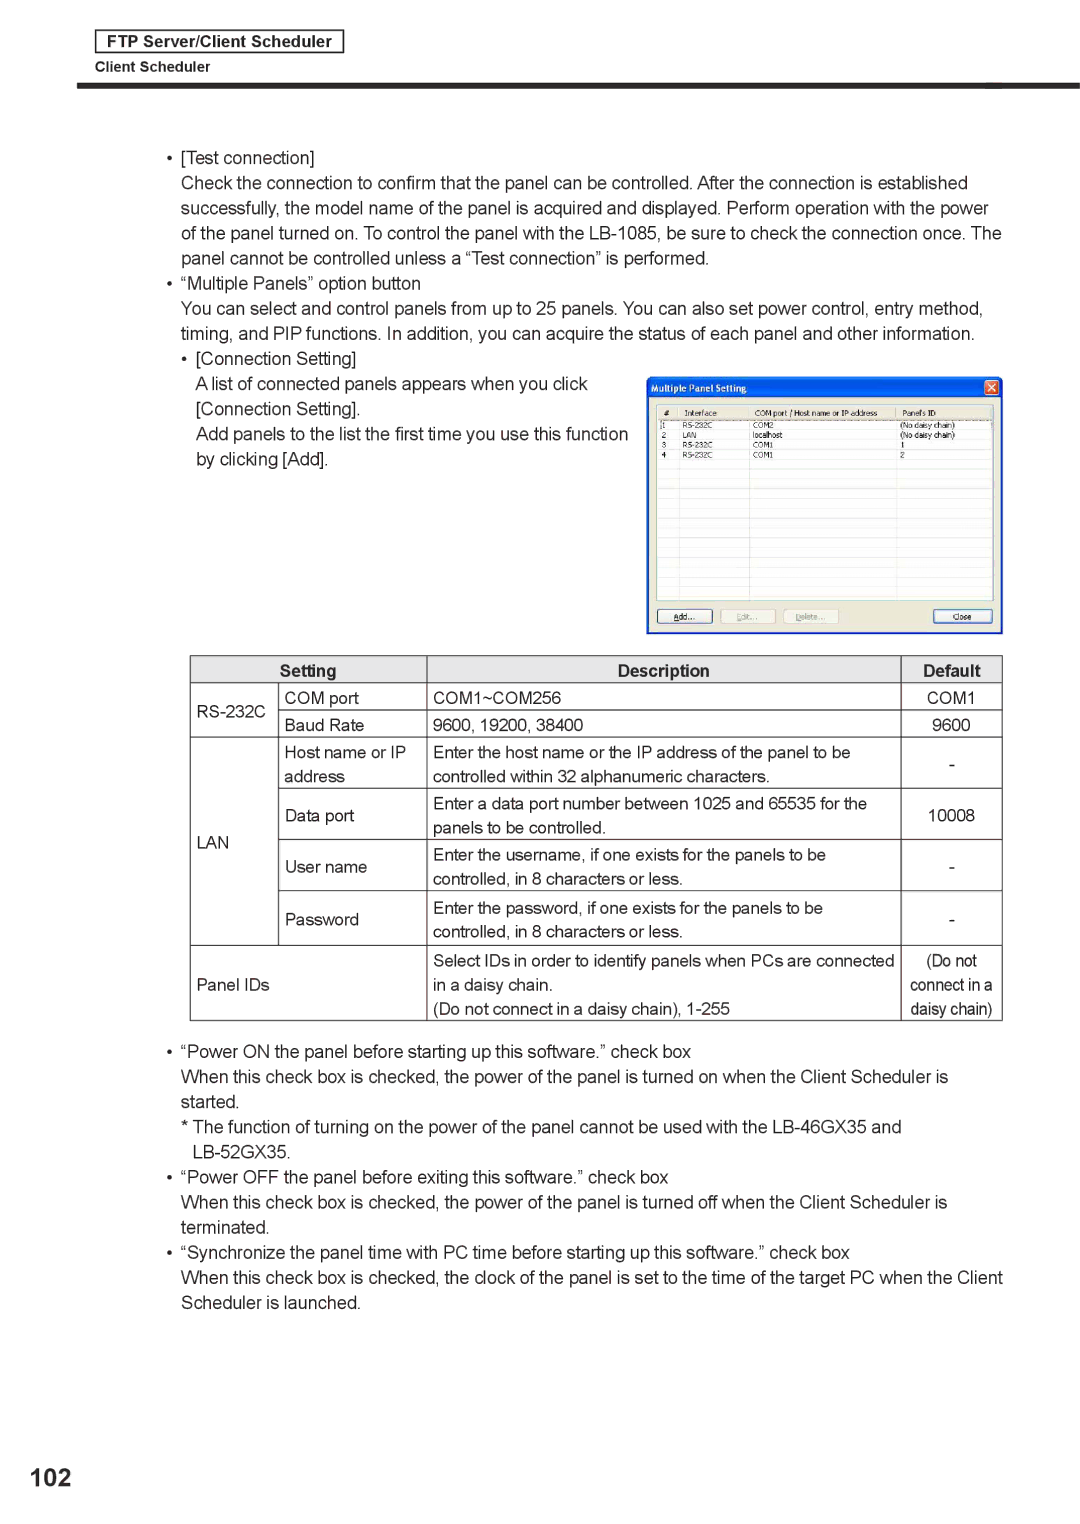
Setting
Client Scheduler
Client Scheduler menu
100
Hide task bar while showing check box
Display Area tab
Power Control tab
101
FTP Server tab Sets the FTP Server
102
103
Version information
Set the target PC to Contents direct distribute mode
104
Exiting Client Scheduler
Program Viewer
105
Remove it from the safe removal icon in the Task Tray
Launching the Key/Mouse Monitoring Tool window
Key/Mouse Monitoring
Key/Mouse Monitoring Tool Window
Key/Mouse Monitoring Tool menu
Assign for mouse input will appear
107
Click Detail
Operation Set the action of the registered mouse operation
108
About
Exit
Launching Status Monitoring Tool
Monitoring status
Main Status Monitoring Tool window
Main Status Monitoring Tool window
110
Acquisition
Panel list
111
Group tree
Panel icon/thumbnail
Acquiring and displaying panel status
Acquiring status of selected panels
112
113
Setting panels for which status will not be obtained
Controlling target PC power
Target PC can be turned on and off, and restarted
114
Check the settings, and click Close
Displaying detailed information for a panel
Panel property dialog box will appear
Changing thumbnail size
115
Small Medium
Setting the operation environment
Set advanced settings for panel status acquisition
116
PN-SS01/SS02/SV01 10D2