6ERSIONS���
License Information
Contents
Access online features and functions
Using Vssetup
Administrative menu and tasks
Update computers where no user is logged on
Enable firewall protection
Enable spyware protection Select a spyware protection mode
Specify who configures firewall protection settings
Install the firewall protection service via policy
Update your MX records
How safety ratings are compiled
Configuring browser protection from the SecurityCenter
Installing via policy
Introduction
Enforced Client overview
What is Enforced Client?
Enforced Client Anti-Virus and Anti-Spyware Basic Advanced
Select the right version of Enforced Client
Protect against many kinds of threats
Select the version that best supports your needs
Ensure continuous, automatic protection
Changes in support
What is new in this release?
New features
New feature Description
Updating process
How does the software work?
Methods for updating client computers
Retrieving updates
Outbreak response
Rumor technology
Uploading security information
Internet Independent Updating IIU
Online SecurityCenter
Managing with the online SecurityCenter
Enforced Client Product Guide Introduction
User groups
Policy Setting
Example Sales Team group and Sales policy
Customized policies
Who should read this guide?
Using this guide
Condensed
Conventions
This guide uses the following conventions
Bold
Getting product information
Customer Service
Professional Services Enforced Client
Contact information
Enforced Client Product Guide Introduction
Installing Enforced Client
After you place your order
This email Contains
Welcome
System requirements
Operating systems
Servers
Operating system support ending
Notifying users when support ends
Email server security application
Email security service
Terminal servers
Before you install
Uninstall existing virus protection software
Windows Control Panel, open Add/Remove Programs
Non-SonicWALL products automatically detected
SonicWALL products automatically detected
Non-Microsoft browsers
Uninstall existing firewall software
Configure your browser
Internet Explorer
Install the standalone installation agent
Requirements
Installing Enforced Client
Standard URL installation
Install the client software in any of the following ways
Click Select Text and Copy to Clipboard
Sending an installation URL to users
Installing on client computers
Enforced Client installs automatically
Continue
Internet URL installation
Push Install utility
Advanced installation methods
Advanced installation method
Administrator Silent Push
To use silent installation
Silent installation
On the Computers page, click Add Computer
Installation
Examples
How push installation works
Push installation
Considerations for scheduling push installations
Window displays a list of visible computers in your domain
Select target computers and protection services
Enabling relay servers
If you use a corporate firewall or proxy server
Completing the installation
Using the Push Install utility
Using Vssetup
Test virus protection
Scan the client computer
Select Scan Tasks, then select Scan My Computer
Scan the email Inbox
Set up the default firewall
What should I do after installing?
Enforced Client Product Guide Installing Enforced Client
Using Enforced Client
Log off the computer
Using the client software
Enforced Client system tray icon
Removing and displaying the icon
Administrative menu and tasks
Updating client computers
Client menu
Update automatically
Update manually
Update during an outbreak
Update computers where no user is logged on
Using the SecurityCenter
Setting up your account
When you are
Log on to the SecurityCenter
Access online features and functions
Administrative features are divided among six pages
Getting started
SecurityCenter tabs
Do this
Make the most of your online data
Customize listings and reports
Related Links
Using the online help
Show Navigation
Previous and Next
To configure your notification preferences
Setting up your account
Set up your profile
Change your SecurityCenter password
SecurityCenter
Viewing your security services at-a-glance
Install protection services
View and resolve action items
From the SecurityCenter page, you can
Managing your computers
View security coverage for your account
This color Indicates
Computers
Display details for a computer
Search for computers
Click the red action item
Save
View detections for a computer
View user-approved applications for a computer
Send email to computers
Move computers into a group
Block computers from receiving updates
Creating groups to manage your site
Delete computers from your reports
From the Groups + Policies page, you can
Default group
Designating group administrators
Create or edit a group
Delete a group
Site and group administrators
Create or edit a group administrator
Delete a group administrator
Setting up policies
SonicWALL Default policy
Restore default policy settings
Create or edit a policy
Assign a policy to a group
Delete a policy
Viewing reports
Inbound Events
Detections
Unrecognized
Programs
Duplicate Computers report
View duplicate computers
View computer profiles
Managing your correspondence
Add your logo to reports
Update user email addresses
Update your account’s email address
Send email to users
Click Close Window
View your service subscriptions
Click Cancel to return to the My Account
Managing your subscriptions
Subscription History
Update subscription information
Purchase, add, and renew services
To update information for a subscription
View printed and online documents
Getting assistance
Request a trial subscription
Receive subscription notifications
Contact product support
Download utilities
Accessing client features Scan Tasks menu
Service
View PUP Detections
Disable On-Access Scanner
Scan
Quarantine Viewer
Scanning client computers
Scan automatically on-access scans
View scan results
Scan manually on-demand scans
Detected
Cleaned
How detections are handled
Scanned
Under Tools, select Scan for Threats
Schedule on-demand scans
Scan email
Scan for spyware
Check the status of each item, then click Close
Select one or more detections, then select an action
Configuring policies for virus and spyware protection
Set basic virus protection options
Schedule on-demand scans
Exclude files and folders from virus scans
Click the Virus Protection tab
Click Add Exclusion
Set advanced virus protection options
Select your update frequency
Enable optional protection
Click the Advanced Settings tab
Zip, .rar, .tat, .tgz
Rar, .tat, .tgz
Set basic spyware protection options
Enable spyware protection
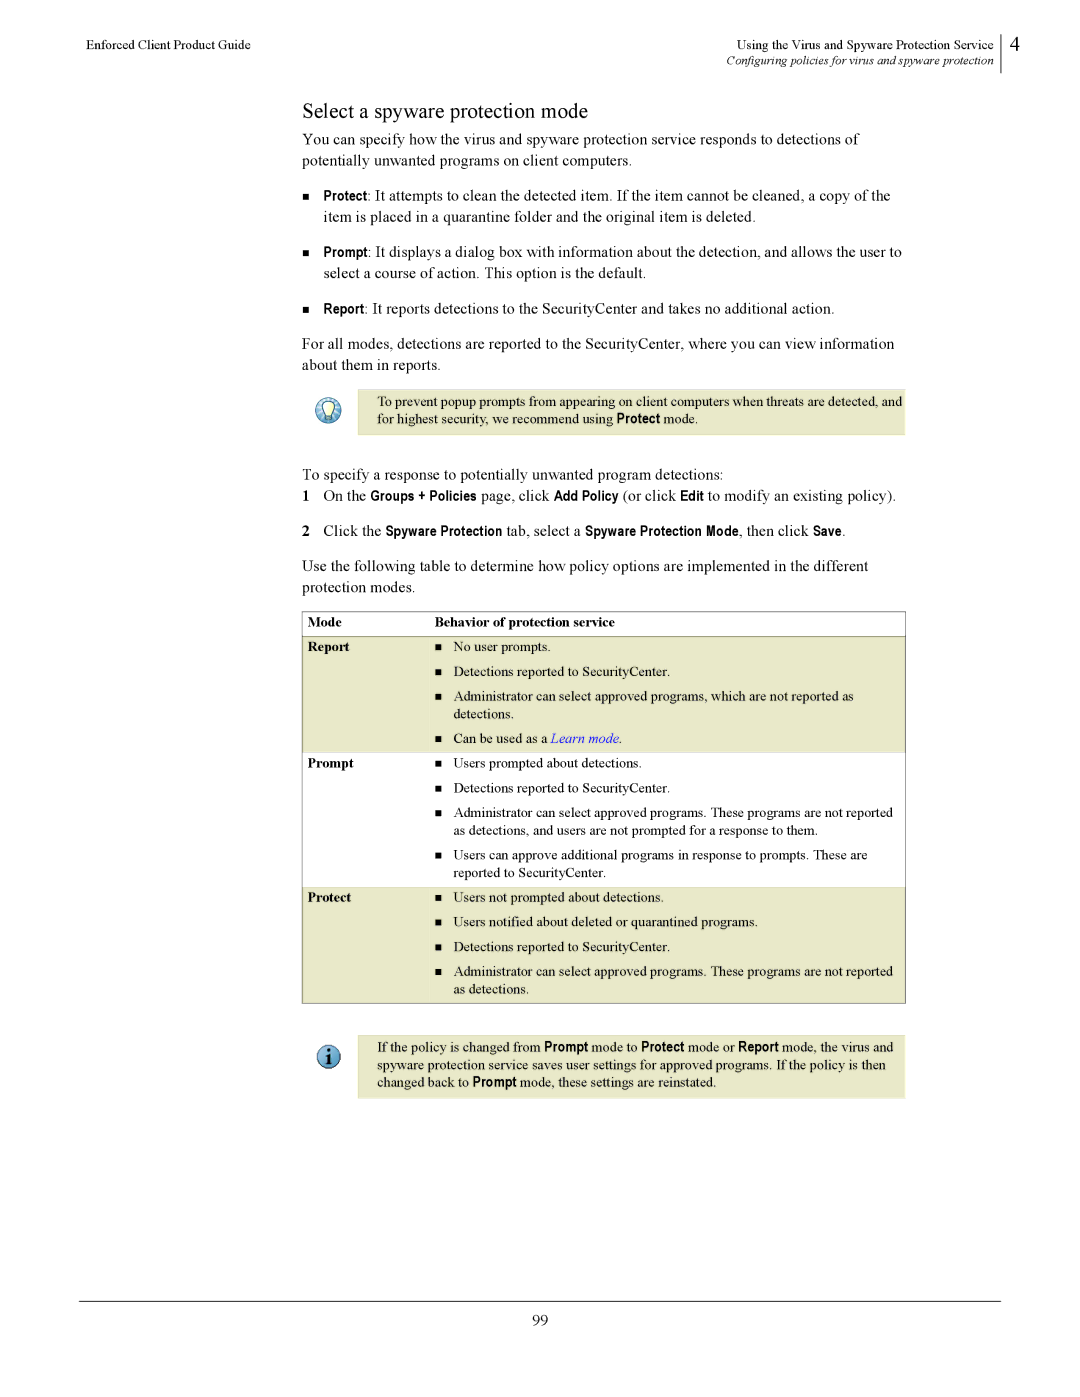
Select a spyware protection mode
Mode Behavior of protection service Report
Protect
Set advanced spyware protection options
Specify approved programs
100
Adware
Password crackers
Spyware
Dialers
Viewing reports for virus and spyware detections
View detections
102
Details
103
Potentially Unwanted Programs
Buffer Overflow Processes
Unrecognized Programs report
View unrecognized programs
Computer Details
Using the Unrecognized Programs report
105
Avert Labs Threat Library
Detection History report
View your detection history
Protect mode
Managing detections
Manage your protection strategy with best practices
108
Manage quarantined files
Click OK to close the Quarantine Viewer
Disabling on-access scanning
Clean failed
Check the status of each item
110
Accessing client features Firewall Settings command
Using the Firewall Protection Service
112
Configuring policies for firewall protection
113
Specify who configures firewall protection settings
Click the Desktop Firewall tab
Install the firewall protection service via policy
Enable firewall protection
Under Firewall Status, select On, then click Save 114
„ Users notified about deleted or quarantined applications
Select a firewall protection mode
Learn mode
115
116
Configure a custom connection
Specify a connection type
Select from three connection environments
„ Configure IP addresses for a custom connection
Configure system services for a custom connection
Open a service port
On the Desktop Firewall tab, click Save
119
Set up allowed Internet applications
Configure IP addresses for a custom connection
Click OK
Specify Internet applications in a policy
Specify whether to use SonicWALL recommendations
121
View unrecognized Internet applications
Viewing reports for firewall protection
Policy
View inbound events blocked by the firewall
Allow an Internet
Application
Using the Inbound Events Blocked by Firewall report
Managing suspicious activity with best practices
Events to display the Inbound Event List
Managing suspicious activity with best practices
126
Accessing site safety information
Using the Browser Protection Service
Staying safe during searches
How safety ratings are compiled
129
Staying safe while browsing
Installing via policy
Configuring browser protection settings
Viewing safety reports
Configuring browser protection from the SecurityCenter
131
Configuring browser protection on the client computer
132
Submitting feedback
133
Using the Email Security Service
Using the portal
Activating the email security service
Update your MX records
Customize your account settings
135
136
Default settings
Do not delete the pdefault entry
Recommended first steps
Optional customization
138
Configure general administration settings
On the portal, click the Administration tab
Under Your email protection, select Click here to configure
Viewing your email protection status
Access basic administration features on the Administration
Use this feature
General Settings
Viewing your email protection status
Select Add Email Security Policy
Configuring a policy for email security
Viewing reports for the email security service
„ Sender Lists Add email addresses to allow or block
Select Quarantine
Managing quarantined email
View and manage quarantined user messages
Check the Quarantine Summary
Open the Quarantine Summary
To restore a message, click Deliver
Getting more information
View quarantined mail deliveries
144
145
Uninstalling protection services
Installing
Frequently asked questions FAQ
Adding, renewing, and moving licenses
Configuring and managing policies
Reporting
Scanning
Updating
Firewall protection
General
Browser protection
152
Error messages
153
Security level of the browser is too high
Creation Date columns
Select Start Run
From the Windows Control Panel, open Add/Remove Programs
See If you use a corporate firewall or proxy server on
Contacting product support
161
162
Read & Modify Reports
163
164
165
Network it considers them to be unsafe
Where the computer is placed
166
Untrusted connection
Login
SecurityCenter tab
167
168
Computers tab
169
170
Reports tab
171
Groups + Policies tab
Try
My Account tab
172
View subscription history
173
Install Protection
Help tab
174
Install Protection New Computers
Install Protection New Computers Email Text
175
Install Protection Existing Computers
Install Protection Existing Computers Email Text
176
Install Email Security Service
Advanced Installation Methods
177
Product Purchase
Product Coverage
178
Use this feature
Computer Details
179
Detection List
User-Approved Application List
180
Search Results
181
Type
Group by
Detections report by computer
182
Detection type
Last Detection Date
Detections report by detection
183
Detected Objects
Program type
Unrecognized Programs report by computer
184
Shows the number of occurrences for this detection
Unrecognized Programs report by program
185
„ Potentially Unwanted Programs Programs detected the by
186
Attack Type
Inbound Event List
Duplicate Computers report
187
Computer Profiles report
188
IP Address
189
Detection History report
Edit Default Group
Edit Group
190
View Default Policy
Add Group
191
192
193
194
Edit Policy Virus Protection Settings
Value
Edit Policy Spyware Protection Settings
Reset to Defaults
195
196
Edit Policy Desktop Firewall Settings
197
198
Firewall Custom Settings
199
Add or Edit Incoming Connection
Edit Policy Browser Protection Settings
Edit Policy Advanced Settings
200
Advanced Virus Protection
201
„ Spyware Programs that covertly gathers user information
Add Policy Virus Protection Settings
202
Any potentially unwanted programs
Add Policy Spyware Protection Settings
203
Excluded Files and Folders
Unwanted program is detected
Add Policy Desktop Firewall Settings
„ Prompt Ask the user how to respond when a potentially
204
Them about threats and strategies for avoiding intrusions
205
Policy
Add Policy Browser Protection Settings
206
Detected Application
Add Policy Advanced Settings
207
Their client computers
208
209
Subscription History
210
Edit Subscription Information
Manage Group Administrators
Manage All Group Administrators
211
212
Notification Preferences
213
Edit Profile
Manage Logo
Utilities
Download the standalone
Uninstall components from a
Previous installation
214