call toll free I-800=BUY-AIWA
For assistance and information
United States and Puerto Rico
Installation
Electric Power
“CAUTIONTO REDUCE THE RISK OF ELECTRIC SHOCK
ENGLISH
OF CONTENTS
Maintenance
Damaue Requiring Service
Checlk your unit and accessories
CONNECTING EQUIPMENT
Before connecting the AC cord
CONNECTIONS
DVD or Video 1*3/MD player
CONNECTING SPEAKERS@
Connecting + to +, -to - terminals
7-----”
Speaker terminals
CONNECTING THE SUPPLIED ANTENNAS @
CONNECTING AN OUTDOOR ANTENNA
‘-’d
‘-’%
ABOIJTTHE REMOTE CONTROL
If the receiver cannot be operated with the remote control
When to replace the batteries
Using the remote control
POWER ECONOMIZING ECO MODE
Press the POWER button
Using the headphones
When not connecting a sub woofer
CUSTOM AUDIO ADJUSTMENT
VOLUME CONTROL
IEE!E3
SUPER T-BA!SS SYSTEM
SETTING NEW EQUALIZATION CURVES
3 Turn the MULTI JOG to adjust the level of the selected frequency
6 Turn the MULTI JOG to select a preset number from Ml to M4
ELECTRONIC GRAPHIC EQUALIZER
When ‘the music source is monaural
~y%q~~ To adjust the volume and balance of the surround W~&$$J% iWa%%
DSPWURROUND
speakersg&~** &l&*g#
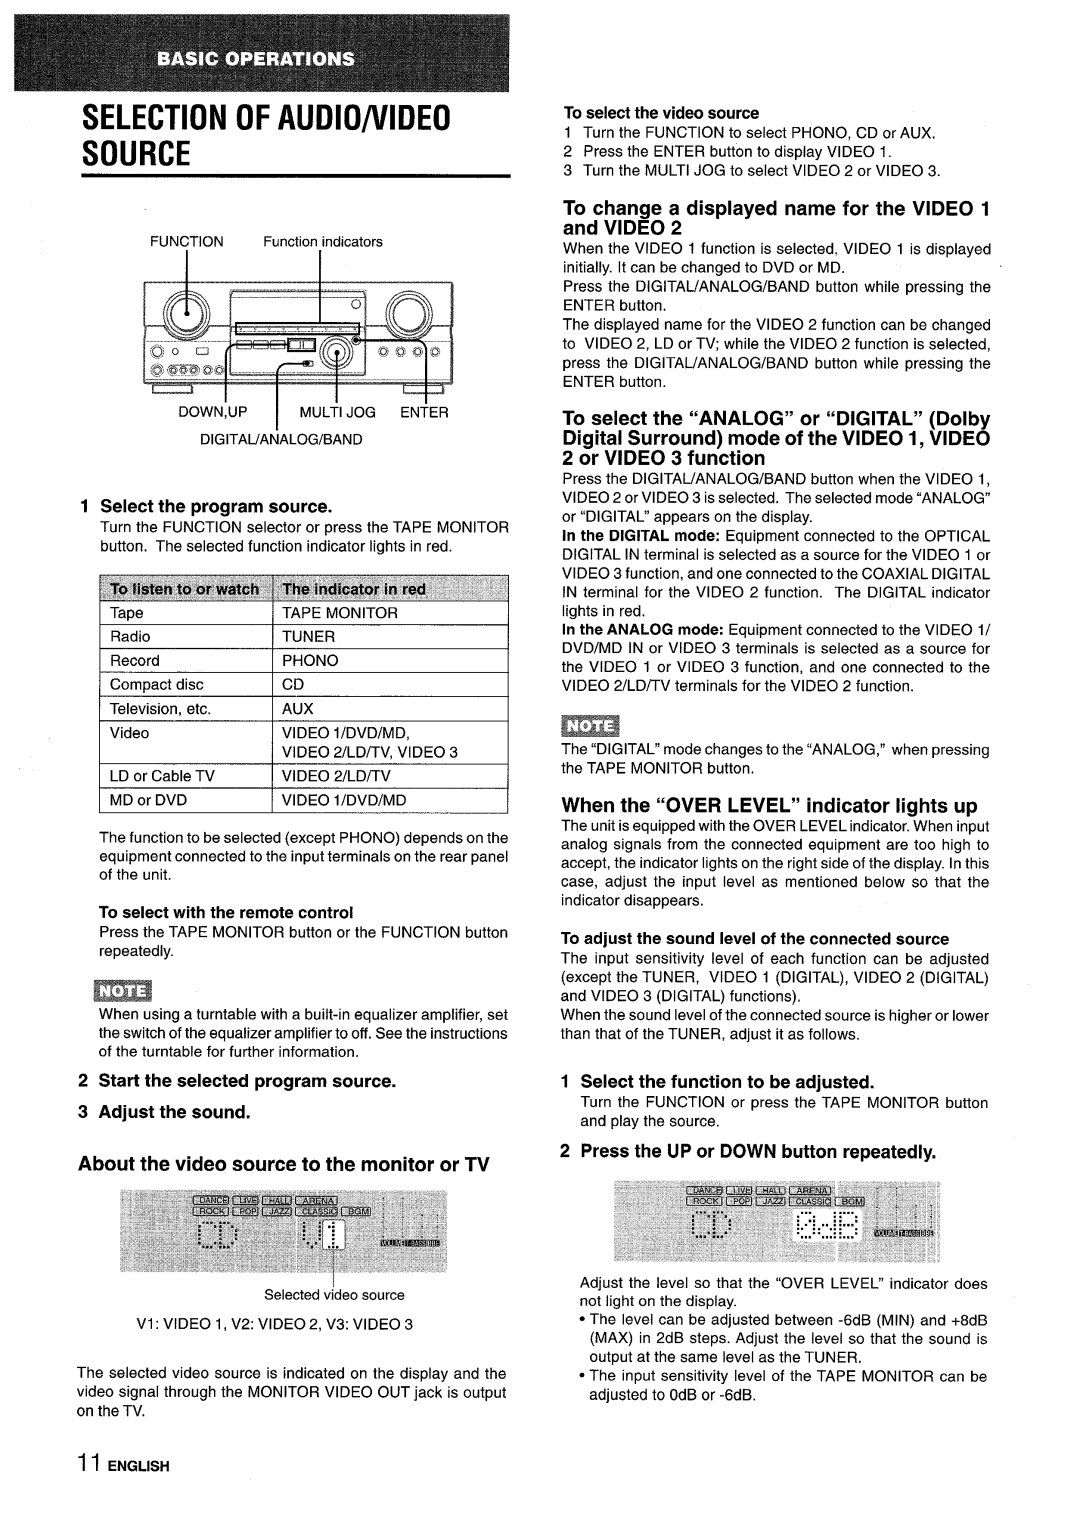
When the “OVER LEVEL” indicator lights up
1 Select the function to be adjusted
2 Start the selected program source 3 Adjust the sound
To adjust the sound level of the connected source
RECORDING Ahl AUDIO SOURCE
TO F~LAY A DVD OR LD RECORDED IN DOLIBY DIGITAL SURROUND
BAIND button repeatedly until “DIGITAL” is displayed
2 Start playing the DVD LD recorded in Dolby Digital Surround
MANUAL TUNING
When an FM stereo broadcast contains noise
To change the AM tuning interval
When the reception contains noise interference
2 Turn the MUILTI JOG to select a preset number
a&am Uau 12 K!lQ12 ‘I maa am ~1 0= ~1
1 Turn the FUNICTION ‘to select the TUNER function
1 Turn the FUNCTION to select theTUNER function
SELECTING DOLBY SURROUND
TO SELECT A DOLBY SURROUND MODE
Check the following
The recommended mode Dolby Digital Surround
ADJUSTING SPEAKER LEVIEL BALANCE
r---l2!,4
1 Select the Dolby Digital Surround exceplt
EE”A
3 Adjust the sound level of the center and surround speakers
4 Press the MANUAL SELECT button again to stop the noise signal
To adjust the speaker level balance while listening to the source
PHANTOM mode L/R OdB*+ L/R OdB
ADJUSTING DOLBY DIGITAL SURROUND SOUND
ADJUSTING DYNAMIC RANGE
the MULTI JOG to adjust the LFE level
When not using a sub-woofer
3 Press and hold the SET UP button for about 2.5 seconds
3 Press “9’ “9” and “O.” 4 Press”1 and count the indicator blinks
OPERATING TV, CABLE TV, VCR AND CD PLAYER
TO ENTER THE ID CODE OF THE EXTERNAL EQUIPMENT
SETTING THE CLOCK
SETTING THE SLEEP TIMER
2 1,3
ENGLISH20
SPECIFICATIONS
FM tuner section
AM tuner section
Amplifier
TROUBLESHOOTING GUIDE
CARE AND MAINTENANCE
PARTS INDEX
HWLSH22
PRECAUCIONES
Instalacion
Eneraia electrica
Antena exterior
Mantenimiento
DafioIs que requieren re~aracion
PREPARATIVES
CONEXIONES
CONEXION DE EQUIPOS
Antes de conectar el cable de alimentacion de CA
IMPORTANTE
EEE!3
CONEXION DE LOS ALTAVOCES @
Altavoces delanteros y central
Ccmexion de Ios terminals + a+, y - a
UBICACION DE LOS ALTAVOCES
CONEXION DE LAS ANTENAS SUMINISTRADAS @
CONEXION DE UNA ANTENA EXTERIOR
@ Altavoces delanteros @ Altavoz central
2 Mantenga Ipresionado el bot6n SET UP dlurante unos 2,5 segundos
‘uNcT’ONvvOLu”
SOBRE EL CONTROLADOR REMOTO
Insertion de Ias pilas
Para conectar la alimentacion de la unidad Presione el boton POWER
L~IndicadorPOWER!STANDBY/ON
Para cancelar el modo ECO
ANTES DE LA OPERACION
CONTROL DEL VOLUMEN
AJUSTE DEL SONIDO A SU GUSTO
SISTEMA BBE
SISTEMA SUPER TIBASS
Para cancelar el modo seleccionado
ECUALIZADOR GRAFICO ELECTRONIC
1 3,6 2 1,5,7
AJUSTE DE NUEVAS CURVAS DE ECUALIZACION
Para ajustar el volumen y el equilibria de Ios altawces, perimetricos
PROCESADOR DESEiiALDIGITAL
SONIDO PERIMETRICO DEL
Parm seleccionar con el controlador remoto
AUDIO/VIDEO
Sobre la fuente de video para el monitor o el televisor
SELECCION DE UNA FUENTE DE
1”EN” ER
AUDIO
GRABACKIN DE UNA FUENTE DE
PARA REPRODUCER UN DISCO DVD O LD GRBADO CON DOLBY DIGITAL SURROUND
SINTONIA MANUAL
1 Gire FUNCTION para seleccionar la funcion
Para buscar una emisora rapidamente desde la unidad
contenga ruido
seleccicmar un ntimero de
IVIEIMORIZACION DE EMISORAS
Es/JAf@II4
SINTONIZACION DE
SELECCION DE DOLBY SURROUND
PARA SELECCIONAR UN MODO DOLBY SURROUND
Compruebe 10 siguiente
cAntes de disfrutar de sonido DOLBY SURROUND, ajuste
AJUSTE DEL EQUILIBRIOI DEL
NIVEL ENTRE ALTAVOCES
Cuiando emplee el controlador remoto
acuerdo con ell tipo y la ubicaci6n de sus altavoces
Erixz31
Modo 3 STEREO NORMAL O WIDE
3 Ajuste el nivel del sonido de Ios altavoces dentral y perimetricos
Altavoz central
AJUSTE DEL SONIDO DOLBY DIGITAL SURROUND
AdlJSTE DEL EFECTQ DE SONIDO DE BAJA FRECUENCIA LFE
Mantenga preskmado el boton UP o DOWN hasta cue se visualice “LFE”
3 Mantenga presionado el bot6n SET UP durante unos 2,5 segundos
CABLEVISION,VIDEOGRABADORA,Y REPRODUCTORDEDISCOSCOMPACTOS
OPERACIONDEUNTELEVISOR,SISTEMADE
PARA INTRODUCER UN CODIGO DE IDENTIFICATION DE UN EQUIPO EXTERNO
Para cancelar el temporizador cronodescomectador
CRONODESCONECTADOR
PROGRAMACIONDELTEMPORIZAIIOIR
FWESTA EN HORA DEL RELOJ
ESPECIFICACIONES
Seccion del sintonizador de FM
Seccion del sintonizador de AM
Seccion
GUIIA PARA LA SOLUCION DE PROBLEMAS
CUIDADOS Y MANTENIMIENTO
INDICE DE LAS PARTES
SECCION GENERAL
PRECAUTIONS
Electricity
Releve du proprietaire
3 Cordon d’alimentation secteur
TELECOMMANDE
DES MATIERES
Wnne exterieure
Entretien
RACCORDEMENTS
Em J
RACCORDEMENT DE TOUT L’EQUIPEMENT
Avantderaccorder Iecordonsecteur
RACCORDEMENT DES ENCEINTES
Racwordernent des bcwnes + & + et - a
POSITIONNEMENT DES ENCEINTES
RACCORDEMENT DES ANTENNES FOURNIES @
RACCORDEMENT D’UN ANTENNE EXTERIEURE
@ Enceintes avant @ Enceinte centrale
A PFKPOS DE L.ATELECOMMANDE
Si I’ampli-tuner ne fonctionne pas avec Ila telecommande
2 Appuyez pendant environ 2,5 seccmdes sur la touche SET UP
Utilisation de la telecommande
Pour mettre I’ampli-tuner sous tension Appuyez sur la touche POWER
AVANT DE COMMENCER
MODE D’ECONOMIE D’ENERGIE ECO
Selection de la paire d’enceintes avant
REGILAGE DE VOLUME
L.+dj. ‘J
FWIiLAGE PERSONNEL DU SON
rilrau ‘
EGALISEUR GRAPHIQUE ELECTRONIQUE
1 3,6
REGLAGE DE NOUVELLES COURBES D’EGALISATION
2 Appuyez sur la touche DOWN ou UP pour selectionner une frequence
Pour ajuster Ie volume! et la balance des enceintes surround
PIRCICESSEUR D’AMBIANCE
A selectionner avec la telecommande
SELECTION D’UNE SOURCE AUDIO OU VIDEO
Quand I’indicateur “OVER LEVEL” s’allume
A propos de la source video fournie au moniteur ou televiseur
w3w3 FCOUTER UN DVD ou UN LD ENREGISTRk EN DOLBY DIGITAL SURROUND
1 Selectionnez la source de pragramme qui doilt iMre enregisikee
3 Demarrez la source de programme s6kct’iormee
ACCORD MANUEL
I’appareil principal pour selectionner une station
2 Appuyez sur la touche UP ou DOWN fk
DIGITAL/ANALOG/BAND pour selectionner la bande voulue ~
FW!REGLAGE DES STATIONS
ACCORD DES STATIONS PREREGLEES &*g*~ $yq#y’
pour ~
selectionner une balnde
SELECTION DU DOLBY SURROUND
POUR SELECTIONNER UN MODE DOLBY SURROUND
Verifiez Ies points suivants
Mode conseille
fonction de la configuration actuelle des enceintes
Lorsque vous utilisez la telecommande
REGLAGE DE LA BALANCE NJ NIVEAU DES ENCEINTES
ee que Ie mode d’enceinte centrale que vous
~Oms--l ms+2ms -3rns---4m5ms~s~
~7 FRAN2AIS
RIEGLAGE NJ SON DOLBY DiGllTAL SURROUND
REGLAGE DE LA PLAGE DYNAIVIIIQUE
REGLAGE DE L’EFFET SONORE DANS LES BASSES FREQUENCIES LFE
3 Appuyez pendant environ 2,5 secondes sur la touche SET UP
FONCTIONNEMENTD’UNTELEVISEUR
CABLE,MAGNETOSCOPEOULECTEURCD
ORDINAIRE,TELEVISEURRACCORDEAU
REGLAGEDEL’HORLOGE
REGLAGE DE LA NIINUTERIE D’ARRET
2 1,3
EEmam
Dimensions l/h/p
Section
Tuner
Tuner AM
Le volume sonore est considerablement reduit
SOIN ET ENTRETIEN
Ehl CAS DE PANNE
NOMENCLATURE
ID CODES FOR TV CODIGOS DE INDENTIFICACION PARA TELEVISION
CODES ID DE TELEVISEURS
BRAND NAME
ID CODE
ID CODES FOR CABLE TV
CODES ID DE DECODEIJRS
I SL Mi~t’x
CODIGOS DE INDENTIFICACION PARA CABLH/lSIION
ID CODES FOR VCR CODIGOS DE IDENTIFICATION PARA VIDEOGRABADORAS
CODES ID DE MAGNETOSCOPES
BRAND NAME
Sanyo
ID CODES FOR CD PLAYER
CODES ID DE LECTEURS CD
wQ&@#f
tQDllOSDElDEtlTIFICACONPARAREPRODUCTORESDEDISCOSCOMPAIllTO
Reorient or relocate the receiving antenna
Increase the separation between the equipment and receiver
Consult the dealer or an experienced radio/TV technician for help