HCD-C5
CHECKS PRIOR TO PARTS REPLACEMENT AND ADJUSTMENTS IN MD
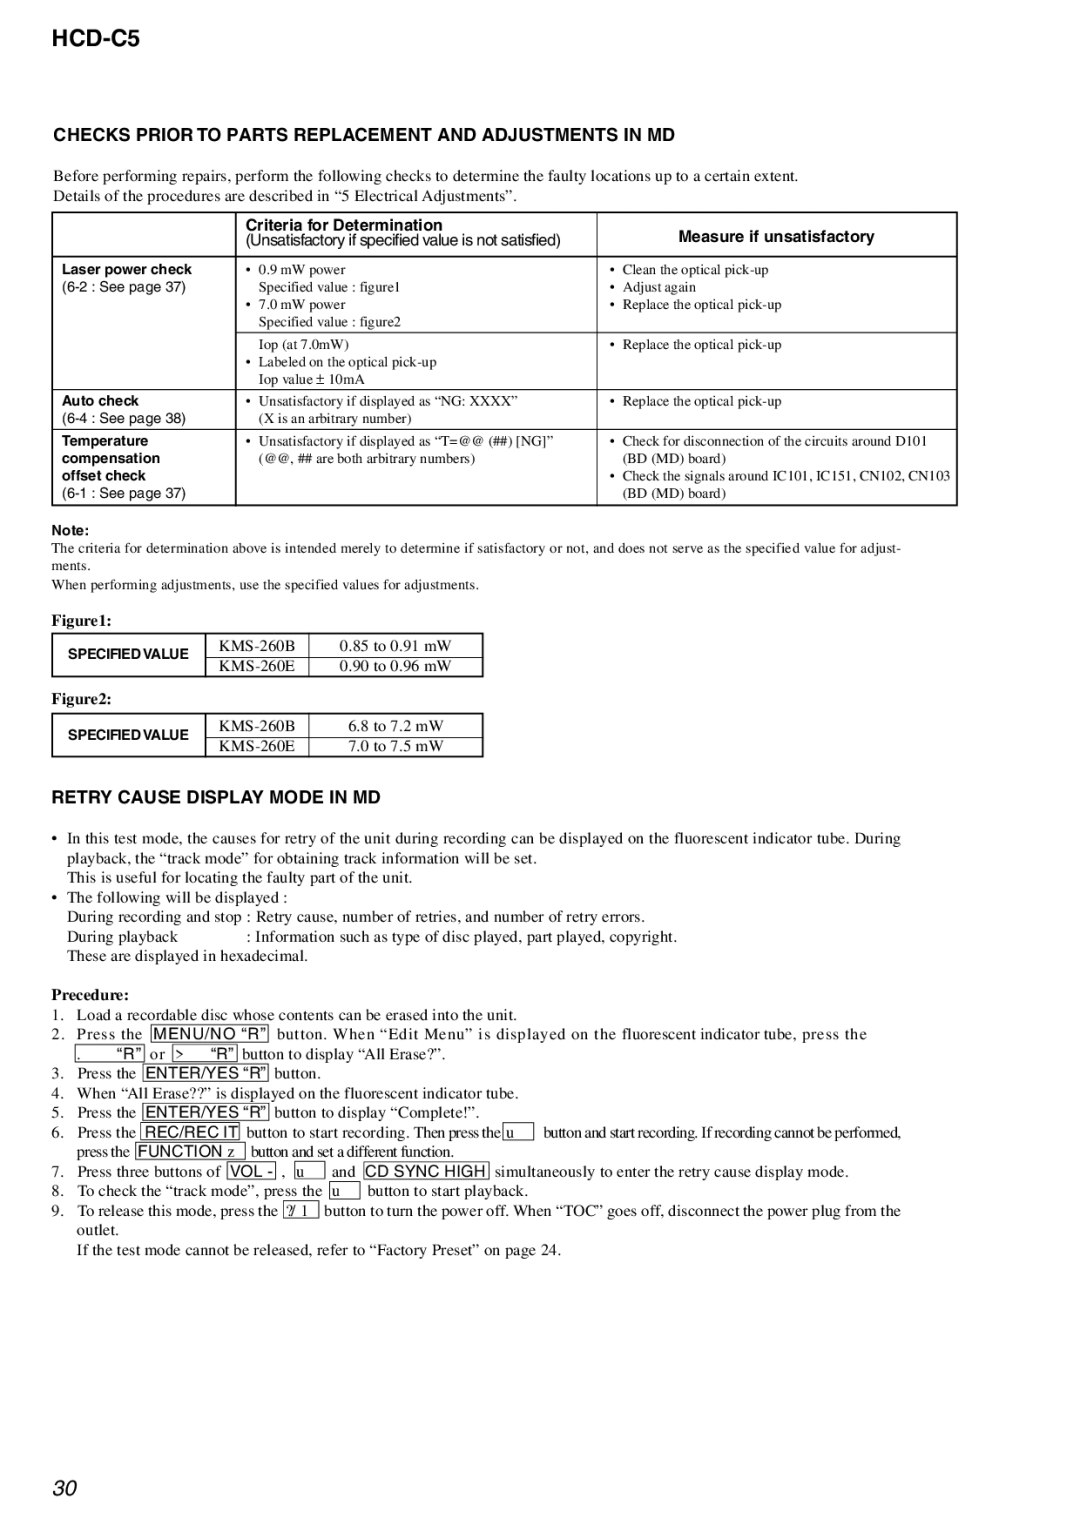
Before performing repairs, perform the following checks to determine the faulty locations up to a certain extent. Details of the procedures are described in “5 Electrical Adjustments”.
| Criteria for Determination |
| Measure if unsatisfactory | |
| (Unsatisfactory if specified value is not satisfied) |
| ||
|
|
|
| |
Laser power check | • | 0.9 mW power | • Clean the optical | |
|
| Specified value : figure1 | • | Adjust again |
| • | 7.0 mW power | • | Replace the optical |
|
| Specified value : figure2 |
|
|
|
|
|
|
|
|
| Iop (at 7.0mW) | • | Replace the optical |
| • | Labeled on the optical |
|
|
|
| Iop value ± 10mA |
|
|
|
|
|
|
|
Auto check | • | Unsatisfactory if displayed as “NG: XXXX” | • | Replace the optical |
| (X is an arbitrary number) |
|
| |
|
|
|
| |
Temperature | • | Unsatisfactory if displayed as “T=@@ (##) [NG]” | • Check for disconnection of the circuits around D101 | |
compensation |
| (@@, ## are both arbitrary numbers) |
| (BD (MD) board) |
offset check |
|
| • | Check the signals around IC101, IC151, CN102, CN103 |
|
|
| (BD (MD) board) | |
|
|
|
|
|
Note:
The criteria for determination above is intended merely to determine if satisfactory or not, and does not serve as the specified value for adjust- ments.
When performing adjustments, use the specified values for adjustments.
Figure1:
SPECIFIED VALUE | 0.85 to 0.91 mW | ||
|
| ||
0.90 to 0.96 mW | |||
| |||
Figure2: |
|
| |
|
|
| |
SPECIFIED VALUE | 6.8 to 7.2 mW | ||
|
| ||
7.0 to 7.5 mW | |||
|
RETRY CAUSE DISPLAY MODE IN MD
•In this test mode, the causes for retry of the unit during recording can be displayed on the fluorescent indicator tube. During playback, the “track mode” for obtaining track information will be set.
This is useful for locating the faulty part of the unit.
•The following will be displayed :
During recording and stop : Retry cause, number of retries, and number of retry errors.
During playback: Information such as type of disc played, part played, copyright.
These are displayed in hexadecimal.
Precedure:
1.Load a recordable disc whose contents can be erased into the unit.
2.Press the MENU/NO “R” button. When “Edit Menu” is displayed on the fluorescent indicator tube, press the
. “R” or > “R” button to display “All Erase?”.
3.Press the ENTER/YES “R” button.
4.When “All Erase??” is displayed on the fluorescent indicator tube.
5.Press the ENTER/YES “R” button to display “Complete!”.
6. | Press the |
| REC/REC IT |
| button to start recording. Then press the | u | button and start recording. If recording cannot be performed, | ||||||
| press the | FUNCTION z | button and set a different function. |
|
| ||||||||
7. | Press three buttons of |
|
| , |
| and |
| simultaneously to enter the retry cause display mode. | |||||
VOL - | u | CD SYNC HIGH | |||||||||||
8.To check the “track mode”, press the u button to start playback.
9.To release this mode, press the ?/1 button to turn the power off. When “TOC” goes off, disconnect the power plug from the outlet.
If the test mode cannot be released, refer to “Factory Preset” on page 24.
30
