Getting Started
Using the Menu Dubbing/Editing
HDV
Sony Corporation
Overloading
PowerSources
Polarization
ObjectandLiquid Entry
DamageRequiringService
Accessories
Replacementparts
OwnersRecord
Batterypack
Readthis first
RegulatoryInformation
Forthe State of California, USA only
Kindsof manuals
Your camcorderis suppliedwith two
Type of cassetteyoucan use in your
Onrecording
Read this first Co,timber
Viewfinder,and lens
MemoryStick DuoAdaptor
Aboutthis manual
OnplayingbackHDVtapesonother devices
Aboutthe Carl Zeiss lens
Menu Subjects Recording Mirror mode Customizing Personal
Using the guide functions Usage
Connecting to a high definition TV
Searching for the starting point
Compliantprinter
MemoryStickDuo
Mark/Imageprotection
Tryingout the HDVformat
High image quality
Viewingvideorecordedin the HDVformat
Checkingsupplieditems
Attach the battery pack to your camcorder
Chargingthe batterypack
Slide the POWERswitch to OFF CHG the default setting
Tips
To checkthe remaining battery BatteryInfo
GhaNic the battery park/Cecticued
When storing the battery pack
Chargingtime
On the charging/recording/playback time
Playingtime
On the AC Adaptor
POWERswitch
To turn offthe power
To reset the date andtime
While pressing the green button, slide the Power switch
CAMERA-MEMORY+
Battery last longer
Making setting adjustmentsbefore recording
To turn off the LCD backlight to make
Close Lid
Insertinga tape or a Memory Stick
To eject Cassette
Leserticg a tape or a NemerStick 8# gecticced
Access lamp
To eject a Memory Stick Duo
Start recording
EasyRecording/PlaybackEasyHandycam
Press START/STOP or to
Press Photo to record
EasReceNNg/Naback EasHand,cam getiued
To cancel EasyHandycamoperation
Adjustable menu settings during EasyHandycamoperation
Unavailable buttons during EasyHandycam
Press START/STOP or
Power switch
Recording
To stop recording, press START/STOP or again
To checkthe latest recordingon a Memory Stick Duo
Power zoom lever Wider range of view Wide angle
Close view Telephoto
To assignthe menu items to the CAM
CTRLdial
Menu items that can he assigned
CAM Ctrl dial
Set the Nightshot switch to on Nightshot appear
Infrared port
To search for a scene duringplayback
Toadjustthesoundvolume
Playback
HDVI080i 1 ornmPl
To displaypictureson a MemoryStick Duoon theIndexscreen
Touch
All
Handycam
Usingthe guidefunctionsUSAGEGUIDE
Touch SET Unavailable settings during Easy
Touch Guide Select the desired item
Touch r-=J--, r
Touch here to cancel the operation
Searchingfor the starting point
Touch
To cancelthe operation
Press Stop when you want to stop playback
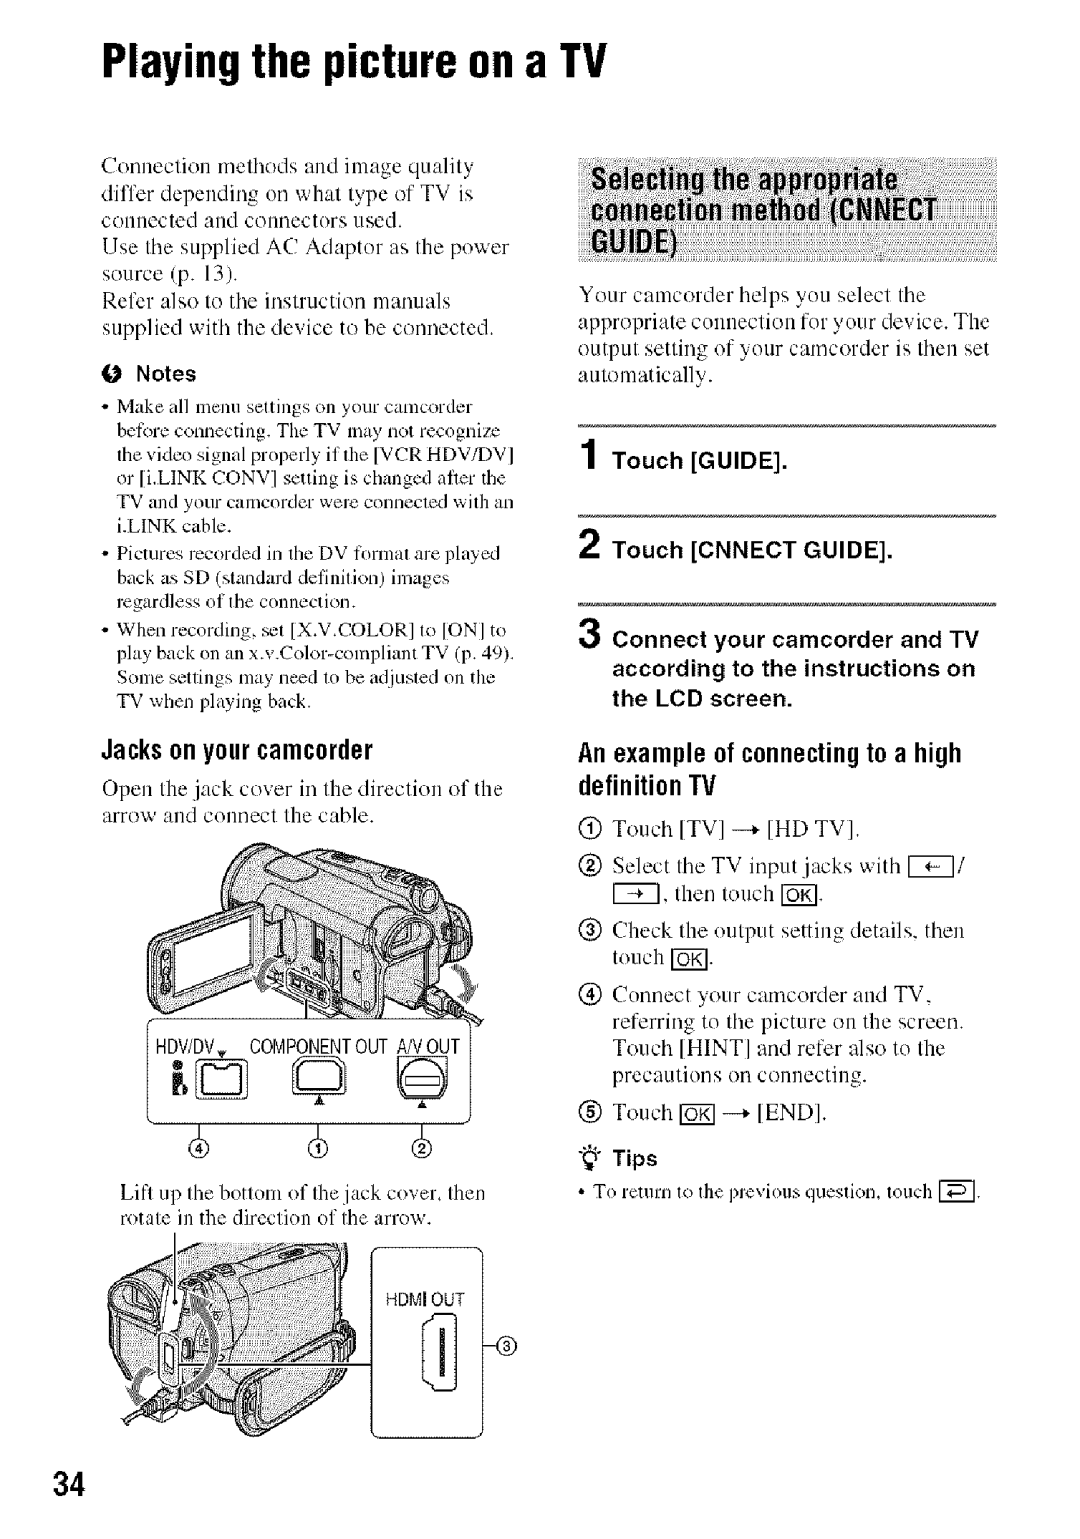
Jacksonyourcamcorder
Anexample0f connectingt0 a high definitionIV
Playingthe pictureon a TV
Touch Guide
Yellow
+a+++the p++tm+÷++ a TV Ige+t+++÷+
Use an Hdmi cable with the Hdmi logo on the front cover
To setthe aspect ratio accordingto the connectedTV169/43
WhenyourTVismonauralWhenyour TVhasonly one audioinputjack
Whenconnectingto yourTVvia a VCR
+ctm+÷++ a TV Ige+t+++÷+
OnPhotoTV HD
To usemenuitemsduringEasy Handycamoperation
Usingthe menuitems
PersonalMenu
To use the short-cutsof
Positionof lamp
Menu p
Camera SET menu p
Menu
Menu
QUICKRECHDV1080i
Menu
SUNRSESUNSETSunriseand sunset
See page 39 for details on selecting menu items
Twilit PORTRTTwilight portrait
Beach
Iol
@ Touch END
125,180,250 SlowerFaster
Tips
Touch If tile subjecl is white or tile
When recording under a discharge tube such as
Piclmcsqpearbluish, mid when set to a higher
Color
HIGH+
LOW
0FF
OFF
Lipto 10 x zoom is pcrlbrmcd optically 211×
100
Higher
After that, up to 21x ZOO1/iS performed digitally
1M r.lU
Settings for the Memory Stick Duo
6M M
Whenthe POWERswitchis settoCAMERA- Tape
Whenthe POWERswitchis settoCAMERA
MEMORYWhenthePOWERswitch issettoPLAY
NENORYSETmem
Images ill the selected folder @ Touch YES twice---+
Currnt Folder Deletes all
Select the playback fulder with 1, then touch B
PICT.APPLI.menu
Aaa
FLASHflashmotion
@ Touch log +, appears To cancel D.EFFECT, touch OFF
Does not use D.EFFECT setting
Cinema EFECTCinematic effect
?ET.gPPLL mesh gotim÷d
WBlackandwhite
El Nemory Stick
Settings for editing or playing back Various modes
RgcN
PictBridgePRINT
Settingswhilerecordingon a tapeor other basicsettings
SEDT/PLAYmsss/Ssstisssd
REC Node Recording mode SP s
HDV1080i HDVI080i
Standard SETme/goiue
See page l lO
16g
Seh.,ct to view your pictures on a
480i
Standard SETme/gotiue
Camera Data below
Lcdpanel
Smin
Touch 17/17 to select a menu category, then touch IKI
Touch -+ P-MENU SET UP ADD
Menu
Touch Fw/Fv7 to select a menu Item, then touch YES
Touch YES -+
Touch IFgg--+P-MENU SET UP
Touch -+ P-MENUSET UP Reset -+ YES -+ YES -+
Touch -+
AV device with i.LINK jack -- SD quality
Dubbingto VCRor DVD/HDDrecorders
Quality
Jacksonyourcamc0rder
Usingan i.LINKcablesupplied
WhenconnectingwiththeA/V connectingcablewith anS Video
Optionalgea
VCR or DVDrHDD recorder to
When dubbing is complete, stop Your camcorder
Gubbi t+ VSB +r gVNHgg recordersg+tiBe
Camcorder, and recording on the recording device
ToucllIgNgff-+ IlealRE? Ctrli -+ RE Pause
Recordingpicturesfrom a VCR, etc
Operate yourcamcorder to record movies
Insert a cassette into the VCR
Perform steps 1 to 4
Recodi pictures from a VCR, etc. gotiued
Tottch Slop or REC Pausei
Recording movies
Select a picture you want to delete with r7 Touch --+YES
Dubbingpicturesfrom Tape to a Memory Stick Duo
Deletingrecorded picturesfromthe Memory Stick Duo
Search and record the scene you want to record
Touch ---*END
Touch I
Touch the image that you want to print out later
Touch IW --* --* Iset
PktBridge
PrintingrecordedimageSPictBridgecompliant printer
Touch I0 -+* END
PH+t+r+Sr+s++++÷++++mms+SI+++++t+++S+
Viewingimagesimportedto a computer
What you can do with Windowscomputer
Computertoyourcamcorder
Exportingimportedmoviesfrom a
What aa car da with idows cemput÷Ca.tiauad
When using Picture Motion Browser
When playing still images recorded on a
Sound system Direct Sound compatible sound card
Before connecting your camcorder
Installingthe First Step Guideandsoftware
To install the software Adobe
Place the supplied CD-ROM Disc drive of your computer
Check your area and country Region, then click Next
IstaH the FirstS÷pGNU÷ a s0fwar÷/Cotiued
Remove the CD-ROM from Disc drive of your computer
To view First Step Guide
To install First Step Guide
ViewingFirst Step Guide
To copy still images from a Memory Stick Duo
Menu item settings have changed unexpectedly
Troubleshooting
Settings change during Easy Handycam operation
Supplied Remote Commander does not function
You cannot Turn off Indicator
Power abruptly turns off
Battery pack discharges too quickly
You cannot turn the LCD backlight off
TrssbsshsstisS/Ssstisssd
Flash does not work
HDV1080i
Refer also to Cassette tapes/Memory Stick Duo section p
Manual of Exposure
TrssNsshsstiss Ssstisssd
Fine patterns flicker, diagonal lines look jagged
You cannot play back a tape
You cannot play back in reverse direction
Noises appear and or is displayed on the screen
Picture appears distorted on a 43 TV
No picture appears during END Search or Rec Review
J4ch-12bappears on the LCD screen
Black bands appear at the top and bottom on a 43 TV
Recorded tape
You cannot dub correctly using the Hdmi cable
You cunnot dub pictures using the Hdmi cable
Your camcorder
1431
Pertaining to files
Gl Warning indicators pertaining to
Memory Stick Duo formatting
WamiaS iadieates ad messasss gestia÷d
PictBridgecompliantprinter
DualRec
Memory Stick Duo
Simplesettingofthe clockbytime difference
Usingyourcamcorderabroad
Powersupply
OnTVcolorsystems
II¸ Copyrightsignal
Maintenanceand precautions
Playback
Gold-plated connector Filli!!i! iil Illiiiiiiiiiliii
When cleaning the gold-plated connector
When labelingthe cassette
Naistssasss ass presatisss gsstiss÷
Ona MemoryStickPRODuo
Onthe MemoryStick Duoadaptor
On image data compatibility
Maistssasss ass p÷satisss gsstiss÷
To use i.LINK functionson this unit
What is i.LINK?
Betbm connecling or disconnecting tile i.LINK cable
About the i.LINK Baud rate
Moisturecondensation
Onuseandcare
About the required i.LINK cable
If moisture condensationhas occurred
How to avoid moisture condensation
Videohead
Sound breaks ollL
LCDscreen
Onadjustmento! thetouchpanel
Naistssasss ass presatisss gsstiss÷t
Onhandlingthe casing
Rechargeahlebattery
Specifications
Onchargingthepre-installed
Procedures
Link Interface IEEE1394 -tliu connector S
Input/Output connectors
Stereo minijack 0 3.5 ram
General
RechargeablebatterypackNP-FH60
ACAdaptorAC-L200/L200B
Ontrademarks
Mini I *hital
IckRmce
Identifyingparts and controls
Down and push il lo the end, and lhen
104
÷tifyiS pats a cotms Co,timber
Attaching the supplied lens hood
To change the batteryol the Remote
RemoteCommander
Commander
NstifyiS pats a ++tmsC+tim8
Tape transpurt indicator
Indicatorsdisplayedduringrecording/playback
Recordingror,u.tHDVI080iorDV
108
Sicat+s disp+asdtisS r+s+diS/p+aybaskC+fi+d
Upperright
Upperleft
HDVI080iDV
Bottom
Isicatss disp+asdtisS rsssdiS/piaybask gstimsd
Other indicator
IndicatorsmMtheir positionsm+cppro×hn+tte
+P+ni+++++++++++++++++++++++++++++++++++++++++++++++++
Index
Numeric
IVi
Portrait
113
114
Asegfirese de Que su videocfimara centiene
Paso1 Comprobaci6nde los elementos suministrados
Cable USB
Instale la bateria en la videocamara
Deslice el interruptor Power
Paso2 Cargade la bateria
Conecte el adaptador de
Tiempodecarga
Pararetirarla bateria
Cuandoguardela bateria
Suslituya la balerfa por una
Tiempodereproducci6n
Paso 2 gar#a de abatea goiuaci6N
Tiempodegrabaci6n
Acerca de la bateria
Paso3 Encendidoy Ajuste de la fecha y la hora
Interruptor Power
CAMERA-MEMORY para grabar en
Pararestablecerla fechay la h0ra
Pas+ 3 E++÷+N++ + ai+s+ +++a +++ha +g+a h+ra g+++++a++++
Paraapagarla vide0cmara
Ajuste a afro con Fl/Fl
Ajuste La correa De sujecidn y sostenga
Paso4 Ajustesantesde grabar
Visor
Juste Del objetivo del visor
Para
Paso5 Inserci6nde una cinta o un Memory Stick Duo
Cierre La tapa
Expulsar El vide0casete
Para expulsarun Memory Stick Duo
Indicador de acceso
Presione START/STOP o
Tor Power
Grabaci6n
Cubierta del objetivo Se abrc sem cl ajusle de1
Paraverificarla ultimagrabaci6nenun MemoryStickDuo
Parabuscarunaescenadurantela repr0duccidn
Reproducci6n
Paraajustarel v01umendel s0nid0
126
Toque
Se visualizl la imagen grlbada mils recielllemente
3278987120