Getting started
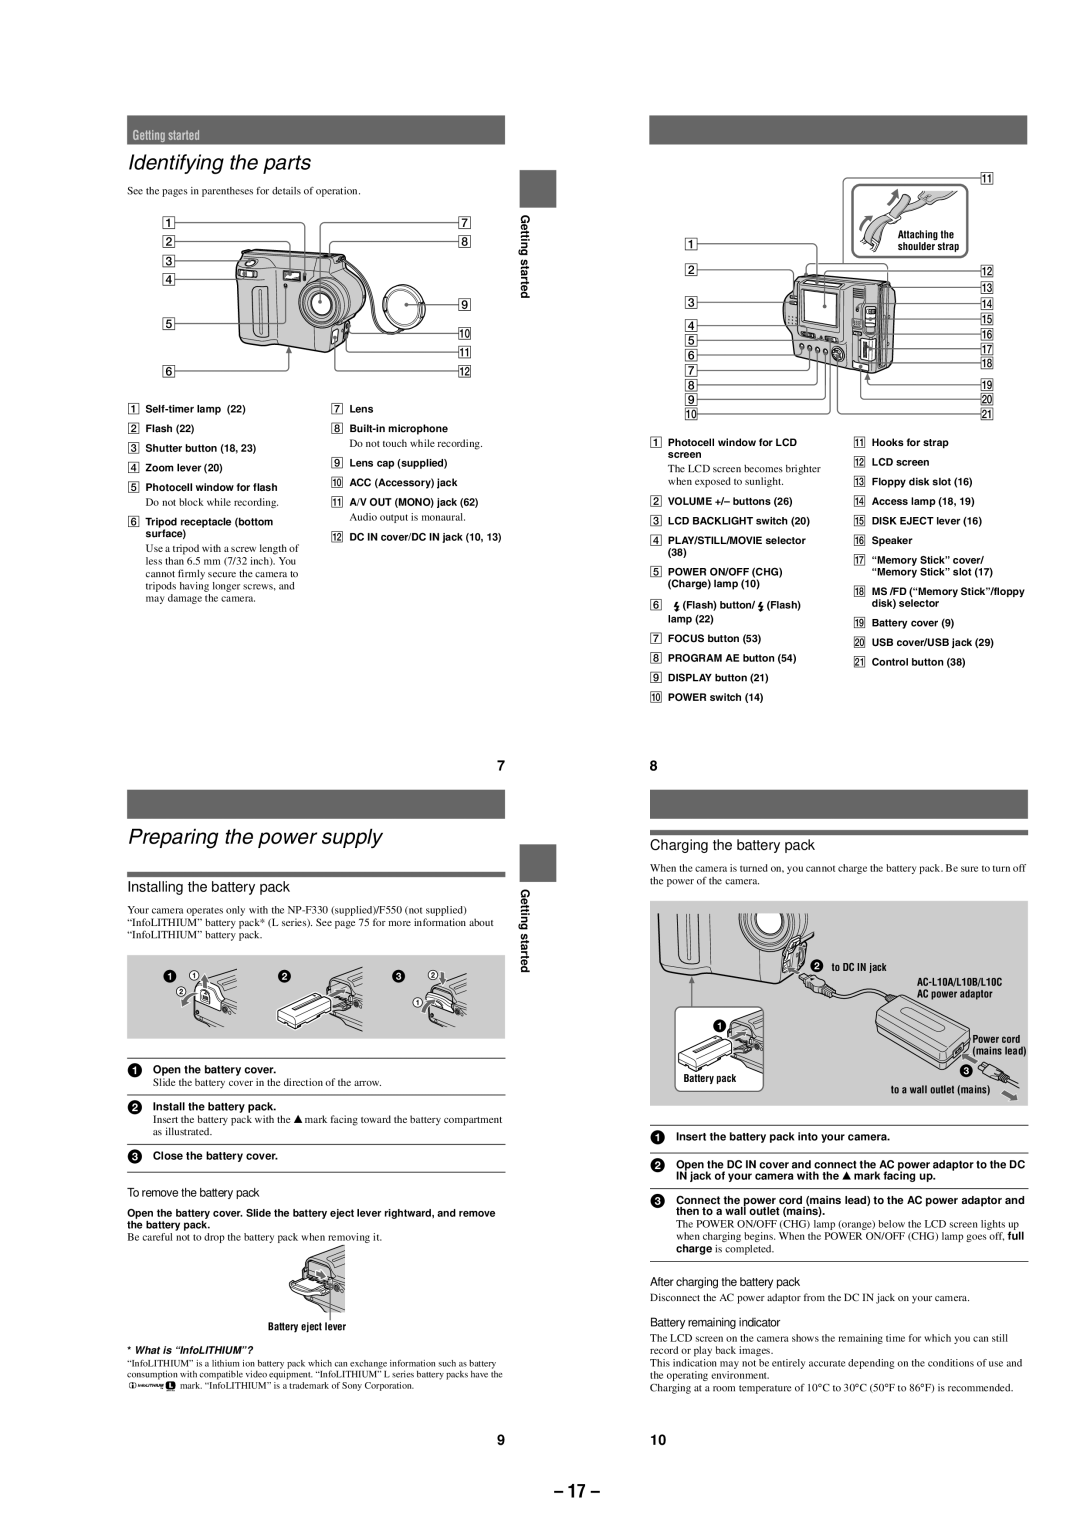
Identifying the parts
See the pages in parentheses for details of operation.
qa
1
2
3
4
5
6
A
BFlash (22)
CShutter button (18, 23)
DZoom lever (20)
EPhotocell window for flash
Do not block while recording.
FTripod receptacle (bottom surface)
Use a tripod with a screw length of less than 6.5 mm (7/32 inch). You cannot firmly secure the camera to tripods having longer screws, and may damage the camera.
7
8
9
0 qa qs
GLens
H
Do not touch while recording.
ILens cap (supplied)
JACC (Accessory) jack
KA/V OUT (MONO) jack (62)
Audio output is monaural.
LDC IN cover/DC IN jack (10, 13)
Getting started
1
2
3
4
5
6
7
8
9
0
APhotocell window for LCD screen
The LCD screen becomes brighter when exposed to sunlight.
BVOLUME +/– buttons (26)
CLCD BACKLIGHT switch (20)
DPLAY/STILL/MOVIE selector (38)
EPOWER ON/OFF (CHG) (Charge) lamp (10)
F![]() (Flash) button/
(Flash) button/![]() (Flash) lamp (22)
(Flash) lamp (22)
GFOCUS button (53)
HPROGRAM AE button (54)
IDISPLAY button (21)
JPOWER switch (14)
Attaching the shoulder strap
qs qd qf qg qh qj qk
ql w; wa
KHooks for strap
LLCD screen
MFloppy disk slot (16)
NAccess lamp (18, 19)
ODISK EJECT lever (16)
PSpeaker
Q“Memory Stick” cover/ “Memory Stick” slot (17)
RMS /FD (“Memory Stick”/floppy disk) selector
SBattery cover (9)
TUSB cover/USB jack (29)
UControl button (38)
|
|
|
| 7 | |
Preparing the power supply |
|
|
| ||
Installing the battery pack |
|
| Getting | ||
“InfoLITHIUM” battery pack* (L series). See page 75 for more information about | |||||
Your camera operates only with the |
| ||||
“InfoLITHIUM” battery pack. |
|
|
| started | |
1 1 | 2 | 3 | 2 | ||
| |||||
2 |
|
|
|
| |
|
|
| 1 |
| |
1Open the battery cover.
Slide the battery cover in the direction of the arrow.
2Install the battery pack.
Insert the battery pack with the v mark facing toward the battery compartment as illustrated.
3Close the battery cover.
To remove the battery pack
Open the battery cover. Slide the battery eject lever rightward, and remove the battery pack.
Be careful not to drop the battery pack when removing it.
Battery eject lever
*What is “InfoLITHIUM”?
“InfoLITHIUM” is a lithium ion battery pack which can exchange information such as battery consumption with compatible video equipment. “InfoLITHIUM” L series battery packs have the ![]()
![]()
![]()
![]()
![]()
![]()
![]()
![]() mark. “InfoLITHIUM” is a trademark of Sony Corporation.
mark. “InfoLITHIUM” is a trademark of Sony Corporation.
8
Charging the battery pack
When the camera is turned on, you cannot charge the battery pack. Be sure to turn off the power of the camera.
![]()
![]() 2 to DC IN jack
2 to DC IN jack
AC power adaptor
1
Power cord
(mains lead)
![]()
![]() 3
3![]() Battery pack
Battery pack
to a wall outlet (mains)
1Insert the battery pack into your camera.
2Open the DC IN cover and connect the AC power adaptor to the DC IN jack of your camera with the v mark facing up.
3Connect the power cord (mains lead) to the AC power adaptor and then to a wall outlet (mains).
The POWER ON/OFF (CHG) lamp (orange) below the LCD screen lights up when charging begins. When the POWER ON/OFF (CHG) lamp goes off, full charge is completed.
After charging the battery pack
Disconnect the AC power adaptor from the DC IN jack on your camera.
Battery remaining indicator
The LCD screen on the camera shows the remaining time for which you can still record or play back images.
This indication may not be entirely accurate depending on the conditions of use and the operating environment.
Charging at a room temperature of 10° C to 30° C (50° F to 86° F) is recommended.
9 | 10 |
– 17 –