SECTION 4 TEST MODE
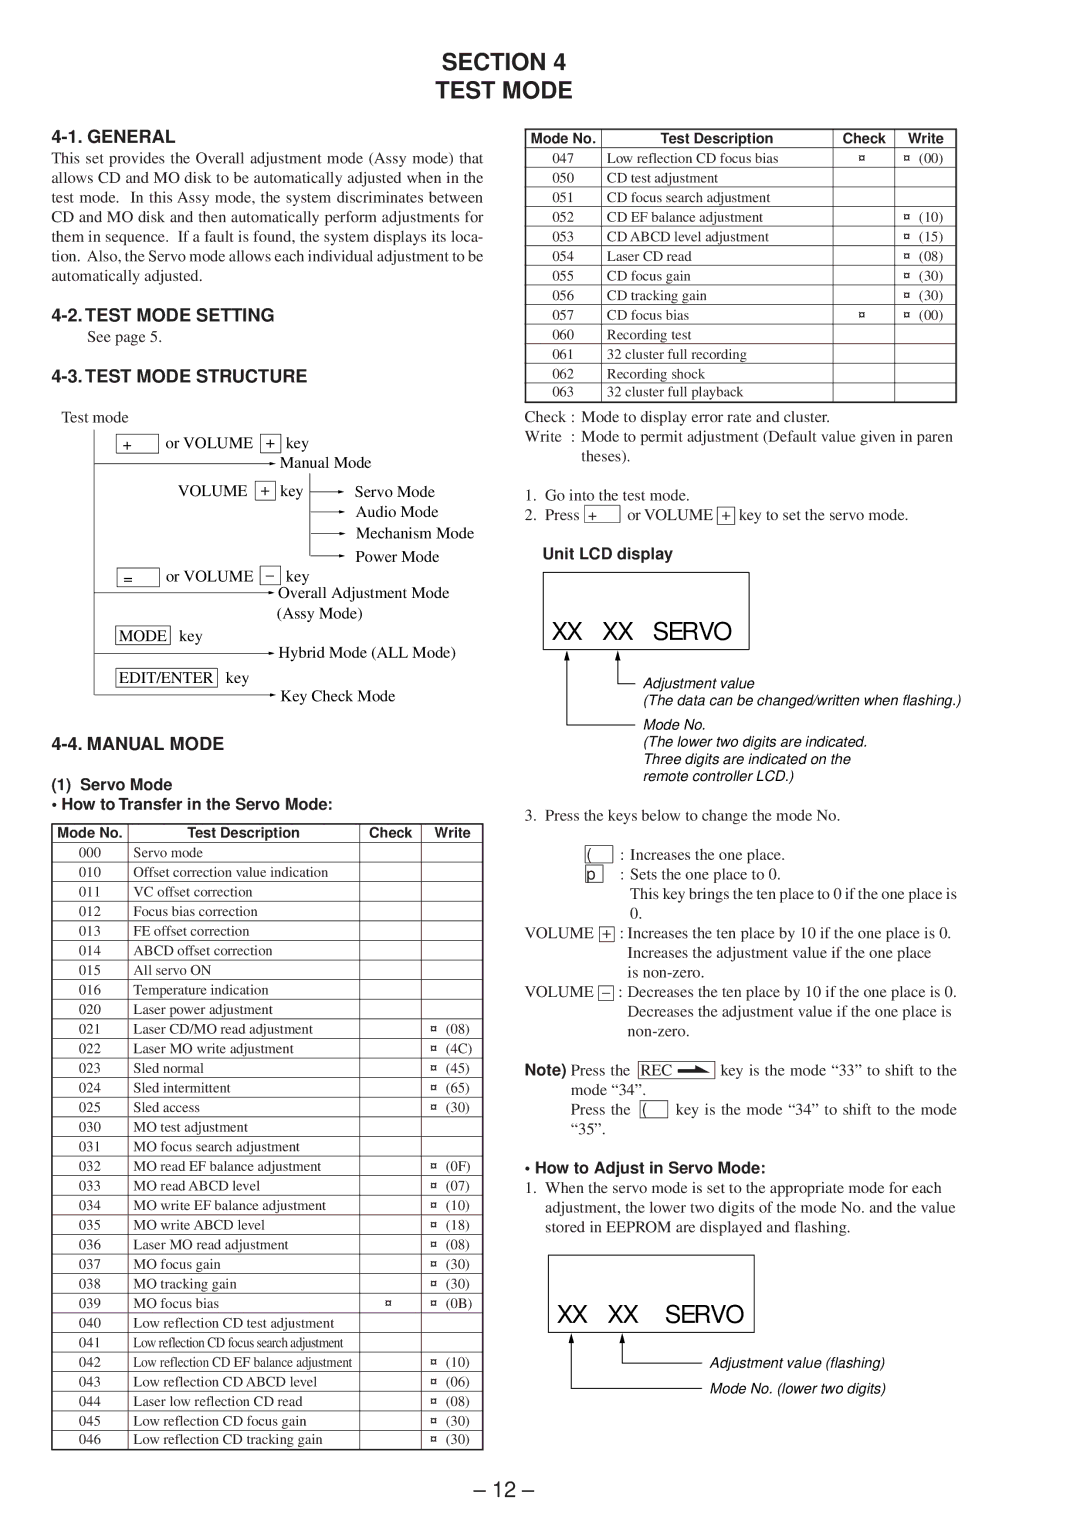
This set provides the Overall adjustment mode (Assy mode) that allows CD and MO disk to be automatically adjusted when in the test mode. In this Assy mode, the system discriminates between CD and MO disk and then automatically perform adjustments for them in sequence. If a fault is found, the system displays its loca- tion. Also, the Servo mode allows each individual adjustment to be automatically adjusted.
4-2. TEST MODE SETTING
See page 5.
4-3. TEST MODE STRUCTURE
Test mode
+or VOLUME + key ![]() Manual Mode
Manual Mode
VOLUME + key |
|
|
| Servo Mode |
| ||||
|
|
|
| Audio Mode |
|
|
| ||
|
|
|
| Mechanism Mode |
|
|
|
| |
|
|
|
| Power Mode |
|
|
|
|
=or VOLUME – key ![]() Overall Adjustment Mode
Overall Adjustment Mode
(Assy Mode)
MODE key
![]() Hybrid Mode (ALL Mode)
Hybrid Mode (ALL Mode)
EDIT/ENTER key
![]() Key Check Mode
Key Check Mode
4-4. MANUAL MODE
(1) Servo Mode
• How to Transfer in the Servo Mode:
Mode No. | Test Description | Check | Write |
000 | Servo mode |
|
|
010 | Offset correction value indication |
|
|
011 | VC offset correction |
|
|
012 | Focus bias correction |
|
|
013 | FE offset correction |
|
|
014 | ABCD offset correction |
|
|
015 | All servo ON |
|
|
016 | Temperature indication |
|
|
020 | Laser power adjustment |
|
|
021 | Laser CD/MO read adjustment |
| ¨(08) |
022 | Laser MO write adjustment |
| ¨(4C) |
023 | Sled normal |
| ¨(45) |
024 | Sled intermittent |
| ¨(65) |
025 | Sled access |
| ¨(30) |
030 | MO test adjustment |
|
|
031 | MO focus search adjustment |
|
|
032 | MO read EF balance adjustment |
| ¨(0F) |
033 | MO read ABCD level |
| ¨(07) |
034 | MO write EF balance adjustment |
| ¨(10) |
035 | MO write ABCD level |
| ¨(18) |
036 | Laser MO read adjustment |
| ¨(08) |
037 | MO focus gain |
| ¨(30) |
038 | MO tracking gain |
| ¨(30) |
039 | MO focus bias | ¨ | ¨(0B) |
040 | Low reflection CD test adjustment |
|
|
041 | Low reflection CD focus search adjustment |
|
|
042 | Low reflection CD EF balance adjustment |
| ¨(10) |
043 | Low reflection CD ABCD level |
| ¨(06) |
044 | Laser low reflection CD read |
| ¨(08) |
045 | Low reflection CD focus gain |
| ¨(30) |
046 | Low reflection CD tracking gain |
| ¨(30) |
Mode No. | Test Description | Check | Write |
047 | Low reflection CD focus bias | ¨ | ¨(00) |
050 | CD test adjustment |
|
|
051 | CD focus search adjustment |
|
|
052 | CD EF balance adjustment |
| ¨(10) |
053 | CD ABCD level adjustment |
| ¨(15) |
054 | Laser CD read |
| ¨(08) |
055 | CD focus gain |
| ¨(30) |
056 | CD tracking gain |
| ¨(30) |
057 | CD focus bias | ¨ | ¨(00) |
060 | Recording test |
|
|
061 | 32 cluster full recording |
|
|
062 | Recording shock |
|
|
063 | 32 cluster full playback |
|
|
Check : Mode to display error rate and cluster.
Write : Mode to permit adjustment (Default value given in paren theses).
1.Go into the test mode.
2.Press + or VOLUME + key to set the servo mode.
Unit LCD display
XX XX SERVO
Adjustment value
(The data can be changed/written when flashing.)
Mode No.
(The lower two digits are indicated. Three digits are indicated on the remote controller LCD.)
3. Press the keys below to change the mode No.
(: Increases the one place. p : Sets the one place to 0.
This key brings the ten place to 0 if the one place is 0.
VOLUME + : Increases the ten place by 10 if the one place is 0. Increases the adjustment value if the one place is
VOLUME
Note) Press the REC c key is the mode “33” to shift to the mode “34”.
Press the ( key is the mode “34” to shift to the mode “35”.
• How to Adjust in Servo Mode:
1.When the servo mode is set to the appropriate mode for each adjustment, the lower two digits of the mode No. and the value stored in EEPROM are displayed and flashing.
XX XX SERVO
Adjustment value (flashing)
Mode No. (lower two digits)
– 12 –
