|
|
|
|
| ||
|
| Menu | Item | Description |
| |
|
| INPUT | VIDEO MEMORY | You can select picture viewing mode that best suits the type of picture or the | ||
|
| SETTING |
| environment. |
| |
|
| (continued) |
| OFF: Select for the setting stored in each input channel or input signal. | ||
|
|
|
| DYNAMIC: Select for enhanced picture contrast and sharpness. | ||
|
|
|
| STANDARD: Recommended for normal viewing condition. Also select to | ||
|
|
|
|
| reduce roughness when viewing the picture with DYNAMIC. | |
|
|
|
| LIVING: Select for soft, |
| |
|
|
|
| USER 1, 2 and 3: You can adjust the quality of the picture to suit your taste and | ||
|
|
|
|
| store the settings. Once the settings are stored, you can view the picture with | |
|
|
|
|
| the adjusted picture quality by pressing the button. | |
|
|
|
| To store the settings |
| |
|
|
|
| 1 Select USER 1, USER 2 or USER 3. |
| |
|
|
|
| 2 Adjust the items you want in the menus. |
| |
|
|
|
|
| Items that can be stored are: |
|
|
|
|
|
| CONTRAST, BRIGHT, COLOR, HUE, SHARP, RGB ENHANCER, | |
|
|
|
|
| D.PICTURE, COLOR TEMP, COLOR SYS, SCAN CONV, ASPECT. | |
|
|
|
|
| Tip |
|
|
|
|
|
| You can also adjust the picture quality in DYNAMIC, STANDARD or | |
|
|
|
|
| LIVING mode. To reset to the factory setting, press RESET. | |
|
| SET | STATUS | Set to OFF to turn off the | ||
|
| |||||
| Using | SETTING |
| when turning off the power, and warning messages. | ||
|
|
| To display all of the | |||
|
|
|
| |||
|
|
|
| Selects the signal input from the PJ MULTI connector. | ||
| the |
|
| COMPUTER: Inputs the signal from a computer. | ||
|
|
| COMPONENT: Inputs the component or progressive component signal from a | |||
|
|
|
| |||
| Menus |
|
|
| DVD player, digital BS tuner, etc. |
|
|
|
| VIDEO GBR: Inputs the signal from a TV game, DVD player or HDTV | |||
|
|
|
| |||
|
|
|
|
| broadcast. |
|
|
|
| LANGUAGE | Selects the language used in the menu and | ||
|
|
|
| languages are: English, French, German, Italian, Spanish, Japanese, Chinese, | ||
|
|
|
| Portuguese and Korean. |
| |
|
|
| POWER SAVING | When set to ON, the POWER SAVING indicator lights. The projector goes into | ||
|
|
|
| power saving mode if no signal is input for 10 minutes, and the lamp goes out | ||
|
|
|
| and the cooling fan keeps running. In power saving mode, no button functions | ||
|
|
|
| for the first 60 seconds. It is cancelled when a signal is input or any button is | ||
|
|
|
| pressed. If you do not set the projector to power saving mode, select OFF. | ||
|
| INSTALL | KEYSTONE MEM | ON: DIGIT KEYSTONE setting is stored. |
| |
|
| SETTING | (memory) |
| The data is retrieved when the projector power is turned on. The setting will | |
|
|
|
|
| remain the same every time. |
|
|
|
|
| OFF: DIGIT KEYSTONE is reset to “0” when the power is turned on next | ||
|
|
|
|
| time. |
|
|
|
| DIGIT KEYSTONE | Corrects the trapezoidal distortion caused by the projection angle. Use this item | ||
|
|
|
| after selecting the type of distortion, H (horizontal) or V (vertical), with | ||
|
|
|
| KEYSTONE DIR. |
| |
|
|
| KEYSTONE DIR | When the picture is a vertical trapezoid ( | ), select V. Next, correct the | |
|
|
|
| distortion with DIGIT KEYSTONE. When the picture is a holizontal trapezoid | ||
|
|
|
| ( | ), select H, then correct the distortion with DIGIT KEYSTONE. | |
|
|
| MENU POSITION | Selects the display position from TOP LEFT, BOTTOM LEFT, CENTER, TOP | ||
|
|
|
| RIGHT and BOTTOM RIGHT. |
| |
|
|
| MENU COLOR | Selects the tone of the menu display from STANDARD, WARM, COOL, | ||
|
|
|
| GREEN or GRAY. |
| |
|
|
| MENU | Selects the intensity of the background picture of the menu display from DARK, | ||
|
|
| BACKGROUND | STANDARD or LIGHT. |
| |
|
|
| LAMP TIMER | Indicates how long the lamp has been turned on. |
| |
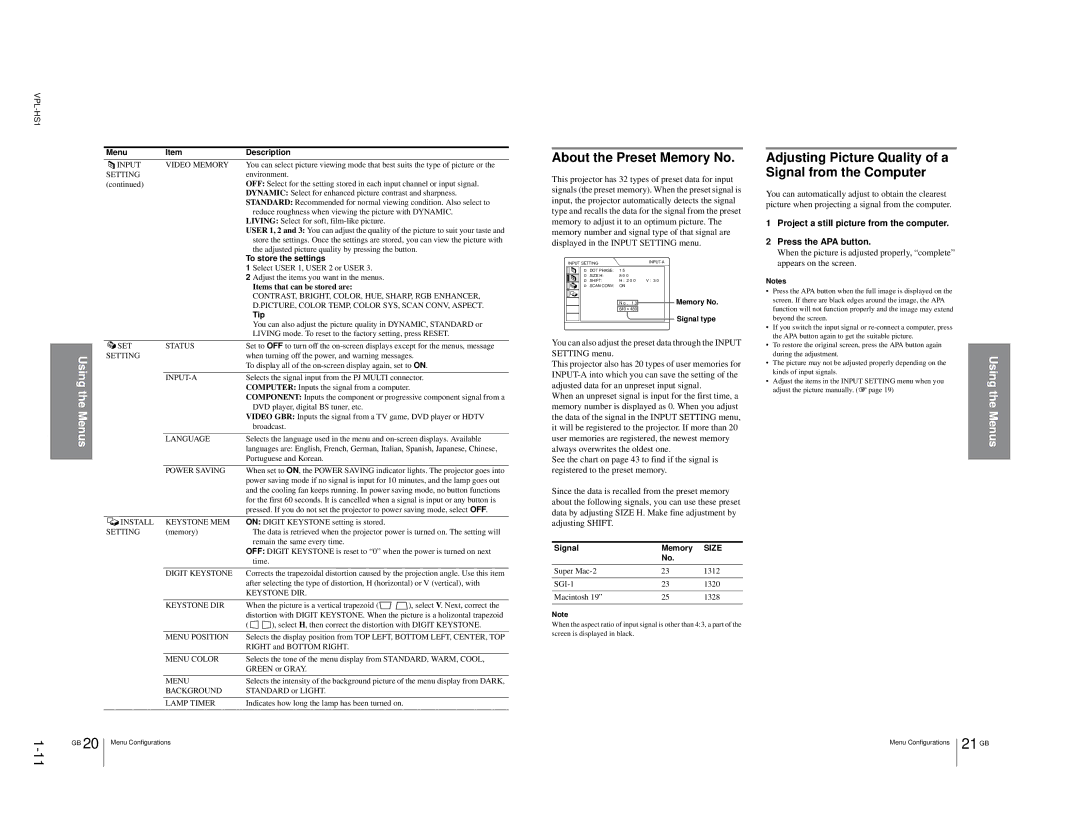
About the Preset Memory No. | ||||||
This projector has 32 types of preset data for input | ||||||
signals (the preset memory). When the preset signal is | ||||||
input, the projector automatically detects the signal | ||||||
type and recalls the data for the signal from the preset | ||||||
memory to adjust it to an optimum picture. The | ||||||
memory number and signal type of that signal are | ||||||
displayed in the INPUT SETTING menu. |
| |||||
| INPUT SETTING |
|
|
| ||
|
| DOT PHASE: | 1 5 |
|
|
|
|
| SIZE H: | 8 0 0 |
|
|
|
|
| SHIFT: | H : 2 0 0 | V : 3 0 |
| |
|
| SCAN CONV: | ON |
|
|
|
|
|
| N o . | 1 3 | Memory No. | |
|
|
| ||||
|
|
| ||||
|
|
| 640 | 480 |
|
|
|
|
|
|
| Signal type | |
|
|
|
|
| ||
You can also adjust the preset data through the INPUT | ||||||
SETTING menu. |
|
|
|
| ||
This projector also has 20 types of user memories for | ||||||
adjusted data for an unpreset input signal. |
| |||||
When an unpreset signal is input for the first time, a | ||||||
memory number is displayed as 0. When you adjust | ||||||
the data of the signal in the INPUT SETTING menu, | ||||||
it will be registered to the projector. If more than 20 | ||||||
user memories are registered, the newest memory | ||||||
always overwrites the oldest one. |
| |||||
See the chart on page 43 to find if the signal is | ||||||
registered to the preset memory. |
| |||||
Since the data is recalled from the preset memory | ||||||
about the following signals, you can use these preset | ||||||
data by adjusting SIZE H. Make fine adjustment by | ||||||
adjusting SHIFT. |
|
|
|
| ||
Signal |
|
| Memory | SIZE | ||
|
|
|
|
| No. |
|
Super |
|
| 23 | 1312 | ||
|
|
| 23 | 1320 | ||
Macintosh 19” |
|
| 25 | 1328 | ||
Note |
|
|
|
| ||
When the aspect ratio of input signal is other than 4:3, a part of the | ||||||
screen is displayed in black. |
|
| ||||
Adjusting Picture Quality of a Signal from the Computer
You can automatically adjust to obtain the clearest picture when projecting a signal from the computer.
1Project a still picture from the computer.
2Press the APA button.
When the picture is adjusted properly, “complete” appears on the screen.
Notes
•Press the APA button when the full image is displayed on the screen. If there are black edges around the image, the APA function will not function properly and the image may extend beyond the screen.
•If you switch the input signal or
•To restore the original screen, press the APA button again during the adjustment.
•The picture may not be adjusted properly depending on the kinds of input signals.
•Adjust the items in the INPUT SETTING menu when you adjust the picture manually. (1 page 19)
Using the Menus
1 | GB | 20 | Menu Configurations |
|
|
|
Menu Configurations | 21 | GB |
|
|
|