| 42 |
|
|
| Quick Installation Guide | ||
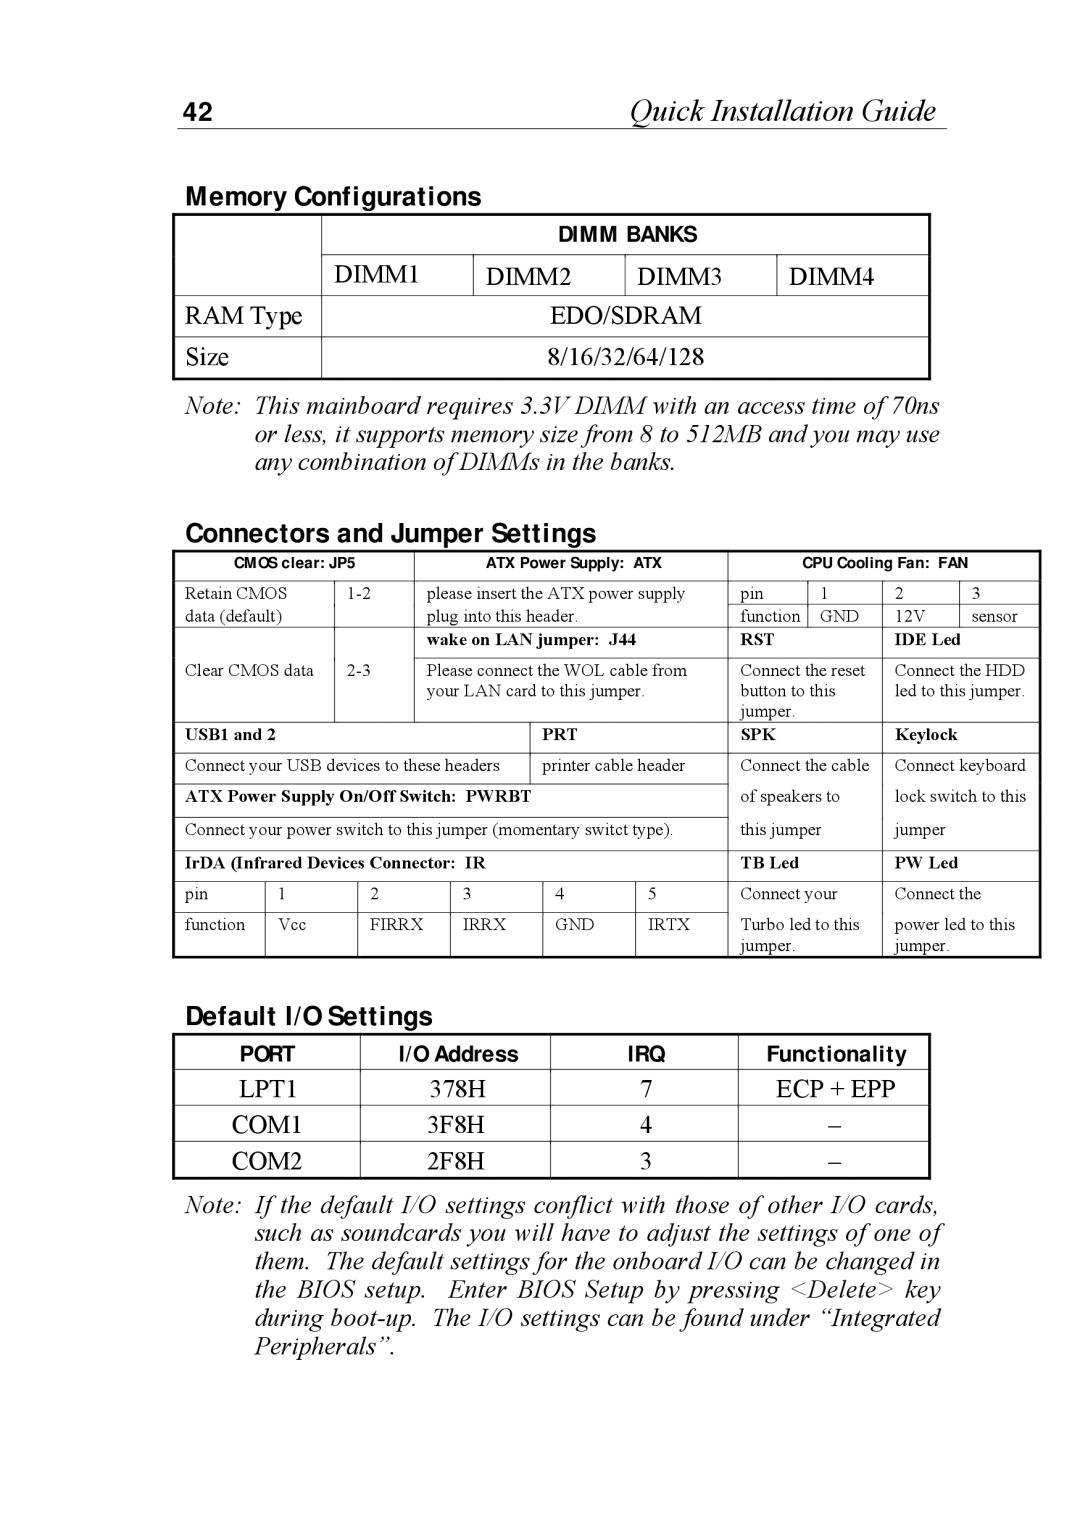
| Memory Configurations |
|
|
|
| ||
|
|
|
| DIMM BANKS |
|
| |
|
|
|
|
|
|
|
|
|
| DIMM1 |
| DIMM2 | DIMM3 | DIMM4 |
|
|
|
|
|
|
|
|
|
| RAM Type |
| EDO/SDRAM |
|
| ||
|
|
|
|
|
| ||
| Size |
| 8/16/32/64/128 |
|
| ||
|
|
|
|
|
|
|
|
Note: This mainboard requires 3.3V DIMM with an access time of 70ns or less, it supports memory size from 8 to 512MB and you may use any combination of DIMMs in the banks.
Connectors and Jumper Settings
CMOS clear: JP5 |
|
| ATX Power Supply: ATX |
| CPU Cooling Fan: FAN |
| |||||||||||
|
|
|
|
|
|
|
|
|
|
|
|
|
|
|
| ||
Retain CMOS |
| please insert the ATX power supply | pin |
| 1 | 2 |
| 3 | |||||||||
data (default) |
|
|
| plug into this header. |
| function |
| GND | 12V |
| sensor | ||||||
|
|
|
|
|
| wake on LAN jumper: J44 |
| RST |
|
| IDE Led |
| |||||
|
|
|
|
|
|
|
|
|
|
|
| ||||||
Clear CMOS data |
| Please connect the WOL cable from | Connect the reset | Connect the HDD | |||||||||||||
|
|
|
|
|
| your LAN card to this jumper. |
| button to this | led to this jumper. | ||||||||
|
|
|
|
|
|
|
|
|
|
|
| jumper. |
|
|
|
|
|
USB1 and 2 |
|
|
|
|
|
|
| PRT |
| SPK |
|
| Keylock |
| |||
|
|
|
|
|
|
|
|
| |||||||||
Connect your USB devices to these headers |
| printer cable header | Connect the cable | Connect keyboard | |||||||||||||
|
|
|
|
|
|
|
|
|
| ||||||||
ATX Power Supply On/Off Switch: PWRBT |
|
|
| of speakers to | lock switch to this | ||||||||||||
|
|
|
|
|
|
|
|
| |||||||||
Connect your power switch to this jumper (momentary switct type). | this jumper | jumper |
| ||||||||||||||
|
|
|
|
|
|
|
|
|
|
|
| ||||||
IrDA (Infrared Devices Connector: IR |
|
|
| TB Led |
|
| PW Led |
| |||||||||
|
|
|
|
|
|
|
|
|
|
|
|
|
| ||||
pin |
| 1 |
| 2 |
|
| 3 |
| 4 |
| 5 | Connect your | Connect the | ||||
|
|
|
|
|
|
|
|
|
|
|
| ||||||
function |
| Vcc |
| FIRRX |
| IRRX | GND |
| IRTX | Turbo led to this | power led to this | ||||||
|
|
|
|
|
|
|
|
|
|
|
| jumper. |
|
| jumper. |
| |
Default I/O Settings
PORT | I/O Address | IRQ | Functionality |
LPT1 | 378H | 7 | ECP + EPP |
COM1 | 3F8H | 4 | Ð |
COM2 | 2F8H | 3 | Ð |
Note: If the default I/O settings conflict with those of other I/O cards, such as soundcards you will have to adjust the settings of one of them. The default settings for the onboard I/O can be changed in the BIOS setup. Enter BIOS Setup by pressing <Delete> key during