Timer recording
NOTES:
¥If you select timer recording on a specified date only one time, select ÒONCEÓ in the ÒTYPEÓ for recording. You can record same days of every week or from Monday to Friday using the item ÒTYPEÓ. The items you can select are as follows:
ONCE: Recording on the selected
ÒDATEÓ
EVERY SUN: Recording every Sun.
EVERY MON: Recording every Mon.
EVERY TUE: Recording every Tue.
EVERY WED: Recording every Wed.
EVERY THU: Recording every Thu.
EVERY FRI: Recording every Fri.
EVERY SAT: Recording every Sat.
EVERYDAY: Recording everyday.
¥The starting and stopping times for the recording are displayed on the
¥The initial setting of ÒREC TOÓ and ÒREC MODEÓ can be changed us- ing ÒSetting the recordingÓ. (See page 32.)
The unauthorized recording, use, distribution, or revision of television programs, videotapes, DVDs and other materials, is prohibited under the Copyright Laws of the United States and other countries, and may subject you to civil and/or criminal liability.
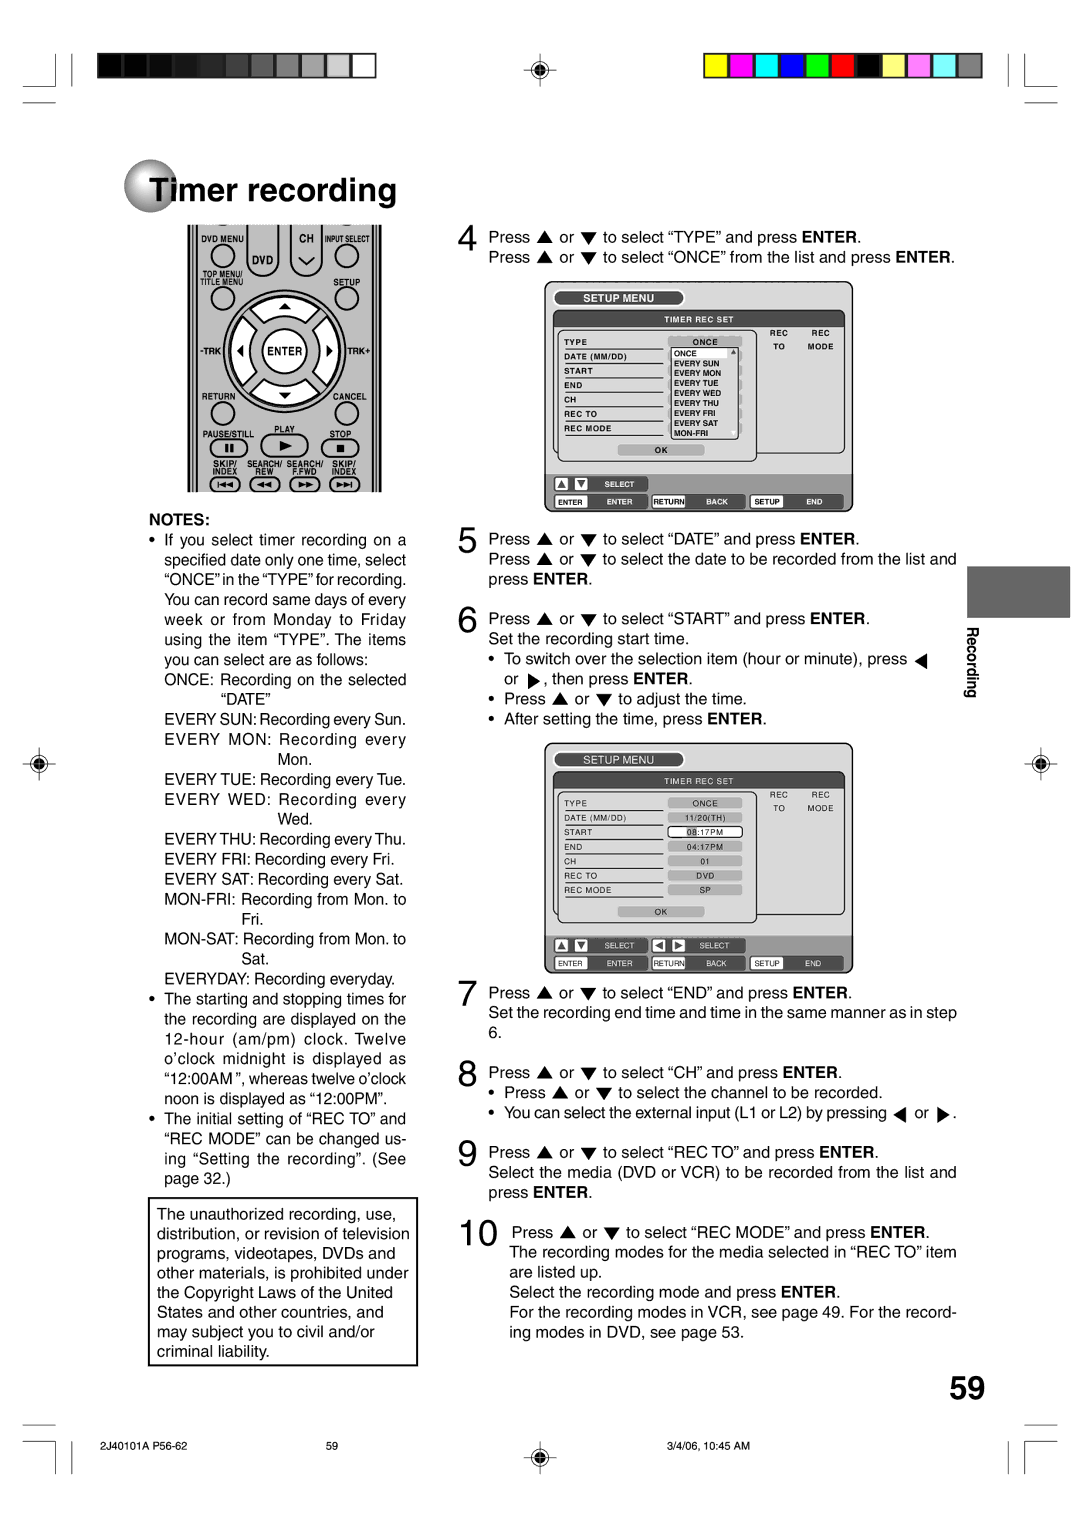
4Press ![]() or
or ![]() to select ÒTYPEÓ and press ENTER.
to select ÒTYPEÓ and press ENTER.
Press ![]() or
or ![]() to select ÒONCEÓ from the list and press ENTER.
to select ÒONCEÓ from the list and press ENTER.
SETUP MENU
|
|
|
| TIMER REC SET |
|
| ||||
TYPE |
|
|
|
| ONCE | REC | REC | |||
|
|
|
| TO | MODE | |||||
|
|
|
|
| ONCE |
|
|
|
| |
DATE (MM/DD) |
|
|
|
|
| |||||
|
| EVERY SUN |
|
| ||||||
|
|
|
|
|
|
| ||||
START |
|
| 02:17 |
|
|
|
| |||
|
|
|
|
| EVERY MON |
|
| |||
END |
|
|
| EVERY TUE |
|
| ||||
| 03:17 |
|
|
|
| |||||
|
|
|
|
| EVERY WED |
|
| |||
CH |
|
|
|
| ||||||
|
|
|
|
| 000 |
|
|
| ||
|
|
|
|
| EVERY THU |
|
| |||
REC TO |
|
|
| EVERYDVDFRI |
|
| ||||
|
|
|
|
| EVERY SAT |
|
| |||
REC MODE |
|
|
| |||||||
|
|
|
| SP |
|
| ||||
|
|
|
|
|
|
| ||||
|
|
| OK |
|
|
|
| |||
|
| SELECT |
|
|
|
|
|
|
|
|
ENTER | ENTER | RETURN | BACK | SETUP | END | |||||
5Press ![]() or
or ![]() to select ÒDATEÓ and press ENTER.
to select ÒDATEÓ and press ENTER.
Press ![]() or
or ![]() to select the date to be recorded from the list and press ENTER.
to select the date to be recorded from the list and press ENTER.
6 Press | or | to select ÒSTARTÓ and press ENTER. | Recording | ||||||||
Set the recording start time. |
|
| |||||||||
|
|
| |||||||||
¥ | To switch over the selection item (hour or minute), press |
| |||||||||
| or , then press ENTER. |
|
|
| |||||||
¥ | Press |
| or | to adjust the time. |
|
|
| ||||
¥ | After setting the time, press ENTER. |
|
|
| |||||||
|
|
| SETUP MENU |
|
|
| |||||
|
|
|
|
|
| TIMER REC SET |
|
|
| ||
|
|
| TYPE |
|
|
|
| ONCE | REC | REC |
|
|
|
|
|
|
|
| TO | MODE |
| ||
|
|
|
|
|
|
|
|
|
| ||
|
|
| DATE (MM/DD) |
|
|
| 11/20(TH) |
|
|
| |
|
|
| START |
|
|
|
| 08:17PM |
|
|
|
|
|
|
|
|
|
|
|
|
|
|
|
|
|
| END |
|
|
|
| 04:17PM |
|
|
|
|
|
| CH |
| 01 |
|
|
| |||
|
|
| REC TO |
|
|
|
| DVD |
|
|
|
|
|
|
|
|
|
|
|
|
|
| |
|
|
| REC MODE |
|
|
| SP |
|
|
| |
|
|
|
|
| OK |
|
|
| |||
|
|
|
| SELECT |
|
|
| SELECT |
|
|
|
|
| ENTER | ENTER | RETURN BACK SETUP | END |
| |||||
7 Press | or | to select ÒENDÓ and press ENTER. |
| ||||||||
Set the recording end time and time in the same manner as in step |
| ||||||||||
6. |
|
|
|
|
|
|
|
|
|
|
|
8 Press | or | to select ÒCHÓ and press ENTER. |
| ||||||||
¥ | Press |
| or | to select the channel to be recorded. |
| ||||||
¥ | You can select the external input (L1 or L2) by pressing or . |
| |||||||||
9 Press | or | to select ÒREC TOÓ and press ENTER. |
| ||||||||
Select the media (DVD or VCR) to be recorded from the list and |
| ||||||||||
press ENTER. |
|
|
|
|
|
|
|
| |||
10 Press |
| or | to select ÒREC MODEÓ and press ENTER. |
| |||||||
The recording modes for the media selected in ÒREC TOÓ item are listed up.
Select the recording mode and press ENTER.
For the recording modes in VCR, see page 49. For the record- ing modes in DVD, see page 53.
59
2J40101A | 59 | 3/4/06, 10:45 AM |