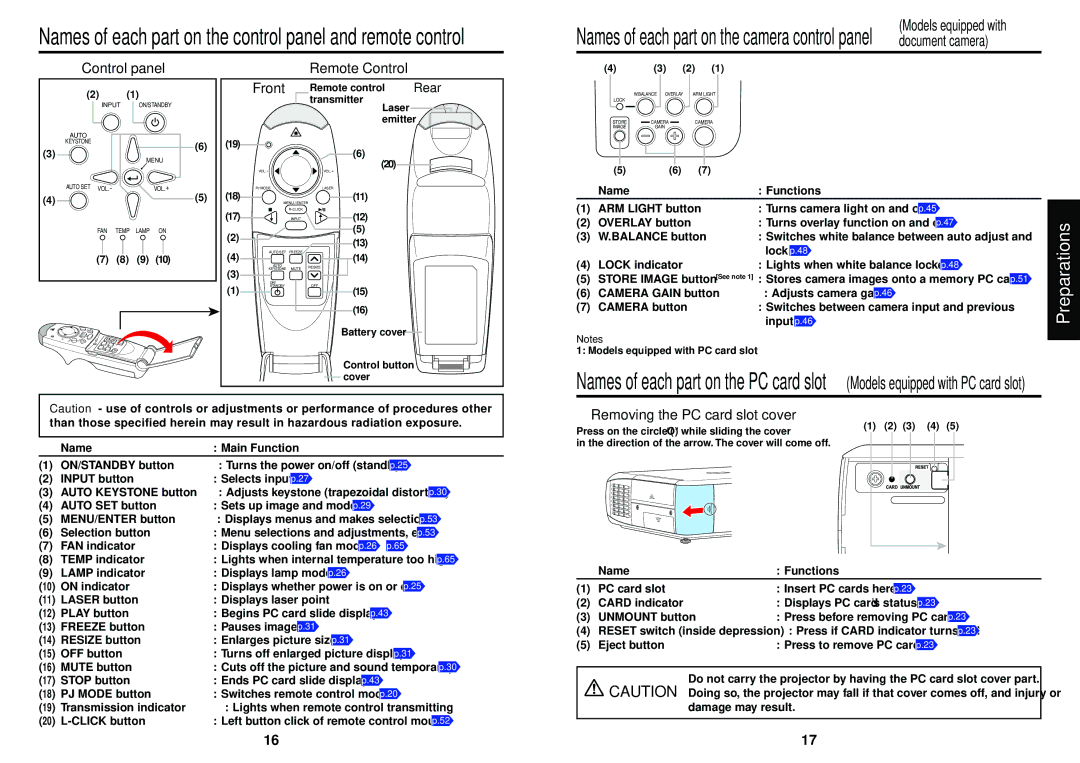
Names of each part on the control panel and remote control
(Models equipped with
Names of each part on the camera control panel document camera)
Control panel
(2)(1)
INPUT ON/STANDBY
AUTO |
| |
KEYSTONE | (6) | |
(3) | ||
MENU | ||
| ||
AUTO SET VOL.- | VOL.+ | |
(4) | (5) | |
FAN TEMP | LAMP ON |
(7) (8) (9) (10)
|
|
|
|
| LASE |
| R |
|
|
|
|
|
|
|
|
|
|
|
|
|
| |
|
|
|
|
|
|
|
| PLA | Y |
|
|
|
|
|
|
|
|
|
|
| ||
|
|
|
|
| ME | N | U |
| TER | INP UT |
|
|
|
|
|
|
|
|
|
|
|
|
|
|
|
|
| / EN | R - CLICK |
|
|
|
|
|
|
|
|
|
|
|
| ||||
VO | .- |
|
| E |
|
|
|
|
|
|
|
|
|
|
|
|
|
|
|
|
|
|
L | J M | OD | STOP |
|
|
|
|
|
|
|
|
|
|
|
|
|
| RE | SIZE |
| ||
| P |
|
|
|
|
|
|
|
|
|
|
|
|
|
| F R | EZ | E |
| OF | F | |
|
|
|
|
|
|
|
|
|
|
|
|
|
|
| ET |
|
|
| M | U |
|
|
|
|
|
|
|
|
|
|
|
|
| A | U | T | O | S |
|
| AUT | E |
| STA NDBY |
|
|
|
|
|
|
|
|
|
|
|
|
|
|
|
|
|
|
| KEYSTON |
| ON/ |
| |
Remote Control
| Front |
| Remote control | Rear |
|
|
| transmitter | Laser |
|
|
|
| |
|
|
|
| emitter |
(19) |
|
| (6) |
|
|
|
| (20) | |
| VOL.- |
| VOL.+ | |
|
|
| ||
(18) | PJ MODE |
| LASER |
|
|
| (11) |
| |
| MENU / ENTER |
| ||
(17) |
| (12) |
| |
| INPUT |
| ||
(2) |
|
| (5) |
|
|
| (13) |
| |
|
|
|
| |
(4) | AUTO SET | FREEZE | (14) |
|
|
|
| ||
| AUTO | MUTE | RESIZE |
|
(3) | KEYSTONE |
| ||
|
| |||
|
|
|
| |
| ON/ |
| OFF |
|
(1) | STANDBY |
|
| |
|
| (15) |
| |
(16)
Battery cover
(4) (3) (2) (1)
| W.BALANCE OVERLAY | ARM LIGHT |
LOCK |
|
|
STORE | CAMERA | CAMERA |
IMAGE | GAIN |
|
(5) | (6) | (7) |
| Name | : Functions |
|
(1) | ARM LIGHT button | : Turns camera light on and off p.45 | Preparations |
(2) | OVERLAY button | input p.46 | |
: Turns overlay function on and off p.47 |
| ||
(3) | W.BALANCE button | : Switches white balance between auto adjust and |
|
|
| lock p.48 |
|
(4) | LOCK indicator | : Lights when white balance locked p.48 |
|
(5) | STORE IMAGE button [See note 1] | : Stores camera images onto a memory PC card p.51 |
|
(6) | CAMERA GAIN button | : Adjusts camera gain p.46 |
|
(7) | CAMERA button | : Switches between camera input and previous |
|
Notes
1: Models equipped with PC card slot
Control button cover
Names of each part on the PC card slot
(Models equipped with PC card slot)
Caution - use of controls or adjustments or performance of procedures other than those specified herein may result in hazardous radiation exposure.
| Name | : Main Function |
(1) | ON/STANDBY button | : Turns the power on/off (standby) p.25 |
(2) | INPUT button | : Selects input p.27 |
(3) | AUTO KEYSTONE button | : Adjusts keystone (trapezoidal distortion) p.30 |
(4) | AUTO SET button | : Sets up image and mode p.29 |
(5) | MENU/ENTER button | : Displays menus and makes selections p.53 |
(6) | Selection button | : Menu selections and adjustments, etc. p.53 |
(7) | FAN indicator | : Displays cooling fan mode p.26 p.65 |
(8) | TEMP indicator | : Lights when internal temperature too high p.65 |
■Removing the PC card slot cover
Press on the circle (“O”) while sliding the cover
in the direction of the arrow. The cover will come off.
(1) (2) (3) (4) (5)
(9) LAMP indicator | : Displays lamp mode p.26 |
(10) ON indicator | : Displays whether power is on or off p.25 |
(11) LASER button | : Displays laser point |
(12) PLAY button | : Begins PC card slide display p.43 |
(13) FREEZE button | : Pauses image p.31 |
(14) RESIZE button | : Enlarges picture size p.31 |
(15) OFF button | : Turns off enlarged picture display p.31 |
(16) MUTE button | : Cuts off the picture and sound temporarily p.30 |
(17) STOP button | : Ends PC card slide display p.43 |
(18) PJ MODE button | : Switches remote control mode p.20 |
(19) Transmission indicator | : Lights when remote control transmitting |
(20) | : Left button click of remote control mouse p.52 |
| Name | : Functions |
(1) | PC card slot | : Insert PC cards here p.23 |
(2) | CARD indicator | : Displays PC card’s status p.23 |
(3) | UNMOUNT button | : Press before removing PC card p.23 |
(4) | RESET switch (inside depression) : Press if CARD indicator turns red p.23 | |
(5) | Eject button | : Press to remove PC card p.23 |
Do not carry the projector by having the PC card slot cover part. CAUTION Doing so, the projector may fall if that cover comes off, and injury or
damage may result.
16 | 17 |