Preparing and using the remote control (Continued)
■Switching operation modes
Operation modes should be switched between projector operation and computer operation.
Placement
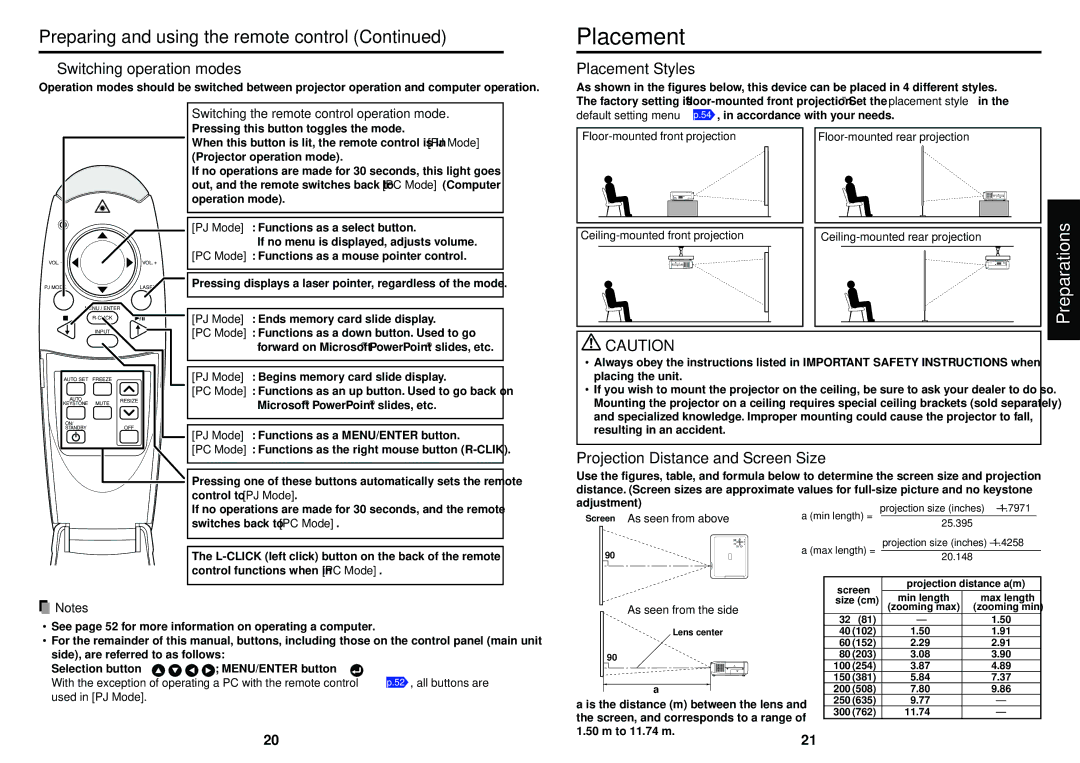
Placement Styles
As shown in the figures below, this device can be placed in 4 different styles.
Switching the remote control operation mode.
The factory setting is
VOL.- | VOL.+ |
PJ MODE | LASER |
Pressing this button toggles the mode.
When this button is lit, the remote control is in [PJ Mode] (Projector operation mode).
If no operations are made for 30 seconds, this light goes out, and the remote switches back to [PC Mode] (Computer operation mode).
[PJ Mode] : Functions as a select button.
If no menu is displayed, adjusts volume. [PC Mode] : Functions as a mouse pointer control.
Pressing displays a laser pointer, regardless of the mode.
Preparations
MENU / ENTER |
|
|
|
|
|
|
|
|
| [PJ Mode] : Ends memory card slide display. | |
|
|
|
| ||
|
| ||||
INPUT |
|
|
|
| [PC Mode] : Functions as a down button. Used to go |
|
|
|
|
| forward on Microsoft® PowerPoint® slides, etc. |
![]() CAUTION
CAUTION
AUTO SET | FREEZE |
| |
AUTO | MUTE | RESIZE | |
KEYSTONE | |||
| |||
ON/ |
| OFF | |
STANDBY |
|
[PJ Mode] : Begins memory card slide display.
[PC Mode] : Functions as an up button. Used to go back on
Microsoft® PowerPoint® slides, etc.
[PJ Mode] : Functions as a MENU/ENTER button.
[PC Mode] : Functions as the right mouse button
•Always obey the instructions listed in IMPORTANT SAFETY INSTRUCTIONS when placing the unit.
•If you wish to mount the projector on the ceiling, be sure to ask your dealer to do so. Mounting the projector on a ceiling requires special ceiling brackets (sold separately) and specialized knowledge. Improper mounting could cause the projector to fall, resulting in an accident.
Projection Distance and Screen Size
Pressing one of these buttons automatically sets the remote control to [PJ Mode].
If no operations are made for 30 seconds, and the remote
Use the figures, table, and formula below to determine the screen size and projection distance. (Screen sizes are approximate values for
switches back to [PC Mode].
The
![]() Notes
Notes
•See page 52 for more information on operating a computer.
•For the remainder of this manual, buttons, including those on the control panel (main unit
side), are referred to as follows:
Selection button ⇒ ![]()
![]()
![]()
![]() ; MENU/ENTER button ⇒
; MENU/ENTER button ⇒ ![]()
With the exception of operating a PC with the remote control p.52 , all buttons are used in [PJ Mode].
20
Screen As seen from above
90°
As seen from the side
Lens center
90°
a
a is the distance (m) between the lens and the screen, and corresponds to a range of 1.50 m to 11.74 m.
a (min length) =
a (max length) =
screen | projection distance a(m) | ||
size (cm) | min length | max length | |
|
| (zooming max) | (zooming min) |
32 | (81) | — | 1.50 |
40 | (102) | 1.50 | 1.91 |
60 | (152) | 2.29 | 2.91 |
80 | (203) | 3.08 | 3.90 |
100 | (254) | 3.87 | 4.89 |
150 | (381) | 5.84 | 7.37 |
200 | (508) | 7.80 | 9.86 |
250 | (635) | 9.77 | — |
300 | (762) | 11.74 | — |
21