Using the menus (Continued)
■The control setting menu
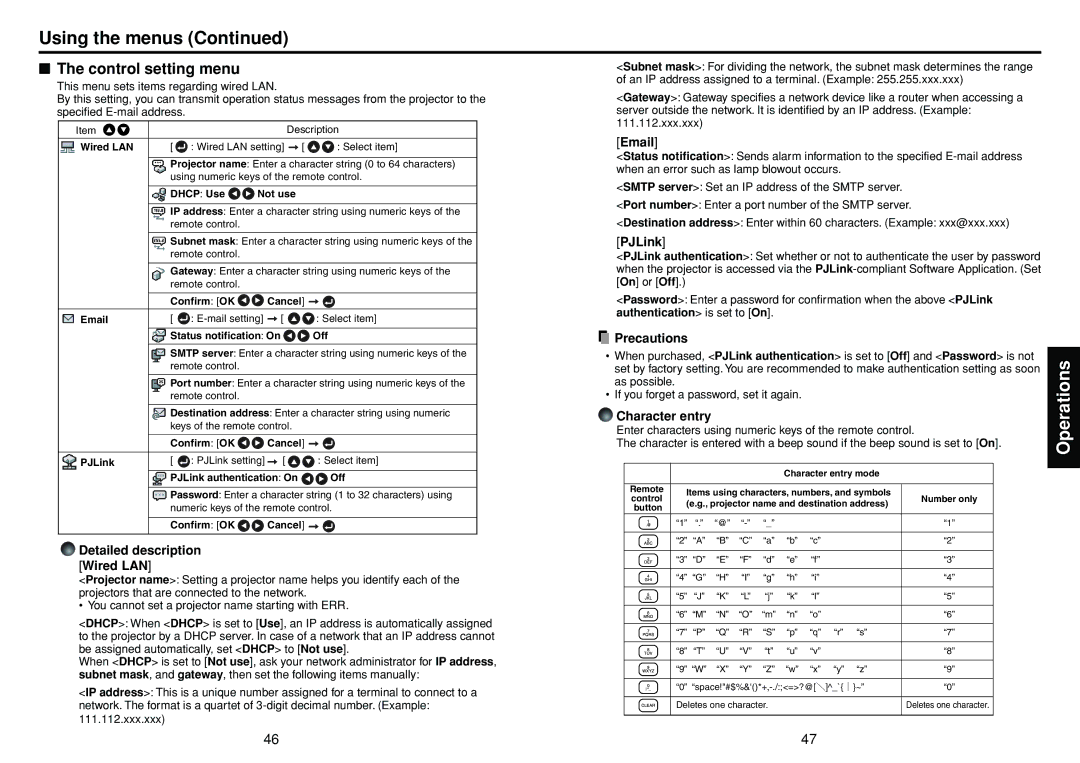
This menu sets items regarding wired LAN.
By this setting, you can transmit operation status messages from the projector to the specified
Item | Description | |
Wired LAN | [ : Wired LAN setting] [ | : Select item] |
Projector name: Enter a character string (0 to 64 characters) using numeric keys of the remote control.
 DHCP: Use
 Not use
IP address: Enter a character string using numeric keys of the remote control.
![]() Subnet mask: Enter a character string using numeric keys of the remote control.
Subnet mask: Enter a character string using numeric keys of the remote control.
Gateway: Enter a character string using numeric keys of the remote control.
Confirm: [OK ![]()
![]() Cancel]
Cancel] ![]()
![]()
[ | : | [ | : Select item] |
 Status notification: On
 Off
Off
SMTP server: Enter a character string using numeric keys of the remote control.
Port number: Enter a character string using numeric keys of the remote control.
![]() Destination address: Enter a character string using numeric keys of the remote control.
Destination address: Enter a character string using numeric keys of the remote control.
Confirm: [OK ![]()
![]() Cancel]
Cancel] ![]()
![]()
PJLink | [ | : PJLink setting] | [ | : Select item] |
 PJLink authentication: On
 Off
Off
![]() Password: Enter a character string (1 to 32 characters) using numeric keys of the remote control.
Password: Enter a character string (1 to 32 characters) using numeric keys of the remote control.
Confirm: [OK ![]()
![]() Cancel]
Cancel] ![]()
![]()
Detailed description [Wired LAN]
<Projector name>: Setting a projector name helps you identify each of the projectors that are connected to the network.
• You cannot set a projector name starting with ERR.
<DHCP>: When <DHCP> is set to [Use], an IP address is automatically assigned to the projector by a DHCP server. In case of a network that an IP address cannot be assigned automatically, set <DHCP> to [Not use].
When <DHCP> is set to [Not use], ask your network administrator for IP address, subnet mask, and gateway, then set the following items manually:
<IP address>: This is a unique number assigned for a terminal to connect to a network. The format is a quartet of
<Subnet mask>: For dividing the network, the subnet mask determines the range
of an IP address assigned to a terminal. (Example: 255.255.xxx.xxx)
<Gateway>: Gateway specifies a network device like a router when accessing a server outside the network. It is identified by an IP address. (Example: 111.112.xxx.xxx)
[Email]
<Status notification>: Sends alarm information to the specified
<SMTP server>: Set an IP address of the SMTP server.
<Port number>: Enter a port number of the SMTP server.
<Destination address>: Enter within 60 characters. (Example: xxx@xxx.xxx)
[PJLink]
<PJLink authentication>: Set whether or not to authenticate the user by password when the projector is accessed via the
<Password>: Enter a password for confirmation when the above <PJLink authentication> is set to [On].
 Precautions
•When purchased, <PJLink authentication> is set to [Off] and <Password> is not set by factory setting. You are recommended to make authentication setting as soon as possible.
•If you forget a password, set it again.
Character entry
Enter characters using numeric keys of the remote control.
The character is entered with a beep sound if the beep sound is set to [On].
|
|
|
|
|
| Character entry mode |
| ||
|
|
|
|
|
|
|
|
| |
Remote | Items using characters, numbers, and symbols |
| |||||||
control | Number only | ||||||||
(e.g., projector name and destination address) | |||||||||
button |
| ||||||||
|
|
|
|
|
|
|
| ||
| “1” | “.” | “@” | “_” |
|
| “1” | ||
|
|
|
|
|
|
|
|
| |
| “2” | “A” | “B” | “C” | “a” | “b” | “c” | “2” | |
|
|
|
|
|
|
|
|
| |
| “3” | “D” | “E” | “F” | “d” | “e” | “f” | “3” | |
|
|
|
|
|
|
|
|
| |
| “4” | “G” | “H” | “I” | “g” | “h” | “i” | “4” | |
|
|
|
|
|
|
|
|
| |
| “5” | “J” | “K” | “L” | “j” | “k” | “l” | “5” | |
|
|
|
|
|
|
|
|
| |
| “6” | “M” | “N” | “O” | “m” | “n” | “o” | “6” | |
|
|
|
|
|
|
|
|
| |
| “7” | “P” | “Q” | “R” | “S” | “p” | “q” “r” “s” | “7” | |
|
|
|
|
|
|
|
|
| |
| “8” | “T” | “U” | “V” | “t” | “u” | “v” | “8” | |
|
|
|
|
|
|
| |||
| “9” | “W” | “X” | “Y” | “Z” “w” “x” “y” “z” | “9” | |||
|
|
| |||||||
| “0” | “0” | |||||||
|
|
|
|
| |||||
| Deletes one character. |
|
| Deletes one character. | |||||
|
|
|
|
|
|
|
|
| |
Operations
46 | 47 |