Setting up the wireless LAN (Continued)
■Setting Wireless Utility
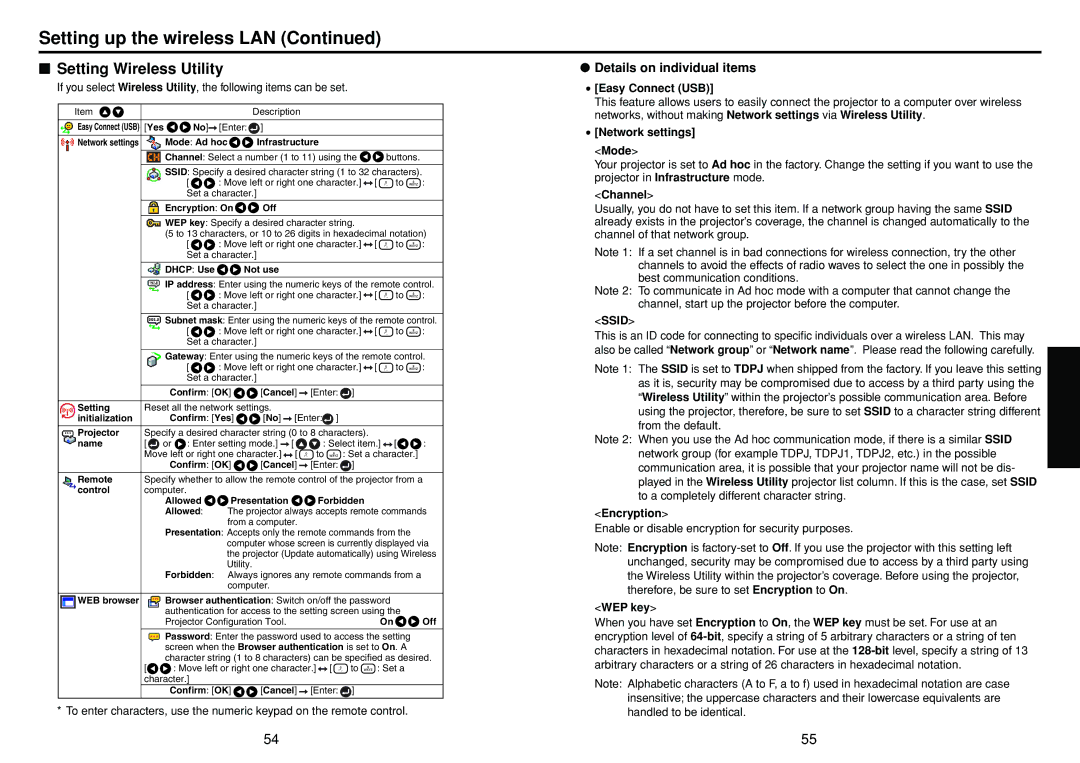
If you select Wireless Utility, the following items can be set.
Item |
|
| Description |
|
|
|
|
| ||
Easy Connect (USB) | [Yes | No] | [Enter: | ] |
|
|
|
|
|
|
|
|
|
|
|
|
| ||||
Network settings | Mode: Ad hoc | Infrastructure |
|
|
|
| ||||
|
|
|
| |||||||
| Channel: Select a number (1 to 11) using the | buttons. |
| |||||||
|
|
| ||||||||
| SSID: Specify a desired character string (1 to 32 characters). |
| ||||||||
|
| [ | : Move left or right one character.] | [ | to | : | ||||
|
| Set a character.] |
|
|
|
|
|
|
| |
| Encryption: On | Off |
|
|
|
|
|
| ||
|
|
|
|
| ||||||
| WEP key: Specify a desired character string. |
|
|
| ||||||
| (5 to 13 characters, or 10 to 26 digits in hexadecimal notation) | |||||||||
|
| [ | : Move left or right one character.] | [ | to | : | ||||
|
| Set a character.] |
|
|
|
|
|
|
| |
|
|
|
|
|
|
|
|
| ||
| DHCP: Use | Not use |
|
|
|
|
|
| ||
|
| |||||||||
| IP address: Enter using the numeric keys of the remote control. | |||||||||
|
| [ | : Move left or right one character.] | [ | to | : | ||||
|
| Set a character.] |
|
|
|
|
|
|
| |
|
| |||||||||
| Subnet mask: Enter using the numeric keys of the remote control. | |||||||||
|
| [ | : Move left or right one character.] | [ | to | : | ||||
|
| Set a character.] |
|
|
|
|
|
|
| |
|
| |||||||||
| Gateway: Enter using the numeric keys of the remote control. | |||||||||
|
| [ | : Move left or right one character.] | [ | to | : | ||||
|
| Set a character.] |
|
|
|
|
|
|
| |
|
|
|
|
|
| |||||
| Confirm: [OK] | [Cancel] [Enter: ] |
|
|
| |||||
|
|
|
|
|
|
|
| |||
Setting | Reset all the network settings. |
|
|
|
|
|
| |||
initialization | Confirm: [Yes] | [No] [Enter: ] |
|
|
|
| ||||
|
|
|
|
| ||||||
Projector | Specify a desired character string (0 to 8 characters). |
|
|
| ||||||
name | [ or | : Enter setting mode.] | [ | : Select item.] | [ | : | ||||
| Move left or right one character.] | [ | to | : Set a character.] |
| |||||
| Confirm: [OK] | [Cancel] [Enter: ] |
|
|
| |||||
|
| |||||||||
Remote | Specify whether to allow the remote control of the projector from a | |||||||||
control | computer. |
|
|
|
|
|
|
|
|
|
| Allowed | Presentation |
| Forbidden |
|
|
| |||
| Allowed: | The projector always accepts remote commands | ||||||||
|
|
| from a computer. |
|
|
|
|
| ||
| Presentation: Accepts only the remote commands from the |
| ||||||||
|
|
| computer whose screen is currently displayed via | |||||||
|
|
| the projector (Update automatically) using Wireless | |||||||
| Forbidden: | Utility. |
|
|
|
|
|
|
| |
| Always ignores any remote commands from a |
| ||||||||
|
|
| computer. |
|
|
|
|
|
| |
|
|
|
| |||||||
WEB browser | Browser authentication: Switch on/off the password |
|
| |||||||
| authentication for access to the setting screen using the |
| ||||||||
| Projector Configuration Tool. |
|
|
| On |
| Off | |||
![]() Password: Enter the password used to access the setting screen when the Browser authentication is set to On. A character string (1 to 8 characters) can be specified as desired.
Password: Enter the password used to access the setting screen when the Browser authentication is set to On. A character string (1 to 8 characters) can be specified as desired.
[![]()
![]() : Move left or right one character.]
: Move left or right one character.]![]() [
[![]() to
to ![]() : Set a character.]
: Set a character.]
Confirm: [OK] ![]()
![]() [Cancel]
[Cancel] ![]() [Enter:
[Enter: ![]() ]
]
* To enter characters, use the numeric keypad on the remote control.
●Details on individual items
•[Easy Connect (USB)]
This feature allows users to easily connect the projector to a computer over wireless networks, without making Network settings via Wireless Utility.
•[Network settings]
<Mode>
Your projector is set to Ad hoc in the factory. Change the setting if you want to use the projector in Infrastructure mode.
<Channel>
Usually, you do not have to set this item. If a network group having the same SSID already exists in the projector’s coverage, the channel is changed automatically to the channel of that network group.
Note 1: If a set channel is in bad connections for wireless connection, try the other channels to avoid the effects of radio waves to select the one in possibly the best communication conditions.
Note 2: To communicate in Ad hoc mode with a computer that cannot change the channel, start up the projector before the computer.
<SSID>
This is an ID code for connecting to specific individuals over a wireless LAN. This may also be called “Network group” or “Network name”. Please read the following carefully.
Note 1: The SSID is set to TDPJ when shipped from the factory. If you leave this setting as it is, security may be compromised due to access by a third party using the “Wireless Utility” within the projector’s possible communication area. Before using the projector, therefore, be sure to set SSID to a character string different from the default.
Note 2: When you use the Ad hoc communication mode, if there is a similar SSID network group (for example TDPJ, TDPJ1, TDPJ2, etc.) in the possible communication area, it is possible that your projector name will not be dis- played in the Wireless Utility projector list column. If this is the case, set SSID to a completely different character string.
<Encryption>
Enable or disable encryption for security purposes.
Note: Encryption is
<WEP key>
When you have set Encryption to On, the WEP key must be set. For use at an encryption level of
Note: Alphabetic characters (A to F, a to f) used in hexadecimal notation are case insensitive; the uppercase characters and their lowercase equivalents are handled to be identical.
Operations
54 | 55 |