Traulsen R & A Series III. INSTALLATION continued, III. c - INSTALLING LEGS OR CASTERS cont’d

Models: R & A Series

1 28
Download 28 pages 1.89 Kb
Page 4
Image 4
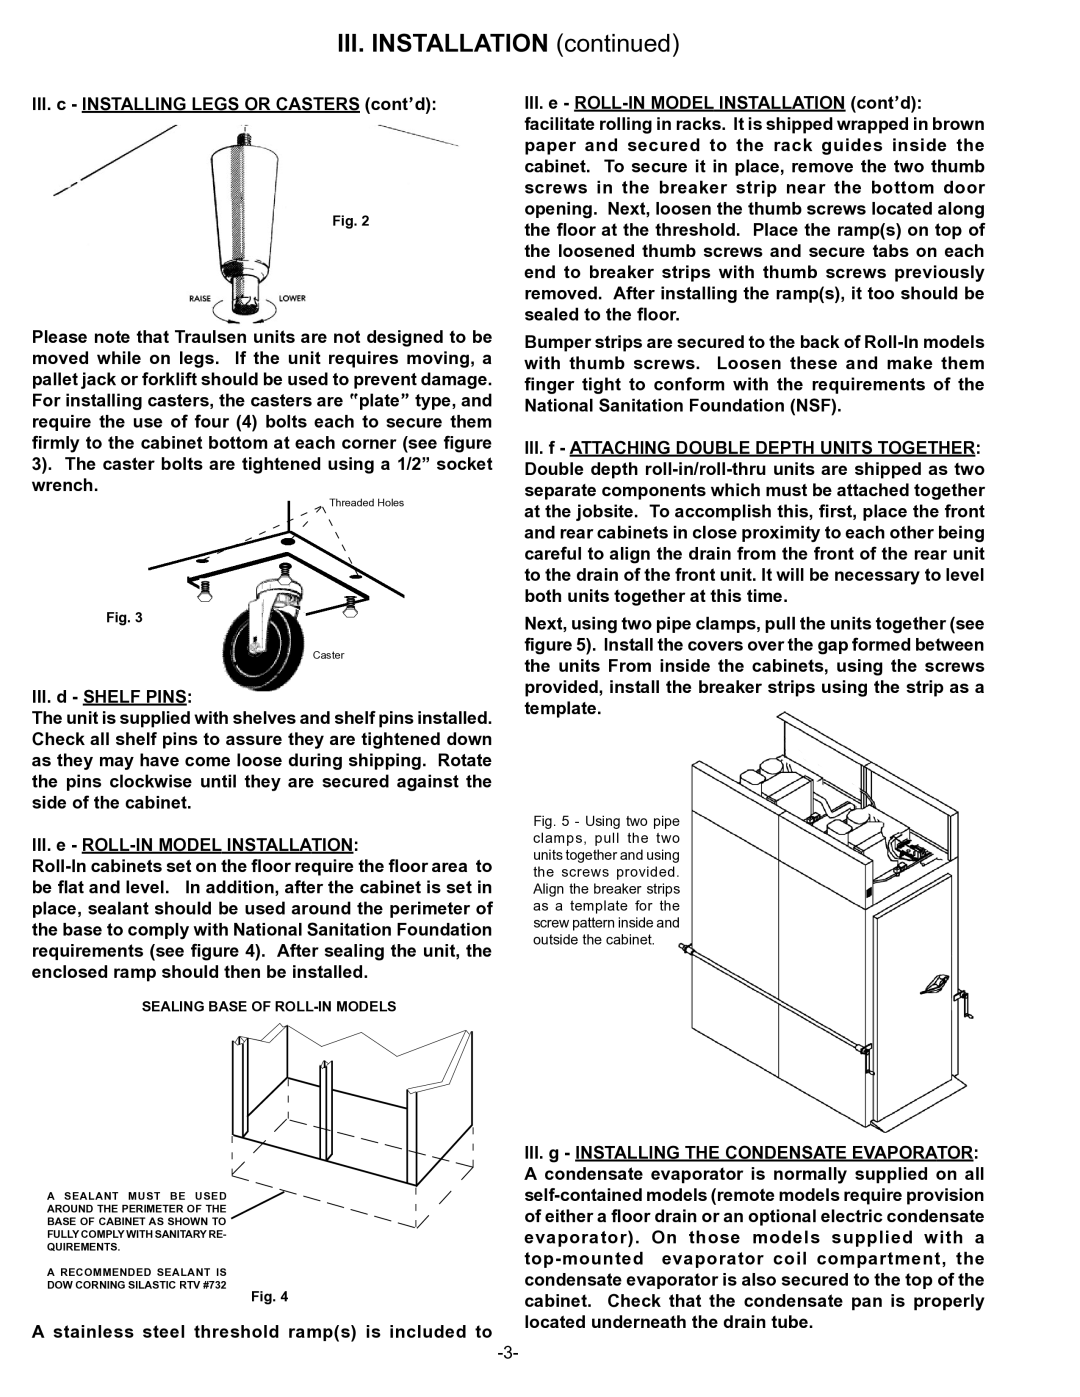
III.c - INSTALLING LEGS OR CASTERS (cont’d):

III. INSTALLATION (continued)

III.c - INSTALLING LEGS OR CASTERS (contd):

Fig. 2

Please note that Traulsen units are not designed to be moved while on legs. If the unit requires moving, a pallet jack or forklift should be used to prevent damage. For installing casters, the casters are platetype, and require the use of four (4) bolts each to secure them firmly to the cabinet bottom at each corner (see figure 3). The caster bolts are tightened using a 1/2” socket wrench.

Threaded Holes

Fig. 3

Caster

III.d - SHELF PINS:

The unit is supplied with shelves and shelf pins installed. Check all shelf pins to assure they are tightened down as they may have come loose during shipping. Rotate the pins clockwise until they are secured against the side of the cabinet.

III.e - ROLL-IN MODEL INSTALLATION:

Roll-In cabinets set on the floor require the floor area to be flat and level. In addition, after the cabinet is set in place, sealant should be used around the perimeter of the base to comply with National Sanitation Foundation requirements (see figure 4). After sealing the unit, the enclosed ramp should then be installed.

III.e - ROLL-IN MODEL INSTALLATION (contd): facilitate rolling in racks. It is shipped wrapped in brown paper and secured to the rack guides inside the cabinet. To secure it in place, remove the two thumb screws in the breaker strip near the bottom door opening. Next, loosen the thumb screws located along the floor at the threshold. Place the ramp(s) on top of the loosened thumb screws and secure tabs on each end to breaker strips with thumb screws previously removed. After installing the ramp(s), it too should be sealed to the floor.

Bumper strips are secured to the back of Roll-In models with thumb screws. Loosen these and make them finger tight to conform with the requirements of the National Sanitation Foundation (NSF).

III.f - ATTACHING DOUBLE DEPTH UNITS TOGETHER: Double depth roll-in/roll-thru units are shipped as two separate components which must be attached together at the jobsite. To accomplish this, first, place the front and rear cabinets in close proximity to each other being careful to align the drain from the front of the rear unit to the drain of the front unit. It will be necessary to level both units together at this time.

Next, using two pipe clamps, pull the units together (see figure 5). Install the covers over the gap formed between the units From inside the cabinets, using the screws provided, install the breaker strips using the strip as a template.

Fig. 5 - Using two pipe clamps, pull the two units together and using the screws provided. Align the breaker strips as a template for the screw pattern inside and outside the cabinet.

SEALING BASE OF ROLL-IN MODELS

A SEALANT MUST BE USED

AROUND THE PERIMETER OF THE

BASE OF CABINET AS SHOWN TO

FULLY COMPLY WITH SANITARY RE-

QUIREMENTS.

A RECOMMENDED SEALANT IS

DOW CORNING SILASTIC RTV #732

Fig. 4

A stainless steel threshold ramp(s) is included to

-3-

III.g - INSTALLING THE CONDENSATE EVAPORATOR: A condensate evaporator is normally supplied on all self-contained models (remote models require provision of either a floor drain or an optional electric condensate evaporator). On those models supplied with a top-mounted evaporator coil compartment, the condensate evaporator is also secured to the top of the cabinet. Check that the condensate pan is properly located underneath the drain tube.

Page 4
Image 4
Traulsen R & A Series owner manual III. INSTALLATION continued, III. c - INSTALLING LEGS OR CASTERS cont’d