O W N E R ' S M A N U A L • R 7 8 O
O W N E R ' S M A N U A L R 7 8 O
R E M A R K S A N D WA R N I N G S
Please read this Owner's Manual through carefully before assembling, using or servicing the rowing ergometer. Follow the instructions in this manual carefully.
Please notice that the warranty does not cover damage due to negligence of adjustment or maintenance instructions described in this manual.
NOTE ABOUT THE EQUIPMENT
•The magnet caliper in the magnetic brake generates a strong magnetic field. Items such as the mechanism of a wrist watch or the magnetic strip of a credit card may be damaged if taken too close to the magnetic field. Never try to loosen or remove the magnet caliper of the magnetic brake.
NOTE ABOUT YOUR HEALTH
•Before beginning any exercise program, consult a physician to check your state of health.
•If you experience nausea, dizziness or
other abnormal symptoms during exercise, stop immediately and consult a doctor.
•To avoid sore muscles, stretch and do warming up and cooling down exercises.
•Make sure the exercising environment has adequate ventilation. To avoid catching cold, do not exercise in a draughty place.
NOTE ABOUT USING THE EQUIPMENT
•Parents and others responsible for children should note that children's natural playfulness and curiosity may lead to situations and behaviour for which the rowing ergometer is not designed. If children are allowed to use the rowing ergometer, they should be supervised and taught to use the cycle properly, keeping in mind the child's physical and mental development and their personality. The ergometer is not a toy.
•Place the device on a firm, level surface. It is advised to place the device on a protective base.
•Only one person may use the rowing ergometer at a time.
•Wear appropriate clothing and footwear when exercising.
•Never put your hands near moving parts.
•Never release your grip of the drawbar during the rowing stroke.
•Do not attempt to carry out any other adjustment or servicing operations than those described in this manual. If problems arise with the rowing ergometer, stop exercising and consult an authorised Tunturi representative.
•The rowing ergometer is not recommended for use by persons weighing more than 120 kg.
A S S E M B LY
The parts of the R 780 rowing ergometer are packed in two separate packages. Unpack all the parts and assemble the device as follows (right, left, front and rear are as seen from the exercising position).
REAR SUPPORT LEG
Push the rear support leg onto the rail from the front end of the rail so that the heads of the two securing screws in the support leg fit into
the bottom groove of the rail.
NOTE! When fitting the leg to the rear end of the rail, make sure that the rubber seat stopper is at the front!
The rubber stopper prevents the moving seat from hitting the support leg. Once the leg is in place at the rear end of the rail, tighten the two securing screws in the support with a 13 mm ring spanner.
SEAT
Push the seat onto the rail from the front end of the rail. Make sure that the front part of the seat is in the front.
FOOTRESTS
Push the front rubber stopper into the bottom groove of the rail from the front end of the rail. The front rubber stopper prevents the moving seat from hitting the footrests.
Loosen the screw between the footrests as well as the threaded plates on the sides. Push the footrests into place at the front end of the rail so that the screw head between the footrests fits into the bottom groove of the rail and the threaded plates fit into the side grooves of the rail.
RAIL
Connect the pulse receiver lead coming from the front end of the rail to the lead coming from the hole in the front of the ergometer frame.
Push the rail into place on the frame so that the thin metal strip on the frame fits into the groove in the rail bottom. Push the rail until it reaches the stopper at the end of the strip.
NOTE! Be careful not to catch the sensor lead! Tighten the two allen screws on the bottom
of the frame with an allen key, and secure the fastening by locking the two nuts on the allen screws with a ring spanner.
Once the rail has been attached to the frame fasten the footrest by tightening the nut of the bottom screw first before the threaded plates on the sides. Tighten the front rubber stopper. Check the position of the footrests.
G B
O W N E R ' S M A N U A L • R 7 8 O
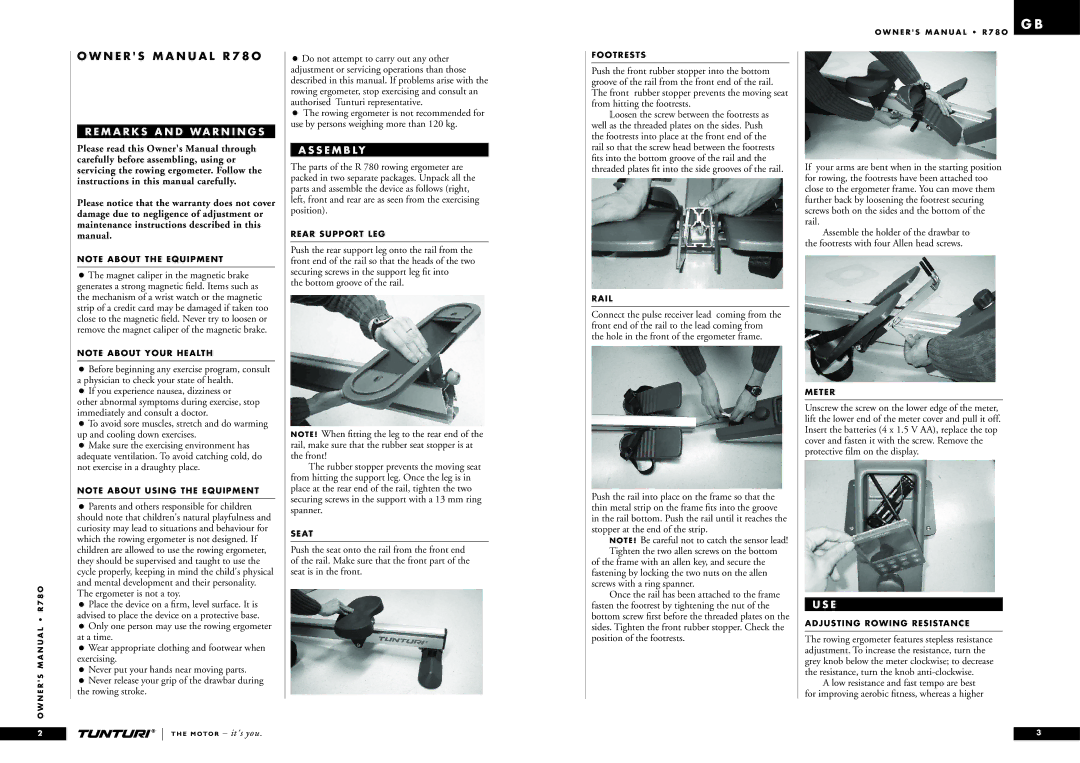
If your arms are bent when in the starting position for rowing, the footrests have been attached too close to the ergometer frame. You can move them further back by loosening the footrest securing screws both on the sides and the bottom of the rail.
Assemble the holder of the drawbar to the footrests with four Allen head screws.
METER
Unscrew the screw on the lower edge of the meter, lift the lower end of the meter cover and pull it off. Insert the batteries (4 x 1.5 V AA), replace the top cover and fasten it with the screw. Remove the protective film on the display.
U S E
ADJUSTING ROWING RESISTANCE
The rowing ergometer features stepless resistance adjustment. To increase the resistance, turn the grey knob below the meter clockwise; to decrease the resistance, turn the knob
A low resistance and fast tempo are best for improving aerobic fitness, whereas a higher
2
3