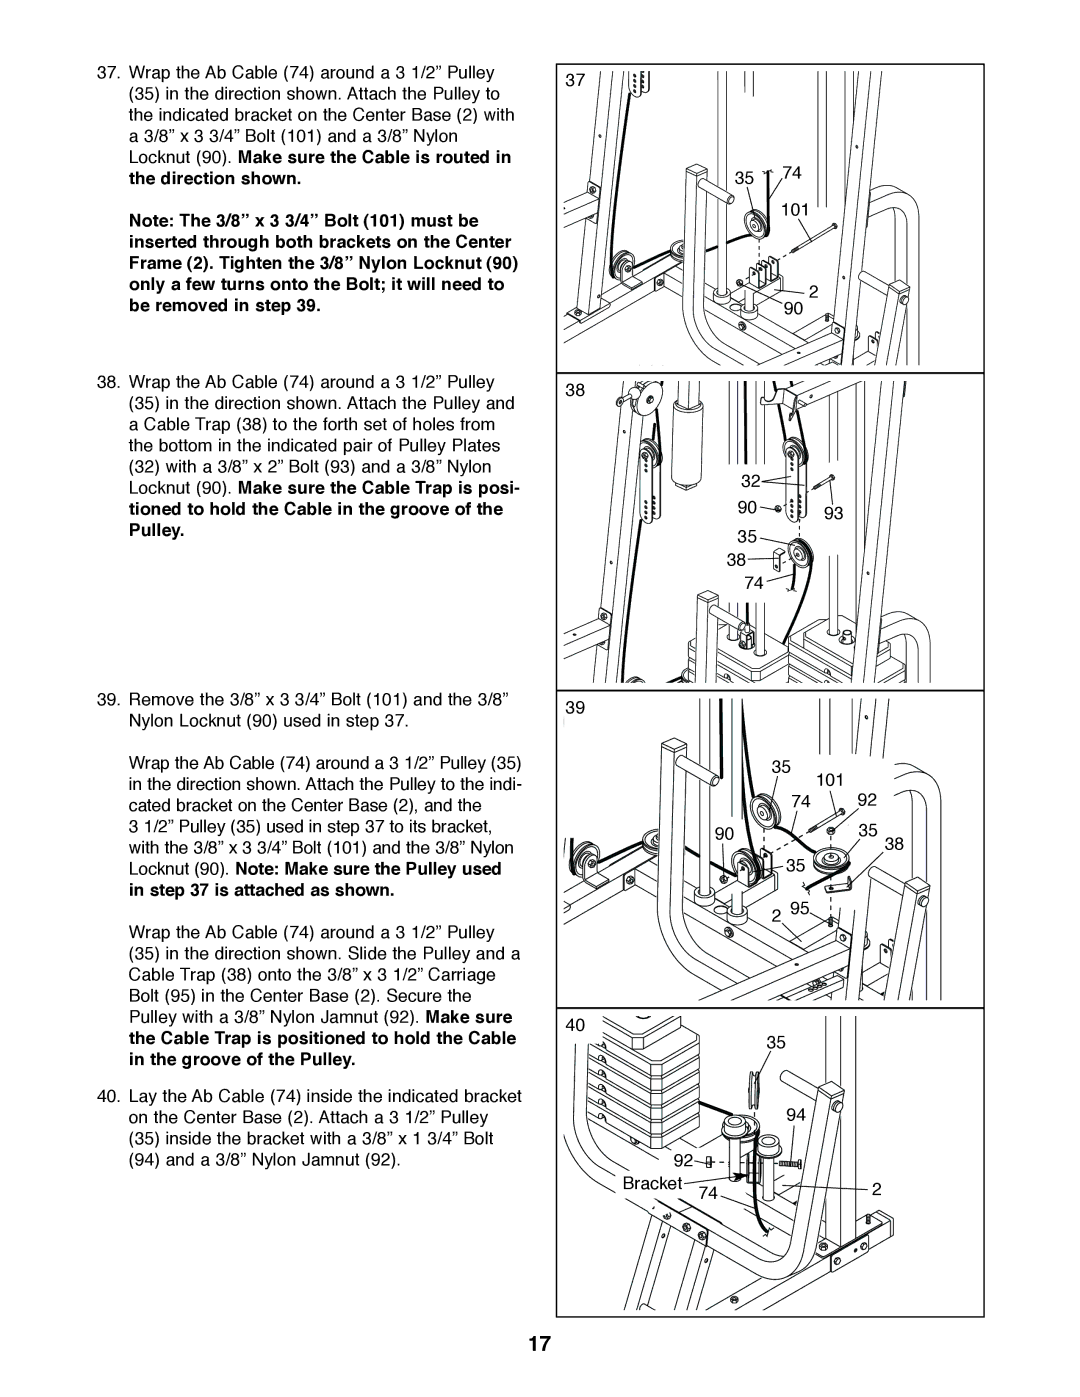
37. Wrap the Ab Cable (74) around a 3 1/2” Pulley | 37 |
|
|
|
(35) in the direction shown. Attach the Pulley to |
|
|
| |
|
|
|
| |
the indicated bracket on the Center Base (2) with |
|
|
|
|
a 3/8” x 3 3/4” Bolt (101) and a 3/8” Nylon |
|
|
|
|
Locknut (90). Make sure the Cable is routed in |
|
| 74 |
|
the direction shown. |
| 35 |
| |
Note: The 3/8” x 3 3/4” Bolt (101) must be |
|
| 101 |
|
|
|
|
| |
inserted through both brackets on the Center |
|
|
|
|
Frame (2). Tighten the 3/8” Nylon Locknut (90) |
|
|
|
|
only a few turns onto the Bolt; it will need to |
|
| 2 |
|
be removed in step 39. |
|
|
| |
|
| 90 |
| |
38. Wrap the Ab Cable (74) around a 3 1/2” Pulley | 38 |
|
|
|
(35) in the direction shown. Attach the Pulley and |
|
|
| |
|
|
|
| |
a Cable Trap (38) to the forth set of holes from |
|
|
|
|
the bottom in the indicated pair of Pulley Plates |
|
|
|
|
(32) with a 3/8” x 2” Bolt (93) and a 3/8” Nylon |
| 32 |
|
|
Locknut (90). Make sure the Cable Trap is posi- |
|
|
| |
| 90 |
|
| |
tioned to hold the Cable in the groove of the |
| 93 |
| |
Pulley. |
| 35 |
|
|
|
|
|
| |
|
| 38 |
|
|
|
| 74 |
|
|
39. Remove the 3/8” x 3 3/4” Bolt (101) and the 3/8” | 39 |
|
|
|
Nylon Locknut (90) used in step 37. |
|
|
| |
|
|
|
| |
Wrap the Ab Cable (74) around a 3 1/2” Pulley (35) |
|
| 35 |
|
in the direction shown. Attach the Pulley to the indi- |
|
| 101 | 92 |
cated bracket on the Center Base (2), and the |
|
| 74 | |
3 1/2” Pulley (35) used in step 37 to its bracket, |
| 90 |
| 35 |
with the 3/8” x 3 3/4” Bolt (101) and the 3/8” Nylon |
|
| 35 | 38 |
Locknut (90). Note: Make sure the Pulley used |
|
|
| |
in step 37 is attached as shown. |
|
| 2 95 |
|
Wrap the Ab Cable (74) around a 3 1/2” Pulley |
|
|
| |
|
|
|
| |
(35) in the direction shown. Slide the Pulley and a |
|
|
|
|
Cable Trap (38) onto the 3/8” x 3 1/2” Carriage |
|
|
|
|
Bolt (95) in the Center Base (2). Secure the |
|
|
|
|
Pulley with a 3/8” Nylon Jamnut (92). Make sure | 40 |
|
|
|
the Cable Trap is positioned to hold the Cable |
| 35 |
| |
|
|
| ||
in the groove of the Pulley. |
|
|
|
|
40. Lay the Ab Cable (74) inside the indicated bracket |
|
| 94 |
|
on the Center Base (2). Attach a 3 1/2” Pulley |
|
|
| |
(35) inside the bracket with a 3/8” x 1 3/4” Bolt |
|
|
|
|
(94) and a 3/8” Nylon Jamnut (92). | 92 |
|
|
|
| Bracket | 74 |
| 2 |
| 17 |
|
|
|