Installer Quick Setup Guide
Quick Setup Guide
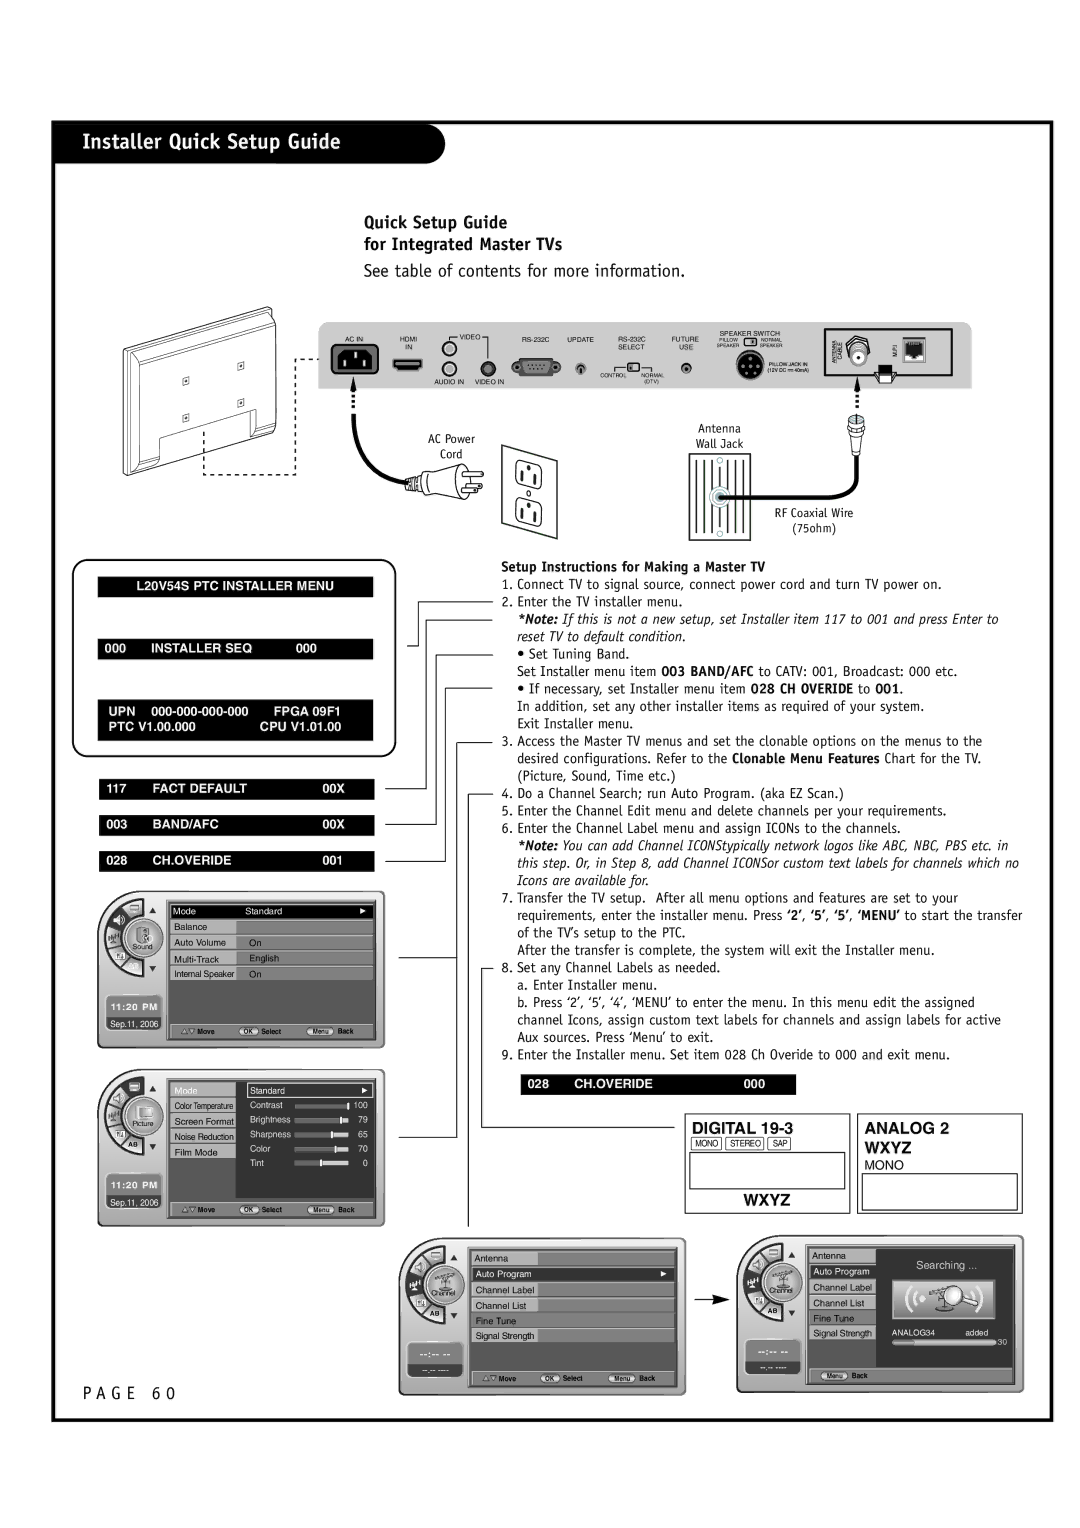
for Integrated Master TVs
See table of contents for more information.
AC IN
L20V54S PTC INSTALLER MENU
000 | INSTALLER SEQ | 000 |
|
| |
UPN | FPGA 09F1 | |
PTC V1.00.000 | CPU V1.01.00 | |
|
|
|
|
|
|
117 | FACT DEFAULT | 00X |
|
|
|
003 | BAND/AFC | 00X |
|
|
|
028 | CH.OVERIDE | 001 |
|
|
|
HDMI | VIDEO | UPDATE | FUTURE | SPEAKER SWITCH | |||||
PILLOW | NORMAL | ||||||||
IN |
|
|
|
| SELECT | USE | SPEAKER | SPEAKER | |
|
|
|
|
|
| ||||
| AUDIO IN | VIDEO IN |
|
| CONTROL | NORMAL |
|
|
|
|
|
|
| (DTV) |
|
|
| ||
Antenna
AC PowerWall Jack
Cord
RF Coaxial Wire
(75ohm)
Setup Instructions for Making a Master TV
1.Connect TV to signal source, connect power cord and turn TV power on.
2.Enter the TV installer menu.
*Note: If this is not a new setup, set Installer item 117 to 001 and press Enter to reset TV to default condition.
• Set Tuning Band.
Set Installer menu item 003 BAND/AFC to CATV: 001, Broadcast: 000 etc.
• If necessary, set Installer menu item 028 CH OVERIDE to 001.
In addition, set any other installer items as required of your system. Exit Installer menu.
3.Access the Master TV menus and set the clonable options on the menus to the desired configurations. Refer to the Clonable Menu Features Chart for the TV. (Picture, Sound, Time etc.)
4. Do a Channel Search; run Auto Program. (aka EZ Scan.)
5. | Enter the Channel Edit menu and delete channels per your requirements. |
6. | Enter the Channel Label menu and assign ICONs to the channels. |
| *Note: You can add Channel ICONStypically network logos like ABC, NBC, PBS etc. in |
| this step. Or, in Step 8, add Channel ICONSor custom text labels for channels which no |
| Icons are available for. |
7. | Transfer the TV setup. After all menu options and features are set to your |
Sound
11:20 PM
Sep.11, 2006
Mode | Standard | G |
|
|
|
Balance |
|
|
|
|
|
Auto Volume | On |
|
|
|
|
English |
| |
|
|
|
Internal Speaker | On |
|
|
|
|
Move | OK Select | Menu Back |
|
|
|
| requirements, enter the installer menu. Press ‘2’, ‘5’, ‘5’, ‘MENU’ to start the transfer |
| of the TV’s setup to the PTC. |
| After the transfer is complete, the system will exit the Installer menu. |
8. | Set any Channel Labels as needed. |
| a. Enter Installer menu. |
| b. Press ‘2’, ‘5’, ‘4’, ‘MENU’ to enter the menu. In this menu edit the assigned |
| channel Icons, assign custom text labels for channels and assign labels for active |
| Aux sources. Press ‘Menu’ to exit. |
9. | Enter the Installer menu. Set item 028 Ch Overide to 000 and exit menu. |
Mode | Standard |
| G |
|
|
|
|
Color Temperature | Contrast |
| 100 |
| |||
| Brightness | 79 | |
Screen Format | |||
028 | CH.OVERIDE | 000 |
|
|
|
Picture |
|
|
Noise Reduction | Sharpness | 65 |
|
| |
Film Mode | Color | 70 |
|
| |
| Tint | 0 |
11:20 PM |
|
|
Sep.11, 2006 | OK Select | Menu Back |
Move |
P A G E 6 0
Channel
Antenna
Auto Program |
| G |
| ||
|
|
|
Channel Label |
|
|
|
|
|
Channel List |
|
|
|
|
|
Fine Tune |
|
|
|
|
|
Signal Strength |
|
|
|
|
|
Move | OK Select | Menu Back |
|
|
|
DIGITAL | ANALOG 2 |
|
MONO STEREO SAP | WXYZ |
|
|
| |
| MONO |
|
WXYZ |
|
|
| Antenna |
|
| Searching ... | |
| Auto Program |
|
Channel | Channel Label |
|
| Channel List |
|
| Fine Tune |
|
| Signal Strength ANALOG34 | added |
| 30 | |
|
| |
Menu Back |
| |
|
| |