Hitachi HOME-1 user manual Setting Up, Arrangement

Page 7

Setting Up

Arrangement

WARNING • Install the projector in a suitable environment according to instructions of the “User’s Manual – Safety Guide” and this manual.

The power outlet should be close to the projector and easily accessible.

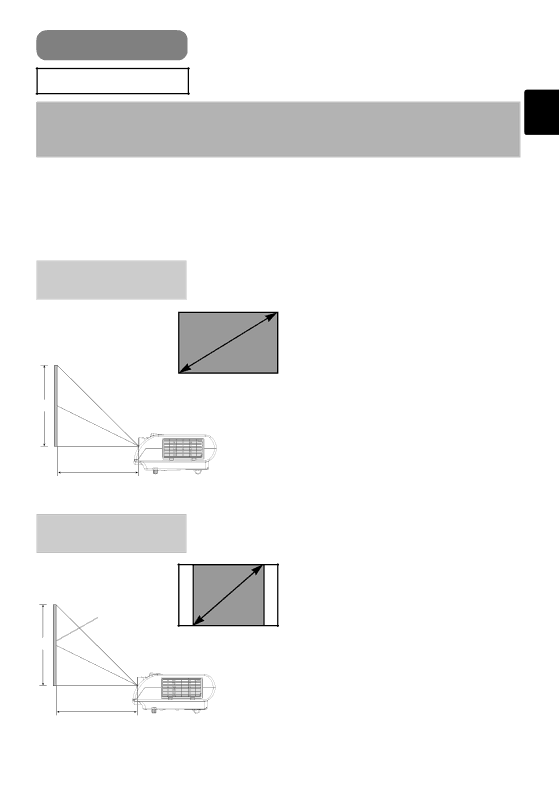
Refer to the illustrations and tables below to determine the screen size and projection distance.

The values shown in the table are calculated for a full size screen:854×480 (a):Distance from the projector to the screen (±10%)

(b):Distance from the lens center to the top of the screen (±10%)

Reference for

the 16:9 aspect ratio

Screen size

Screen

(b)

(a)

Screen Size [type (m)]

(a) [type (m)]

(b)


Min.

Max.

[type (cm)]

30 (0.8)

29(0.7)

60(1.5)

15(37)


40 (1.0)

40(1.0)

81(2.1)

20(50)


50 (1.3)

50(1.3)

102(2.6)

25(62)


60 (1.5)

60(1.5)

122(3.1)

29(75)


70 (1.8)

71(1.8)

143(3.6)

34(87)


80 (2.0)

81(2.1)

163(4.2)

39(100)


90 (2.3)

91(2.3)

184(4.7)

44(112)


100 (2.5)

101(2.6)

205(5.2)

49(125)


120 (3.0)

122(3.1)

246(6.2)

59(149)


150 (3.8)

153(3.9)

308(7.8)

74(187)


200 (5.1)

204(5.2)

411(10.4)

98(249)


250 (6.4)

256(6.5)

513(13.0)

123(311)


300 (7.6)

307(7.8)

616(15.7)

147(374)


Side View

Reference for

the 4:3 aspect ratio

Screen size

Screen

(b)

(a)

Side View

Screen Size [type (m)]

(a) [type (m)]

(b)


Min.

Max.

[type (cm)]

30 (0.8)

36(0.9)

74(1.9)

18(46)


40 (1.0)

49(1.2)

99(2.5)

24(61)


50 (1.3)

62(1.6)

125(3.2)

30(76)


60 (1.5)

74(1.9)

150(3.8)

36(91)


70 (1.8)

87(2.2)

175(4.4)

42(107)


80 (2.0)

99(2.5)

200(5.1)

48(122)


90 (2.3)

112(2.8)

225(5.7)

54(137)


100 (2.5)

124(3.2)

251(6.4)

60(152)


120 (3.0)

150(3.8)

301(7.6)

72(183)


150 (3.8)

187(4.8)

377(9.6)

90(229)


200 (5.1)

250(6.4)

503(12.8)

120(305)


250 (6.4)

313(8.0)

629(16.0)

150(381)


300 (7.6)

376(9.5)

755(19.2)

180(457)


7

Image 7
Contents Projector HOME-1Preparation Projector FeaturesContents Projector Part NamesFastening The Lens Cap ON/OFF ProjectorComponent Video Remote ControlTo adjust the keystone To adjust the volumeArrangement Setting UpAs necessary, you can also finely Adjusting The Projectors ElevatorUsing The Picture Shift Dials Adjust the height of the projector byConnecting Your Devices AUDIO-L AUDIO-R G B R Connecting to a computerConnecting Power Supply Putting Batteries Remote ControlRemove Battery cover Close Battery coverOperating The Remote Control Set the power switch to on Power ON/OFFTurning On The Power When the lens cap is attached, removePress the Input button Selecting An Input SignalUsing the projector’s control button Using the remote control Press the COMPUTER, VIDEO, S-VIDEOAttached the lens cap Turning Off The PowerSwitch the power switch to O OFF Power switch OFF positionOperating Adjusting The VolumeTemporarily Muting The Sound Correcting Keystone Distortions Using The Automatic Adjustment FeatureSelecting The Aspect Ratio Signal SearchingTemporarily Blanking The Screen Recalling Your Adjustments Selecting The Gamma ModeUsing The Menu Functions Multifunctional SettingsMain Menu Picture 1 Menu MY Memory Load/Save a SettingReset the PICTURE-1 Menu Items Picture 1 MenuSize PhasePicture 2 Menu Position3D-YCS Input MenuVideo Frame LockS2-ASPECT Input MenuVideo NR InformationAuto Menu AdjustSearch Start UP Screen MenuMessage Option Menu VolumeLamp Time Lamp Replacing The Lamp Caring For The Air Filter Air FilterFilter, while pulling down it Replacing The Air FilterNew air filter. Tell the dealer your air Hold the release buttons of the airCaring For The Lens Caring For The Cabinet And Remote ControlOther Care Caring For The Inside Of The ProjectorRelated Messages TroubleshootingRelated Messages Power Lamp Temp Regarding The Indicator LampsIndicator Regarding The Indicator LampsPhenomena That May Easily Be Mistaken For Machine Defects Phenomena That May Easily Be Mistaken For Machine Defects Warranty And After-ServiceVideo Input Ports SpecificationsSpecification RGB Input Ports Audio PortsTechnical Signal ConnectorsResolution FH kHz FV Hz Rating Signal mode Example Of Computer SignalText Initial Set Signals Communications Setting Connecting The CableRS-232C Communication Increasing the projector setting value Increment command Requesting projector status Get commandChanging the projector settings Set command Using the projector default settings Reset Command4A D2 Command Data Chart日本語 Be EF EF F6 Be EF EC D9 Auto RGB Be EF CB D3 Turn on Be EF