Fujitsu P300 user manual Working with Floppy Disks

Page 32

3 Floppy Disks

Working with Floppy Disks

Follow the instructions supplied by the vendor of the floppy disks.

Never clean the floppy disk drives with cleaning disks. Any attempt would destroy the read/ write head in the disk drive within 20 seconds.

5

6 7

4

1

2

3

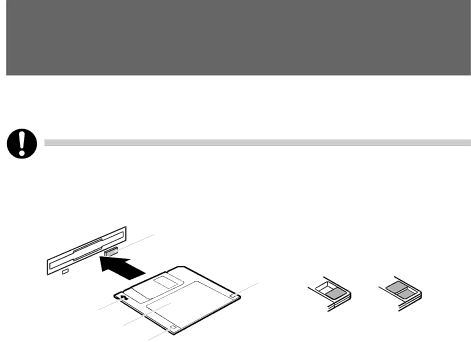
1Insertion direction

2Label area

3Write protection switch for a 720 KB or a 1.44 MB floppy disk

4Identification of a 1.44 MB floppy disk or write protect switch on a 120 MB floppy disk

5Eject button for inserted floppy disks

6Disk is write-protected

7Disk is not write-protected

To insert a floppy disk, push it into the drive in the insertion direction until it engages. The label should be facing upward.

To remove the floppy disk, press the eject button (5).

The write-protect switch enables you to protect the data on the floppy disk from inadvertent overwriting or deletion.

To protect the data on the floppy disk from being overwritten, push the write-protect switch to position (6). The hole is now visible.

To remove write protection, push the switch to position (7). The hole is now covered.

17

Image 32
Contents Deskpower P300 Series User’s Manual Important Safety Instructions Iii Before reading this manual For Safe OperationUsing this Product for High-Safety Applications Backing Up the DataMicrosoft Service Pack Notational conventions Conventions Used in This ManualIntroduction Safety Important NotesManufacturer’s notes Energy savingFCC Class B Compliance Statement Cleaning the PC Cleaning the system unit and the monitorCleaning the keyboard and the mouse Transporting the PCDisposal and recycling Reference to productsXii Organization of This Manual Before Reading This ManualContents Technical Data System ExpansionsChapter Steps for Initial Setup Preparing for UseUnpacking and Checking the Delivery External devicesSetting Up the PC Connecting the keyboardConnecting standard keyboard Connect the Monitor, Mouse and KeyboardConnecting USB mouse Connecting the mouseConnecting a PS/2 mouse Connecting the PC to the Mains Voltage Devices with main power switchDevices without main power switch Notch for inserting the screwdriverInitial Switch-on Software will be Installed Switching on monitor and PCInstalling the software Disconnecting cables Connecting External DevicesConnecting cables LAN Connections on the system unitConnecting external devices to the serial port Connecting external devices to the parallel portSettings of the serial port Settings of the parallel portOperation Switching On the PC On devices with main power switchOn devices without main power switch OperationSwitching Off the PC Indicators on the PC Hard disk indicatorPower-on indicator Floppy disk indicatorKeyboard Point Floppy Disks Working with Floppy DisksSettings in Bios Setup Access Protection Under WindowsProperty and Data Protection Anti-theft protectionBios Setup Security Functions Troubleshooting Tips Troubleshooting and Tips Installing New SoftwareMains voltage supply is faulty Internal power supply overloadedScreen stays blank No Mouse Pointer Displayed on the Screen Floppy Disk Cannot be Read or WrittenWrong monitor has been set under Windows 2000/XP Wrong RAM modules have been insertedPC cannot be switched off with the power button Time and/or Date is Not CorrectTips Out of system resourcesPage System Expansion System Expansions Information about boardsOpening the casing Closing the casingTake the new board out of its packaging Installing and removing a boardInstalling a board Page Removing a board Page Installing an Additional Serial Port Low-Profile boardsMounting slot adapter Removing slot adapterInstalling and Removing the Hard Disk Drives Removing a hard disk driveInstalling a hard disk drive Replacing Lithium Battery Page Technical Data Technical Data List of SpecificationsDimensions Weight Electrical Data Environmental conditions