Fujitsu P300 user manual Replacing Lithium Battery

Page 51

Replacing Lithium Battery

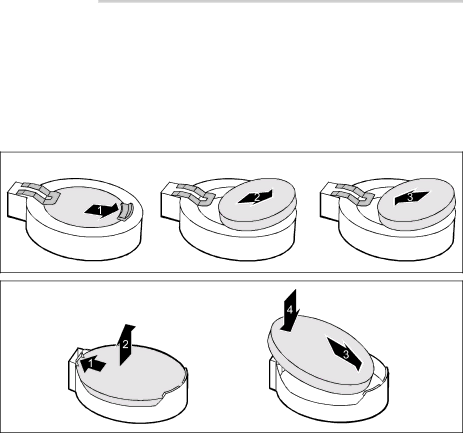
In order to permanently save the system information, a lithium battery is installed to provide the CMOS- memory with a current. A corresponding error message notifies the user when the charge is too low or the battery is empty. The lithium battery must then be replaced.

CAUTION

Incorrect replacement of the lithium battery may lead to a risk of explosion!

The lithium battery may be replaced only with an identical battery or with a type recommended by the manufacturer.

Do not throw lithium batteries into the household waste. They must be disposed of in accordance with local regulations concerning special waste.

Make sure that you insert the battery the right way round. The plus pole must be on the top!

The lithium battery holder exists in different designs that function in the same way.

1Disconnect the USB cable and, if necessary, the audio cable from the mainboard.

2Remove the port cover.

3Remove the screw (1) and pull the USB interface or the USB audio interface upwards out of the location (2).

4Remount the blind cover of the bay (3) from the front.

5Re-attach the cover (4).

37

Image 51
Contents Deskpower P300 Series User’s Manual Important Safety Instructions Iii For Safe Operation Before reading this manualBacking Up the Data Using this Product for High-Safety ApplicationsMicrosoft Service Pack Conventions Used in This Manual IntroductionNotational conventions Energy saving SafetyImportant Notes Manufacturer’s notesFCC Class B Compliance Statement Transporting the PC Cleaning the PCCleaning the system unit and the monitor Cleaning the keyboard and the mouseReference to products Disposal and recyclingXii Before Reading This Manual Organization of This ManualContents System Expansions Technical DataChapter External devices Steps for Initial SetupPreparing for Use Unpacking and Checking the DeliveryConnect the Monitor, Mouse and Keyboard Setting Up the PCConnecting the keyboard Connecting standard keyboardConnecting the mouse Connecting a PS/2 mouseConnecting USB mouse Notch for inserting the screwdriver Connecting the PC to the Mains VoltageDevices with main power switch Devices without main power switchSwitching on monitor and PC Initial Switch-on Software will be InstalledInstalling the software Connecting External Devices Connecting cablesDisconnecting cables Connections on the system unit LANSettings of the parallel port Connecting external devices to the serial portConnecting external devices to the parallel port Settings of the serial portOperation Operation Switching On the PCOn devices with main power switch On devices without main power switchSwitching Off the PC Floppy disk indicator Indicators on the PCHard disk indicator Power-on indicatorKeyboard Point Working with Floppy Disks Floppy DisksAnti-theft protection Settings in Bios SetupAccess Protection Under Windows Property and Data ProtectionBios Setup Security Functions Troubleshooting Tips Internal power supply overloaded Troubleshooting and TipsInstalling New Software Mains voltage supply is faultyScreen stays blank Wrong RAM modules have been inserted No Mouse Pointer Displayed on the ScreenFloppy Disk Cannot be Read or Written Wrong monitor has been set under Windows 2000/XPOut of system resources PC cannot be switched off with the power buttonTime and/or Date is Not Correct TipsPage System Expansion Information about boards System ExpansionsClosing the casing Opening the casingInstalling and removing a board Installing a boardTake the new board out of its packaging Page Removing a board Page Removing slot adapter Installing an Additional Serial PortLow-Profile boards Mounting slot adapterRemoving a hard disk drive Installing and Removing the Hard Disk DrivesInstalling a hard disk drive Replacing Lithium Battery Page Technical Data List of Specifications Technical DataDimensions Weight Environmental conditions Electrical Data