JVC DLA-SX21E Resetting the lamp time, By mode, More, To ensure the lamp time has been reset

Page 17

Replacing the Lamp

Resetting the lamp time

After installing a new lamp, reset the “Lamp time” counter inside the projector. When this is done, a new count will start.

If the display of the accumulated lamp time has reached 2000 hours, the projector will not work (lamp does not light up) unless the lamp time is reset.


1. Insert the main plug. The projector will go into the stand


by mode.


ON: STAND BY indicator lights up.


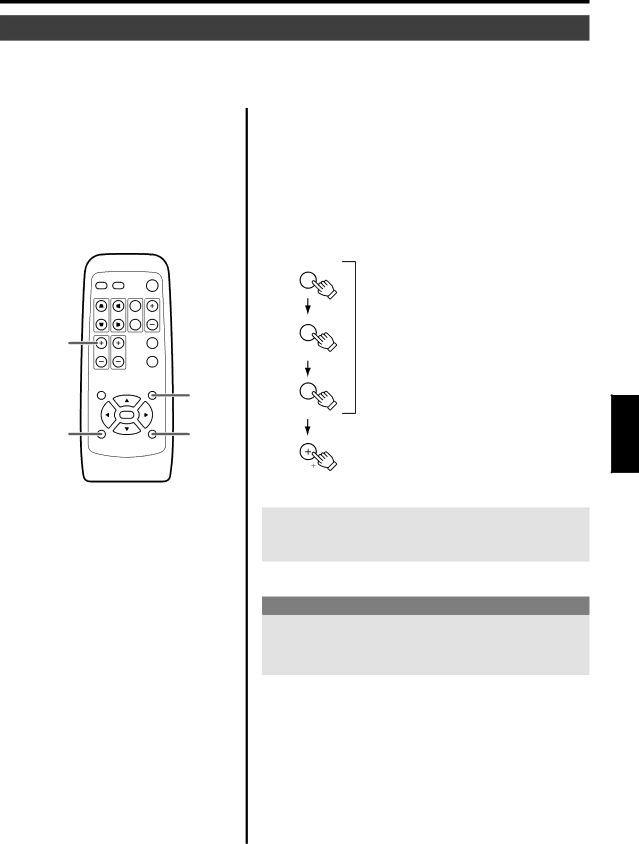
2. Press the EXIT, HIDE, PRESET buttons on the remote


control sequentially, then press VOL ª for 2 seconds or


more.


The STAND BY and OPERATE indicators alternately blink about


every approx.3 seconds. After blinking stops, “Lamp time” resets


and the projector returns to the stand-by state (STAND BY indicator


lights up).


EXIT


PC

VIDEO

OPERATE


W


V-KEYSTONE H-KEYSTONE SCREEN

DIGITAL


ZOOM


S


Press as per normal

press for


FREEZE


HIDE

2 seconds

VOLUME

FOCUS QUICK ALIGN.


MENU


EXIT

EXIT


PRESET


ENTER


PRESET


HIDE


PRESET


HIDE


Press for 2 seconds or more


VOL( )

To ensure the lamp time has been reset.

The Lamp time can be checked via the “Lamp time” item in the “Infor- mation” menu. (page 32, 33, 34, 40)

Caution for reset work

Reset the “Lamp time” only when you have replaced the lamp. Never reset it while the lamp is still in use, otherwise the approxi- mate standard for gauging replacement time may be inaccurate, lamp performance may suffer and lamp blow-out may also occur.

ENGLISH

45

Image 17
Contents DLA-SX21U/DLA-SX21E Machine Noise Information Germany only FCC Information U.S.A. onlyDo not allow any unqualified person to install the unit Safety PrecautionHow To Replace The Fuse Wire which is coloured green-and-yellow must be conBrown Live Do not cut off the main plug from this equipmentAbout burning-in of the D-ILA device Using the screen mode switch functionViewing conditions CareAccessories ContentsSignals that can be input into the projector Connecting to Various Devices Video signals  Computer signals Allowable input signals Connecting to Various DevicesSignal HorPixels Ver Lines KHzPower On Basic Operation ProceduresBasic Operations Selecting the image to be projectedAdjusting the Focus Ring Focus for DLA-SX21U/DLA- SX21E  Display using the direct buttonsBasic Operations Screen displayAdjusting the Sound Volume Power OffMenu Structure Adjustments and Settings Using MenusVideo Input selection Main menuWhen PC input is selected When no image signal is inputted Adjustments and Settings Using MenusMain Set up menu Displayed only when PC is selected SubmenuAbout lamp replacement Procedure for lamp replacementReplacing the Lamp Light source lamp and its lamp timeRemove the lamp unit Replacing the LampInsert the new lamp unit until it is fully Close the handle, and tighten the screwBy mode Resetting the lamp timePress the EXIT, HIDE, Preset buttons on the remote To ensure the lamp time has been resetPull out the power cord from the wall outlet Cleaning and Replacing the FilterClean the filter Reinstalling the filterAction to be taken upon warning indications About warning indicatorsPlease follow the procedures below Memo DLA-SX21U/DLA-SX21E DLA-SX21SU/DLA-SX21SE Information FCC Etats-Unis uniquement Propos du choix de lÕemplacementInformation SUR LE Bruit Machine Allemagne uniquementy Propos de la bržlure du dispositif D-ILACordon d’alimentation Importantes mesures de sécuritéConsultez votre revendeur Ne dŽbranchez pas la fiche principale de cet appareil Remplacement du fusibleImage rŽmanente Quelques précautions d’utilisationLieu de la projection luminositŽ de la pice EntretienContenu de l’emballage Accessoires en OptionTable des matières Raccordement Support de signal Signaux vidéo  Signaux de l’ordinateurHor Pixels Ver Lines KHz PC98 Raccordement Tableau des signaux d’entrée réglables Opérations de base Fonctionnement de baseRemarque Mise sous tension Touches directes Fonctionnement de baseRéglage du zoom taille de l’image pour DLA-SX21U/ DLA-SX21E Mise au point Focus pour DLA-SX21U/DLA-SX21EMise hors tension Réglage du volumeArborescence et structure de menus Réglage et configuration dans les menusEntrée Vidéo Menu principalEntrée PC Réglage et configuration dans les menusRemarque Temp.couleur menu de réglageAucun signal d’iamge Procédure de remplacement Remplacement de la lampeRemplacement de la lampe Lampe de projection et temps d’utilisationRetirez le module lampe Remplacement de la lampeInsérez le nouveau module lampe jusqu’au fond Remettez le couvercle de la lampe et serrez les visPrécaution pour la réinitialisation Réinitialisation du compteur de la lampeOn Le tŽmoin Stand by sÕallume Appui pendantRéinstallez le couvercle du filtre Nettoyage et remplacement du filtreDébranchez la prise d’alimentation Retirez le panneau du filtreAvertissement par indication des témoins Indication des témoins d’alerteAction à prendre en cas d’avertissement Témoin DésignationDLA-SX21SU/DLADLA-SX21U/DLA --SX21E SX21SE