Dell XFR D630 service manual Installing the VGA Door

Page 27

DellTM XFR D630 Fully Rugged Notebook Service Manual

6.3.2Installing the VGA Door

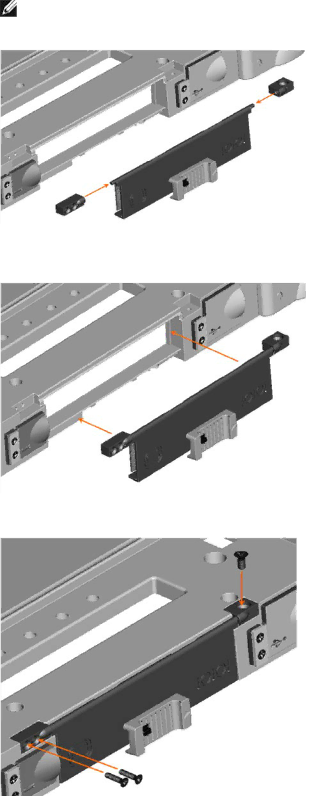
1. Place the 2 screw mounts on the VGA Door hinge.

NOTE: Be careful to ensure that the single screw mount is placed on the right side of the hinge, while the 2 screw mount is placed on the left side of the hinge.

2.Place the VGA Door and screw mounts onto the notebook and align with the mounting holes provided.

3. Secure the VGA Door to the notebook, using the 3 screws provided.

Page 27 of 106

Revision A01

Image 27
Contents Fully Rugged Notebook DellTM XFR D630Revision A01 Table of Contents 10.10 24.1 Before Working Inside Your Computer Before You BeginRecommended Tools Turning Off Your ComputerRevision A01 Screw Image Part Number Description Screw ChartSCR,M3X14,PHH,MSCR,ZPS,XFR CSK Screw M3 X 10 -BLACK SCR,M2.5X5,PHH,TF,BCS PAN Head Screw M2 X 8-BLACK XBay Devices Hard Drive Revision A01 Revision A01 Replacing the Stylus Clip Close Up View of Installed Stylus Clip Replacing the Stylus HandleRemoving the Handle Installing the HandlePort Covers Comms DoorRemoving the Comms Door Installing the Comms Door Docking DoorRemoving the Docking Door Revision A01 Installing the Docking Door Removing the VGA Door VGA DoorRevision A01 Installing the VGA Door Power Door Removing the Power DoorInstalling the Power Door Removing the XBay Door XBay DoorInstalling the XBay Door Removing the Audio Ports/WiFi Door Audio Ports/WiFi DoorUSB Side Door Installing the Audio Ports/WiFi DoorRemoving the USB Side Door Installing the USB Side DoorRemoving USB Rear Door USB Rear DoorInstalling USB Rear Door PC Card Slot DoorRemoving the PC Card Slot Door Installing the PC Card Slot Door Removing the Hinge Cover Hinge CoverRevision A01 Removing the Standard Keyboard Installing the Hinge CoverKeyboards Standard KeyboardRevision A01 Installing the Standard Keyboard Rugged KeyboardRemoving the Rugged Keyboard Revision A01 Revision A01 Installing the Rugged Keyboard KYBD, 87, US, ENG, RGD, XFR Rubber keyboard stiffener bar Revision A01 Connectors should not stack above this level Revision A01 Revision A01 Revision A01 Dimm a MemoryMemory module Dimm a Dimm B Screws Memory module cover Display Assembly Removing the Display Assembly Revision A01 Revision A01 Revision A01 Installing the Display Assembly Revision A01 Removing the Display Bezel Removing the Display Panel Installing the Display BezelRevision A01 Installing the Display Panel Removing the Display Top Cover Installing the Display Top CoverRemoving the Display Latch Internal Card with Bluetooth Wireless Technology Installing the Display LatchRemoving the Bluetooth Wireless Card Installing the Bluetooth Wireless Card Mobile Broadband Network Wwan Card WWAN, FCM & SIM CardsWwan card Antenna cable connectors Metal securing tabs Wwan with Passthu Board & Passthru Cable Removing the Flash Cache Module Flash Cache ModuleInstalling the Flash Cache Module Subscriber Identity Module SIM Card Removing the Coin-Cell Battery Coin-Cell BatteryInstalling the Coin-Cell Battery Removing the Palm Rest Palm RestRevision A01 Underside of Palm Rest showing Touchpad Cable Route Installing the Palm RestRemoving the Wlan Card Wireless Local Area Network Wlan CardsWlan card Antenna cable connectors Metal securing tabs Installing the Wlan Card Removing the Modem ModemInstalling the Modem Processor Thermal-Cooling AssemblyRemoving the Processor Thermal-Cooling Assembly Installing the Processor Thermal-Cooling Assembly Removing the Processor ProcessorInstalling the Processor PC Card Reader Removing the PC Card Cage Installing the PC Card Cage SpeakerRemoving the Speaker Installing the Speaker 21 FanRemoving the Fan Installing the Fan Removing the System Board System BoardWlan Revision A01 Installing the System Board Revision A01 Revision A01 Flashing the Bios Flashing the Bios From a CDFlashing the Bios From the Hard Drive Removing the RF Passthru Board RF Passthru BoardWwan Installing the RF Passthru BoardRemoving the Bottom Chassis Bottom ChassisInstalling the Bottom Chassis Installing the Modem CableRemoving the Modem Cable Revision A01