Hitachi 32LD9700C, 32LD9700N, 32LD9700U, 37LD9700U, 37LD9700C From Timers Menu, From EPG Screen

Page 47

DIGITAL TERRESTRIAL TELEVISION (DTT) OPERATION (continued)

Timer Programming

Timer Programming is available to not only record multiple programmes but also remind you that the desired programme is about to start whilst you are watching another channel.

From “Timers” Menu

You can record multiple programmes from “Timers Menu”.

MENU

1.Press button on the remote control.

2.Select “Timers” from the DTT main menu.

3.Highlight the item on the row of “Mode” using button.

4.Press OK button to display the timer entry window.

5.Set channel name using button.

6.Set Start Time, End Time, and Date with the numeric buttons.

7.Set the frequency mode (Once, Daily, or Weekly) using

button.

MENU

8.Press button to return to the Timer Screen. The mode will automatically be set to “Active” if time and date are valid. (The message “Entered time is not valid” is displayed if invalid and “Please choose a date and time in the future” is displayed if

not input.).


MENU

9. Press

button or OK button to set up.

10.The message appears to ask “Switching to timer channel” to remind you that the selected programme is about to start. If in menu operation or displaying other than channel programme screen, the message “A programme that you set a timer for has started. Would you like to switch to [channel name]?” is displayed.

*The selected channel can be watched or recorded via Scart 1 Output. Refer to 15 for the details.
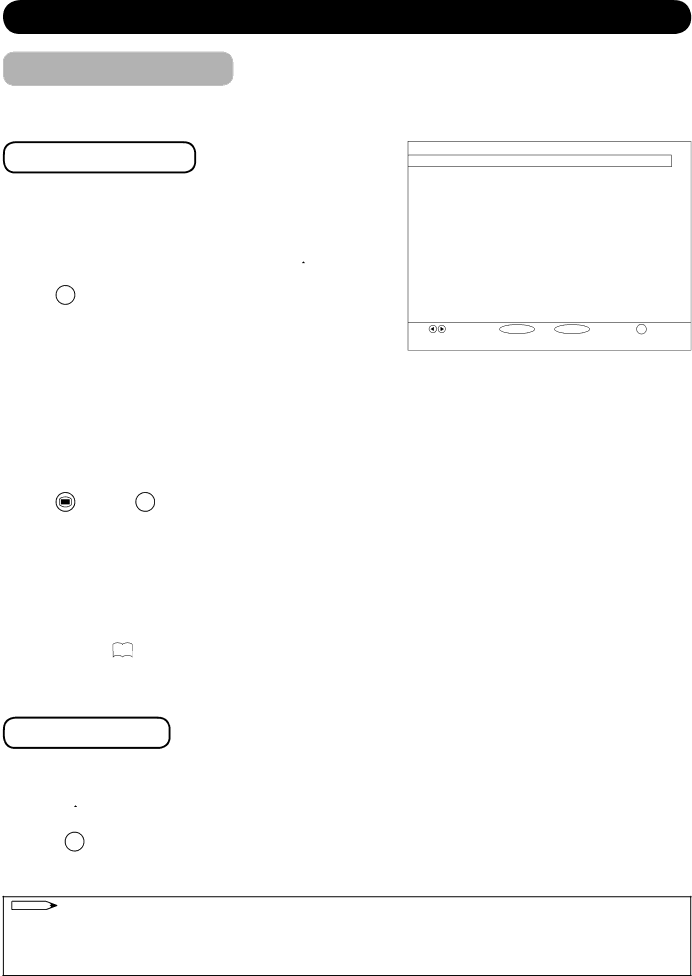
PROGRAMME TIMERS


No

Channel Name

Start

End

Date


Mode

1.

ITV 1

20:00

21:00

12/05/2006


Active

2.

BBC TWO

08:00

09:00

12/06/2006


Active

3.

BBC THREE

10:00

11:00

12/06/2006


Active

4.

BBC ONE

01:00

01:00

01/01/2006


Inactive

5.

BBC ONE

01:00

01:00

01/01/2006


Inactive

6.

BBC ONE

01:00

01:00

01/01/2006


Inactive

7.

BBC ONE

01:00

01:00

01/01/2006


Inactive

8.

BBC ONE

01:00

01:00

01/01/2006


Inactive


19:54


11/05/2005


Toggle Mode MENU

Exit

OK

Edit Timer

i+ More

Name:

3. ITV 1


Start:

20:00


End:

[2] 1:00


Date:

12/05/2006


Mode:

Once


From EPG Screen

If you find the programme you wish to record on EPG screen, you can directly set the timer from EPG screen.

1.Press button to display EPG menu.

2.Using button, select the programme you wish to record.

3.Press OK button so that it leads to the Timers menu screen.

4.After confirming the setting, press button to return to EPG screen.

NOTE

Timer Programming can be set until 31, Dec 2037.

You can set timers up to 8 programmes in total. If you try to set more than that, the box will ask you to deactivate one of them.

A timer can not be set if it is overlapped with another. The box will appear if there is an overlap timer.

46

Image 47
Contents Serial no Colour LCD Television Digital Tuner ModelsNon Digital Tuner Models English Important Safety Instructions ContentsAbout Software IntroductionAbout This Manual Trademark CreditsImportant For United Kingdom Safety PrecautionsAbout the Symbols Do not remove cover, or modify the product Safety PrecautionsDo not place the unit at a dusty place Cleaning and Maintenance PrecautionsCommon Phenomena of LCD Panel About LCD PanelSupplied Accessories FeaturesRear Panel Component NamesMain Unit Front PanelComponent Names Remote Control Close the battery compartment cover Remote Control Batteries InstallationOpen the battery compartment cover Install the batteriesAnti-Tumble Measures Preparation Safety Precaution on Main Unit InstallationTerminal Positions Connecting ProcedureConnection Connecting to External Equipment Terminals on Rear Connection Connecting ProcedureOUTExample Information Terminals on Side To tighten Connecting the plug into the wall socketInformation How to secure the cables How to fasten the bandBasic Operation Power On/OffTo turn On the power of the unit To turn Off the power of the unitThis is an example 32/37LD9700U/N Basic Operation Easy PresetMute Basic Operation Volume UP/DOWNDTT TV AV1 AV2 AV3 RGB Hdmi 2 Hdmi 1 AV5 AV4 Basic Operation Input Switching to TV/AV1~5, HDMI, and RGBInput Signal Screen Display Language Menu TV Setup OperationHow to use the On-Screen Display OSD system How to set LanguageManual Tuning TV Setup Operation Setup Menu TV modeSelected Items Setup hint Auto TuningAuto Off Fine TuningSort Teletext LanguageTV Setup Operation Setup Menu AV mode TV Setup Operation Setup Menu RGB mode Frequency Display Wxga ModeFrequency Mode Input LevelDefault Zoom TV Setup Operation Function MenuVideo Power Save Freeze ModeSlide Interval Selected Items Setup hint BackgroundSlide Mode Slide EffectTV Setup Operation Picture Menu TV/AV mode 3D Comb Filter Contrast ModeFilm Mode Back LightColour Decoding Colour Temp. AdjustColour Management RGB/R/G/BPicture Enhancement TV Setup Operation Picture Menu RGB modeBy pressing OK button TV Setup Operation Audio Menu On Timer Timer MenuHeadphone Volume Off TimerAnalogue Teletext How to operate the TeletextAbout DTT Function Digital Terrestrial Television DTT OperationCountry only for 32/37LD9700C/N Select First Time InstallationSystem Language Select System languageSelecting from the On-screen Channel List Stepping through the ChannelABC DEF GHI JKL MNO PQR STU VWX Digital Terrestrial Television DTT Operation Channel SortChannel Editing TV Text Information BannerNow and Next EPG 7days EPGFrom EPG Screen From Timers MenuSubtitle Setting Audio and Subtitle LanguageAudio Language Menu Lock Setting the ProtectionSet Lock Key Channel LockUpgrading DTT Setting Favourite ModeSelect Receiver Upgrade Select Favourite ModeTV Setup Menu Function Power SwivelDTT/TV/AV1~AV3 signal input Function Size SwitchingAV4 / AV5 / HDMI1 / HDMI2 signal input Vertical Size Adjustment at Panoramic Mode Position AdjustmentRGB signal input Using a wide-screen monitorControl on the side with Speaker Icon Function Multi Picture ModePicture mode Table Mix-and -Match of the Input ModesPicture Picture TV mode only Function Multi Picture Mode Activate the Multi Picture Mode in RGB Mode Strobe Function Picture FreezingSplit Operating the Photo Input Function Photo Input FunctionRotation Function Slide Show Adjustment Function Menu Selection Description Displaying Still Picture in Photo Mode Slide Show FunctionOperating the Movie Specification OtherTo exit from Photo Input… OSD InformationFunction Photo Input Function Stereo broadcast Function Audio SwitchingNicam / Sound Multiplexincluding A2 TV mode Bilingual/Dual Sound broadcastReturning to operating status Function Power Save ModeWhen AV input is selected When the RGB input is selectedDVD Selection Set up hintFunction DVD Player / STB SelectionSymptom and Check List TroubleshootingWhen Following Messages Appear on the Screen 57 ~ Troubleshooting Symptom and Check ListStripes appear and some Specification Product SpecificationsHdmi connector pin specifications Product Specifications Signal InputRGB terminal D-sub 15-pin connector Input connector pin specificationsWith RGB input Product Specifications Recommended Signal ListWith Hdmi input Picture Product Specification Recommended Signal ListWith Multi Picture Function With Picture Freezing FunctionThank you for purchasing this Hitachi Television