Jensen MP6211 instruction manual Tuner Operation

Page 13

MP6211

TUNER OPERATION

The MP6211 comes equipped with a World Tuner, allowing you to receive channels in USA, EUROPE, LATIN, & OIRT (Russia). See “Frequency Spacing” on page 7 to learn how to change the World Tuner options.

Select a Band

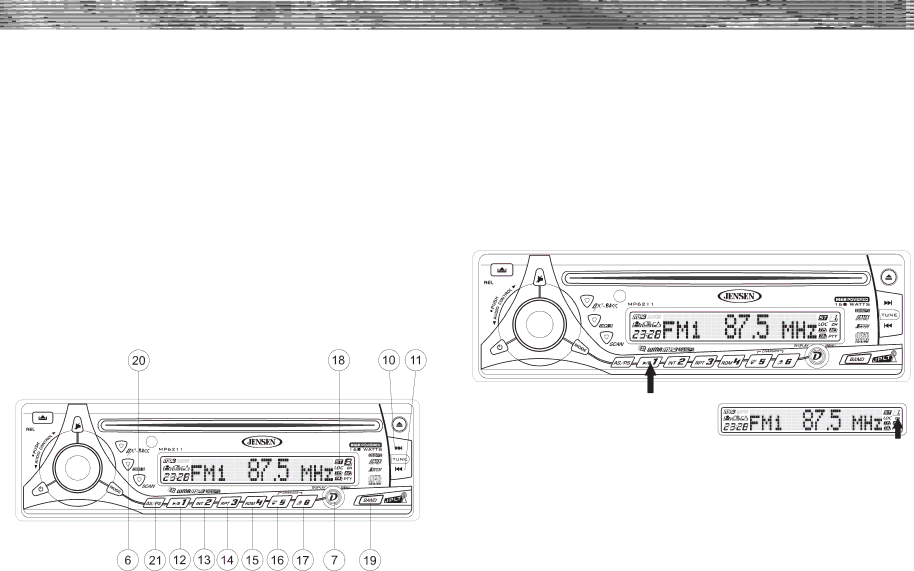
Press BAND (19) to change between three FM bands and two AM bands. Each band stores up to six preset stations.

Tuning

Manual Tuning

Press the Up Tuning (10) or Down Tuning (11) button for more than three seconds to enter manual tuning mode, then press the Up Tuning or Down Tuning buttons to move the radio frequency number up or down one step.

Auto Seek Tuning

Press the Up Tuning (10) or Down Tuning (11) button for less than three seconds to move to next station automatically.

Scan

Press SCAN (20) to scan through strong stations in the current band. The radio pauses for five seconds at each strong station. Press SCAN again to listen to the current station.

Preset Stations

Up to six stations on each band can be stored as presets and can then be instantly recalled by pressing the associated preset button (12-17). To store a station, turn the radio on and select the desired band and station. Press and hold the desired preset button (numbered one through six on the face of the radio) for more than two seconds. When stored, the preset number will appear in the display. The station is now stored and can be re-called at any time by pressing the corresponding preset button. Repeat for the remaining five presets on the current band and for all presets on the other three bands.

Automatically Store / Preset Scan (AS/PS)

Automatically Store

Select six strong stations and store them in the current band using the Automatic Store feature. To enable this feature, press and hold AS/PS (21) for more than two seconds. The radio will automatically scan the band in use and enter strong stations into the preset memory positions for that band. After entering the stations into memory, the unit will automatically stop at each station for five seconds so each can be heard. When using the Automatically Store feature, the new stations replace any stations already stored in preset memory for the selected band.

Preset Scan

Press AS/PS (21) to scan the six preset stations in the current band. The unit will stop at each station for five seconds before continuing to the next preset station, and the preset number will flash on the display during the preset scan. Press AS/PS again to stop scanning and listen to the current station.

PRESS AND HOLD

PRESET NUMBER APPEARS

Stereo

The unit will automatically pick up a stereo signal, when available. When in stereo mode, the “ST” icon (18) appears in the display. When no stereo signal is available, the unit will automatically revert to mono operation, and no icon will be displayed.

9

Image 13
Contents MP6211 Page Contenido Table of ContentsTable DES Matières MP6211 Optional Accessories FeaturesIntroduction Preparation Pre-installationTools and Supplies Wiring with a Wiring Adapter Purchased Separately WiringReconnect Battery FusesUniversal Installation Using Mounting Sleeve InstallationISO Installation Kit InstallationRemove Radio Operation Menu Operation Greeting Note Reset ButtonFront Panel Release Theft Deterrent LEDTuner Operation CD Player Operation Acceptable Media MP3/WMA OperationLoading an MP3/WMA Disc Accessing the ID3 TagNavigating Folders MP3/WMA File or Folder SearchOther Features CD Changer ModeCD Changer Operation Jport OperationCare and Maintenance Remote ControlCD Player Compact DiscsSpecifications TroubleshootingMonth Limited Warranty Características IntroducciónAccesorios Opcionales Preinstalación PreparaciónHerramientas y Provisiones Cableado con un Adaptador de Cables Cómprelos por separado CableadoFusibles Reconexión de la BateríaInstalación Universal Utilizando la Manga de Montaje InstalaciónInstalación ISO Equipo de InstalaciónCómo Desmontar el Radio Operación Operación del Menú Remover el Panel Delantero Botón de Reconfigurar ResetLuz Antirrobo Selección de Banda Operación DE LA RadioSelección de Emisora RastreoOperación DEL Reproductor DE CD Apuntes Sobre Reproducción de MP3 y WMA Operación DE MP3/WMAAccediendo a la Etiqueta ID3 Insertando el Disco MP3 o WMASelección de Pista Navegando las CarpetasModo de Cambiador de CD Operación DEL Cambiador DE CDSelección de Disco Otras FuncionesControl Remoto Operación DEL JportCuidado Y Mantenimiento Información de DiscosEspecificationes Corrección DE ProblemasGarantia Limitade DE 12 Meses Fonctions Accessoires facultatifsGénéral Prêt pour iAUX vendu séparémentPréparation Pré-installationOutils et matériel Câblage Le diagramme de câblage / Le code de couleursRebranchement de la batterie Aide techniqueInstallation universelle à laide du manchon du montage Installation ISO Installation de la trousseRetrait de radio Opération Volume / contrôleur audioAlimentation Mise en sourdineOpération du menu Le bouton de réglage Relâchement du panneau davantUn DEL pour décourager les voleurs Fonctionnement DE LA Radio Fonctionnement DU Lecteur CD Fonctionnement DE MP3/WMA Accéder à la balise ID3 Charger un disque MP3/WMASélection de la piste Dossiers de navigationOpération DE Changeur DE CD Mode changeur de CDOpération Jport Sélection du disqueSoin ET Entretien Prêt À Être TélécommandéSoins pour la platine CD Information disqueDépannage Garantie Limitée DE 12 Mois