Location of Termination Cap
D
E ![]() V
V
B L ![]()
| C |
|
| Fixed | V |
| Closed | |
|
| |
F | Openable |
|
V |
| |
|
| B |
| B |
|
B
Openable ClosedFixed
![]() H
H ![]()
VI
B
V J XG
AM
N N
| G |
| V |
| G |
V K X | V |
|
|
|
|
|
|
|
|
|
|
| A | ||
|
| V TERMINATION CAP | X AIR SUPPLY INLET |
| G | GAS METER |
|
| RESTRICTED AREA |
|
| ||
|
|
|
| ||||||||||
|
|
|
|
|
|
|
|
|
|
| (TERMINATION PROHIBITED) | ||
A | = | clearance above grade, veranda, porch, deck, or | I | = | clearance to service regulator vent outlet [*72" (182.9 cm) | ||||||||
|
| balcony [*12" (30.5 cm) minimum] |
|
|
| minimum] |
|
|
| ||||
B | = | clearance to window or door that may be opened | J | = | clearance to | ||||||||
|
| [6" (15 cm) min. for 10,000 Btu or less; 9" (23 cm) in US |
|
| or the combustion air inlet to any other fireplace | ||||||||
|
| if between 10,000 and 50,000, 12" (30 cm) in Canada |
|
| [6" (15 cm) min. for 10,000 Btu or less; 9" (23 cm) in US | ||||||||
|
| if between 10,000 and 100,000; 12" (30 cm) in US if |
|
| if between 10,000 and 50,000, 12" (30 cm) in Canada | ||||||||
|
| greater than 50,000, 36" (91 cm) in Canada if greater |
|
| if between 10,000 and 100,000; 12" (30 cm) in US if | ||||||||
|
| than 100,000] |
|
|
| greater than 50,000, 36" (91 cm) in Canada if greater | |||||||
C | = | clearance to permanently closed window |
|
|
| than 100,000] |
|
|
| ||||
|
| [minimum 12" (30.5 cm) recommended to prevent | K | = | clearance to a mechanical air supply inlet [*In Canada, | ||||||||
|
| condensation on window] |
|
|
| 6 ft. (1.83m) minimum; In US 3 ft. (91 cm) above if within | |||||||
D | = | vertical clearance to ventilated soffit located above the |
|
| 10 ft. (3 m) horizontally] |
|
|
| |||||
|
| terminal within a horizontal distance of 24" (61 cm) from L | = | † clearance above paved | |||||||||
|
| the |
|
| located on public property [*84" (213.3 cm) minimum] | ||||||||
E | = | clearance to unventilated soffit [12" (30.5 cm) minimum] M = | clearance under veranda, porch, deck | ||||||||||
F | = | clearance to outside corner (see below) |
|
|
| [*12" (30.5 cm) minimum ‡] | |||||||
G | = | clearance to inside corner (see below) |
| N = | clearance above a roof shall extend a minimum of | ||||||||
H | = | *not to be installed above a meter/regulator assembly |
|
| 24" (61 cm) above the highest point when it passes | ||||||||
|
| within 36" (91.4 cm) horizontally from the center line |
|
| through the roof surface and any other obstruction within | ||||||||
|
| of the regulator |
|
|
| a horizontal distance of 18" (45.7 cm) | |||||||
†vent shall not terminate directly above a
‡only permitted if veranda, porch, deck or balconey is fully open on a minimum of 2 sides beneath the floor* * as specified in CAN/CSA B149 (.1 or .2) Installation Codes (1991) for Canada and U.S.A.
Note: Local codes or regulations may require different clearances
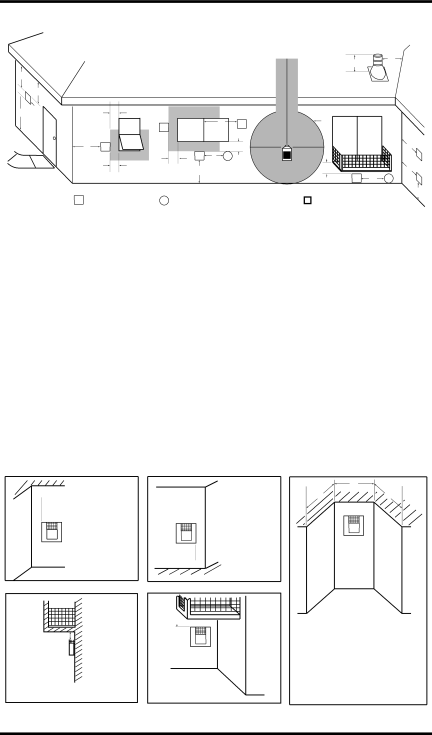
Termination Clearances for Buildings with Combustible and Noncombustible Exteriors
Inside Corner
Outside Corner | Recessed Location |
![]() A
A ![]()
V
A = 6" (15.2 cm)
V
B = 6" (15.2 cm)
![]() B
B ![]()
| D |
C | C |
![]()
![]() E
E ![]()
V
Balcony with No Side Wall
G |
V |
G = 12" (30.5 cm) minimum clearance
Balcony with Perpendicular Side Wall
H![]()
V
![]()
![]() J
J ![]()
Combustible &
Noncombustible
H = 24" (61 cm)
J = 20" (50.8 cm)
C = Maximum depth of 48" (121.9 cm) for recessed location
D = Minimum width for back wall of recessed location - Combustible - 38" (965 mm) Noncombustible - 24" (61 cm)
E = Clearance from corner in recessed location- Combustible - 6" (15.2 cm) Noncombustible - 2" (5.1 cm)
Figure 7 - Minimum Clearances for Termination Cap
www.desatech.com116236-01G