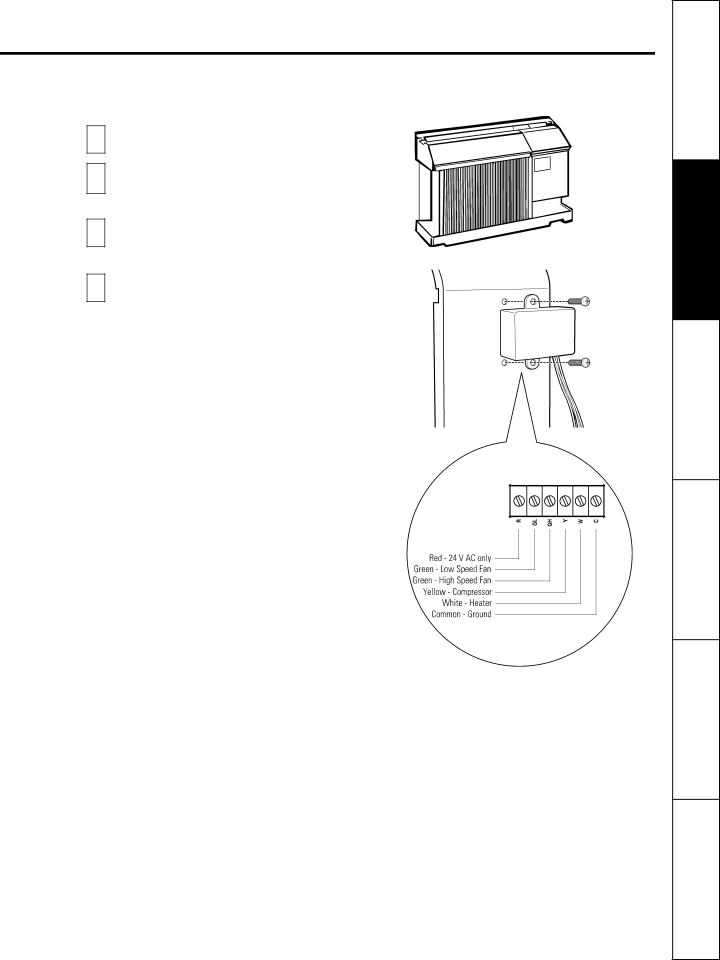
GE AJCM 08 ACD installation instructions Thermostat connections provide 24 V AC only

Page 9

GEAppliances.com

Terminal Connections Remote Thermostat - Class 2 (on some models)

Safety

The controls are located under a plastic cover behind the front grille.

1 Remove the front grille. See the Front Grille section of Care and Cleaning.

2 Remove the screws securing the plastic cover over the wiring connections. Set aside screws and plastic cover.

3 To make wiring connections, insert the wires into the bottom of the terminals and tighten screws securely.

4 After all desired connections have been made, replace the plastic cover and front grille.

The owner is responsible for making all connections and setting the appropriate dip switches.

When connected, the unit will be controlled by a remote thermostat.

NOTE: The number 3 dip switch must be in

the enabled (UP) position to activate the remote thermostat. (See the installation instructions supplied with the remote thermostat.)

IMPORTANT:

The thermostat connections provide 24 V AC only.

If using a digital/electronic wall thermostat, ensure it is compatible with 24 VAC signal. See the Installation Instructions for the wall thermostat.

NOTICE:

Damage to a wall thermostat or to the electronics can result from improper connections. Special care must be used in connecting the wires. No line voltage connections should be made to any circuit. Isolate all wires in building from line voltage.

Terminal

connections

location under front

grille

Instructions Operating Instructions Care and Cleaning Installation Instructions Troubleshooting Tips Consumer Support

9

Image 9
Contents Model # Installation InstructionsEither the plug or connector end New power supply cord obtained fromBefore making any repairs or cleaning Manufacturer and not repaired. DoWe strongly recommend against the use of an adapter plug We strongly recommend against the use of an extension cordGEAppliances.com Instructions Operating InstructionsCleaning Operating Instructions Safety Instructions Consumer Remote ControlAbout the controls on the air conditioner-Cool Only Models Safety Remote ControlCooling Descriptions About the controls on the air conditioner-Heat/Cool Models Consumer Support Remote ControlAppearance may vary FAN SpeedsHeating Descriptions Tips Consumer SupportAbout the controls on the air conditioner Thermostat connections provide 24 V AC only Grille and Case Care and cleaning of the air conditionerOutdoor Coils Front GrilleSafety Air Filter How to Insert the Batteries in the Remote ControlConsumer Support Before YOU Begin Amp time delay fuse or circuit breakerELECTRICAL REQUIREMENTS Model Qualifying QuestionsGE KIT Numbers Tools YOU MAY NeedRemove Locking Plate on Front Left Side Remove ALL Shipping PadsAttach Front Grille Support Requirements for AIR Conditioner Prepare Opening in WallWindow Requirements Window INSTALLATION-OPTIONALRemove AIR Conditioner from Case Prepare Window Install Sill SupportsMark the a and B measurements on each side MEASURE,PANELS CUT and Install FillerCase should have a 1/8″ minimum tilt toward the outside Install Case in WindowReplace AIR Conditioner in Case Install Window Gasket and Locking BracketOperating Instructions Safety Instructions Before you call for service…Cleaning Normal Operating Sounds Consumer SupportCleaning Installation Instructions Air Conditioner WarrantyTroubleshooting Tips Consumer Support GE Will ReplaceParts and Accessories Schedule ServiceConsumer Support GE Appliances Website Real Life Design Studio