Janome MB-4 manual Trac Outline

Page 58

z


88x90mm

4/8


21 min


1 / 5 Color


1 / 8544 ST


1

1

Ivory White 253


2

2

Bamboo 224


3

3

Tangerine 274


4

4

Orange 203


1

5

Sienna 256


q

x

c


88x90mm

4/8


21 min


1 / 8544 ST


1

Trac Outline


1

Ivory White 253


2

2

Bamboo 224


3

3

Tangerine 274


4

4

Orange 203


1

5

Sienna 256


w

Starting to Embroider

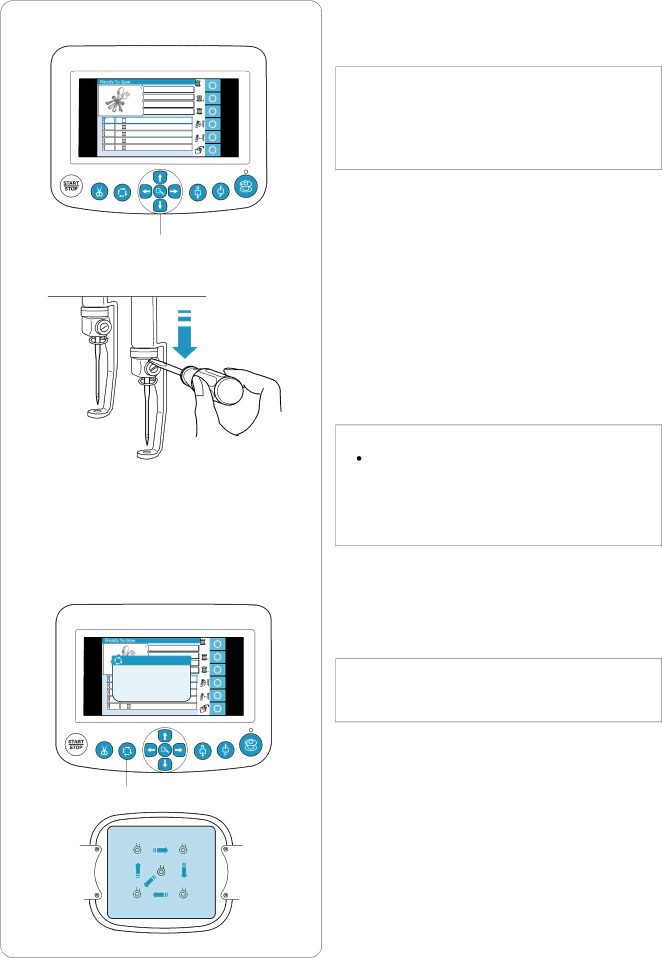
zSelect the pattern you wish to sew. The LCD touch panel shows the Ready to sew window.

NOTE:

The embroidery result may vary depending on the fabric and threads used. Make a test embroidery using the same fabric and threads before sewing on the actual garment.

Adjust the hoop position by pressing the jog buttons if necessary.

qJog buttons

x To check the needle drop position, lower the needle bar with the small screwdriver so you can see the needle point closer to the fabric.

Push down the needle bar using the screwdriver as illustrated.

The needle bar can be lowered by turning the handwheel clockwise.

CAUTION:

Make sure to bring the needle bar and presser foot to the up position by pressing the auto thread cutter button before pressing the trace button or turning the machine off.

cPress the trace button to check the size and position of the selected pattern against the hoop.

w Trace button

NOTE:

Check if the fabric edge will not obstruct the movement of the hoop.

55

Image 58
Contents Instruction Book Important Safety Instructions Grounding Instructions Table of Contents Setting UP the Machine Installing the MachineAdjusting the feet Removing the Head StoppersPage Names of Parts Sub control panel RCS unit optional itemStandard Accessories Optional RCS unitStandard Accessories Assembling the Spool Stand Setting the thread cone Setting the Thread Cones or Spools of ThreadSetting the spool of thread Installing the Hoop Supporter Installing the RCS Unit optional item Connecting the Power Supply Grounding InstructionsDirect PC-Link Needles Bobbin ThreadsStabilizers Winding the Bobbin Removing the bobbin case Inserting the bobbinInserting the bobbin case Threading the Needle Threading needle No.1⁄22 Threading the needle with the needle threader Setting the Fabric in the Embroidery Hoop Setting the Embroidery Hoop Adjusting the Hoop Supporter for Optional HoopsMachine operating buttons Mode buttonLCD brightness adjusting dial Start/Stop buttonY u LCD screenColor section layer setting Machine SettingsStitch count setting Needle bar number settingN1253 N2224 Starting to EmbroiderHM1 ? M1 02010 02/13 Removing the Hoop Adjusting the bobbin thread tension Adjusting the Thread TensionAdjusting the needle thread tension Tension is too tightChecking the needle Replacing the NeedleReplacing the needle Basic Operation of the Optional RCS Unit File open key Function keysMenu key SET keyOn-screen Help Movie Disconnecting the RCS Unit Advanced Operation with the Optional RCS Unit Selecting the Embroidery PatternsSelecting the built-in designs Color list option Function keys circle keysAutomatic color assignment Manual color assignment Monogramming Letter size Function keys Font selectionLettering orientation Letter caseEntering the characters Saving the monogramCorrecting the text To delete a character To insert a characterHorizontal orientation Placement of monogrammingVertical orientation Multi-color monogramming Editing Moving the pattern Editing FunctionsSelecting the hoop Resizing the patternDeleting the pattern Rotating the patternSaving the file Duplicating the pattern Flipping the patternMonogramming in an arc Customizing the color setting To customize the colors of the pattern imageCombining the Patterns and Lettering ⁄2 Edit Bright Blue Trac Outline M2126X110mm Buzzer sound control Customizing the Setting with the Sub Control PanelEco mode setting Machine ID numberMaximum sewing speed Resetting all to defaultsFormatting the memory Thread selectionReminder message ON/OFF Setting the trim tail lengthSetting the thread detector sensitivity Ignoring short stitchesJump thread trimming ON/OFF Jump thread trimming thresholdLCD brightness adjustment Customizing the Settings with the Optional RCS UnitInch/mm option Screen saver Touch screen calibrationMachine ID and name Yes ⁄2Maximum sewing speed ⁄1Grid size⁄3Hoop selection for monogramming ⁄4Selecting the thread brand ⁄5Screen color options⁄7Reserving the color for the needle bar ⁄6Reminder message ON/OFF⁄8Ignoring short stitches ¤2Setting the number of jumps for trimming ⁄9Setting the trim tail length¤0Setting the thread detector sensitivity ¤1Jump thread trimming ON/OFF¤3Language selection File Management Saving the Pattern as a FileCreating a new folder Opening a file Deleting the folder Deleting the fileEjecting the PC Design card PC Design CardsInserting the PC Design card Opening the embroidery pattern from the PC Design cardUSB Memory Opening the embroidery pattern from the USB memoryCD-ROM Drive Opening the embroidery pattern from the CD-ROMCleaning the Hook Cleaning the Bobbin CaseCleaning the Auto Thread Cutter Mechanism Oiling Audible Signals Error MessagesAudible signal Buzzer sounds when Troubleshooting Problem Cause ReferenceTroubleshooting