Smeg A1-6 Electronic Analogue Clock on some models only, List of Functions, Setting the time

Page 13

Instructions for the user

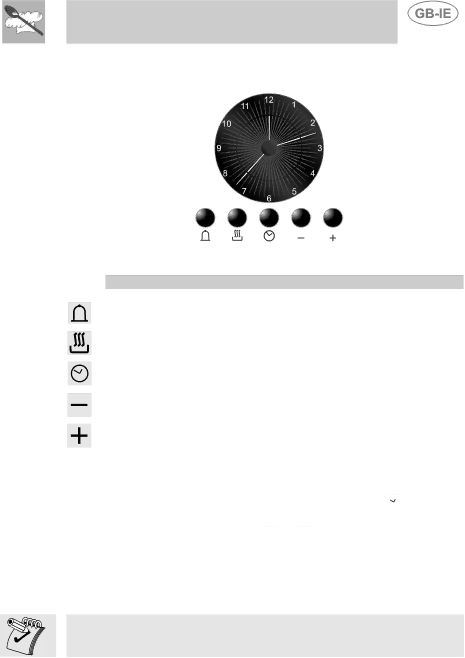
5.3 Electronic Analogue Clock (on some models only)

LIST OF FUNCTIONS

MINUTE-MINDER BUTTON

AUTOMATIC SWITCH-OFF TIMING BUTTON

TIME SETTING AND RESET

VALUE DECREASE BUTTON

VALUE INCREASE BUTTON

5.3.1Setting the time

When the oven is used for the first time, or after a power blackout, the

display flashes on and off at regular intervals. Press the key for 1/2 seconds to stop the display flashing and start setting of the current time.

Press the value modification keys or to increase or decrease by one minute for each time a key is pressed.

Press one of the two value modification keys until the current time appears. The clock will start from the time set 6/7 seconds after the last key is pressed.

At the end of each programmed cooking operation, the clock gives 8 beeps, repeated 3/4 times at intervals of about 1 and a half minutes. The beeps can be stopped at any moment by pressing any key.

47

Image 13
Contents Contents Instructions for Safe and Proper USE IntroductionPlate Must not be Removed Electrical connection Installation of the ApplianceThis rating plate must never be removed Ventilation requirements Adaptation to Different Types of GAS Replacement of nozzles on the hobArrangement of burners on cooking hob Burner and nozzle characteristics tableFinal Operations Adjustment of minimum for natural gasRegulation of minimum for LPG Mounting the rear top upstand Positioning and levelling of the applianceThermostat Knob Selection of cooking temperature is carried Description of SymbolsFunction Switch Knob Description of ControlsCooking HOB Burner Command Knob Manual mode cooking Delayed start cookingAnalog Programmer Regolazione delloraElectronic Analogue Clock on some models only Setting the timeList of Functions Minute-minder Programming Demo Function Lighting of the cooking hob burners USE of the Cooking HOBUSE of the Oven Practical advice for using the cooking hob burnersDiameter of containers Cooling fan system Oven LightStorage drawer Available Accessories Cooking Hints Function Switch Thermostat Selector Switch from 50 to 250CTraditional cooking Hot-air cookingGrill cooking Function Switch Thermostat Switch AT MaximumMake sure that the oven door is closed during cooking Function Switch Thermostat Switch in Position Function Switch Thermostat Switch from 50 to 250CHot-air grilling DefrostingSpit cooking Function Switch Thermostat Switch from 50 to 200CRecommended cooking table Traditional CookingHOT-AIR Cooking Cleaning stainless steel Cleaning and MaintenanceCleaning of cooking hob components Do not USE a Steam JET for Cleaning the Inside of the Oven Cleaning of the ovenBurner caps, flame cap crowns and burners Ignition plugs and thermocouplesUsing the self-cleaning liners Self-cleaning linersLooking after the self-cleaning liners Assembling the self-cleaning linersReplacement of light bulb Extraordinary MaintenanceOven door seal Removing the doorLubrication of gas taps