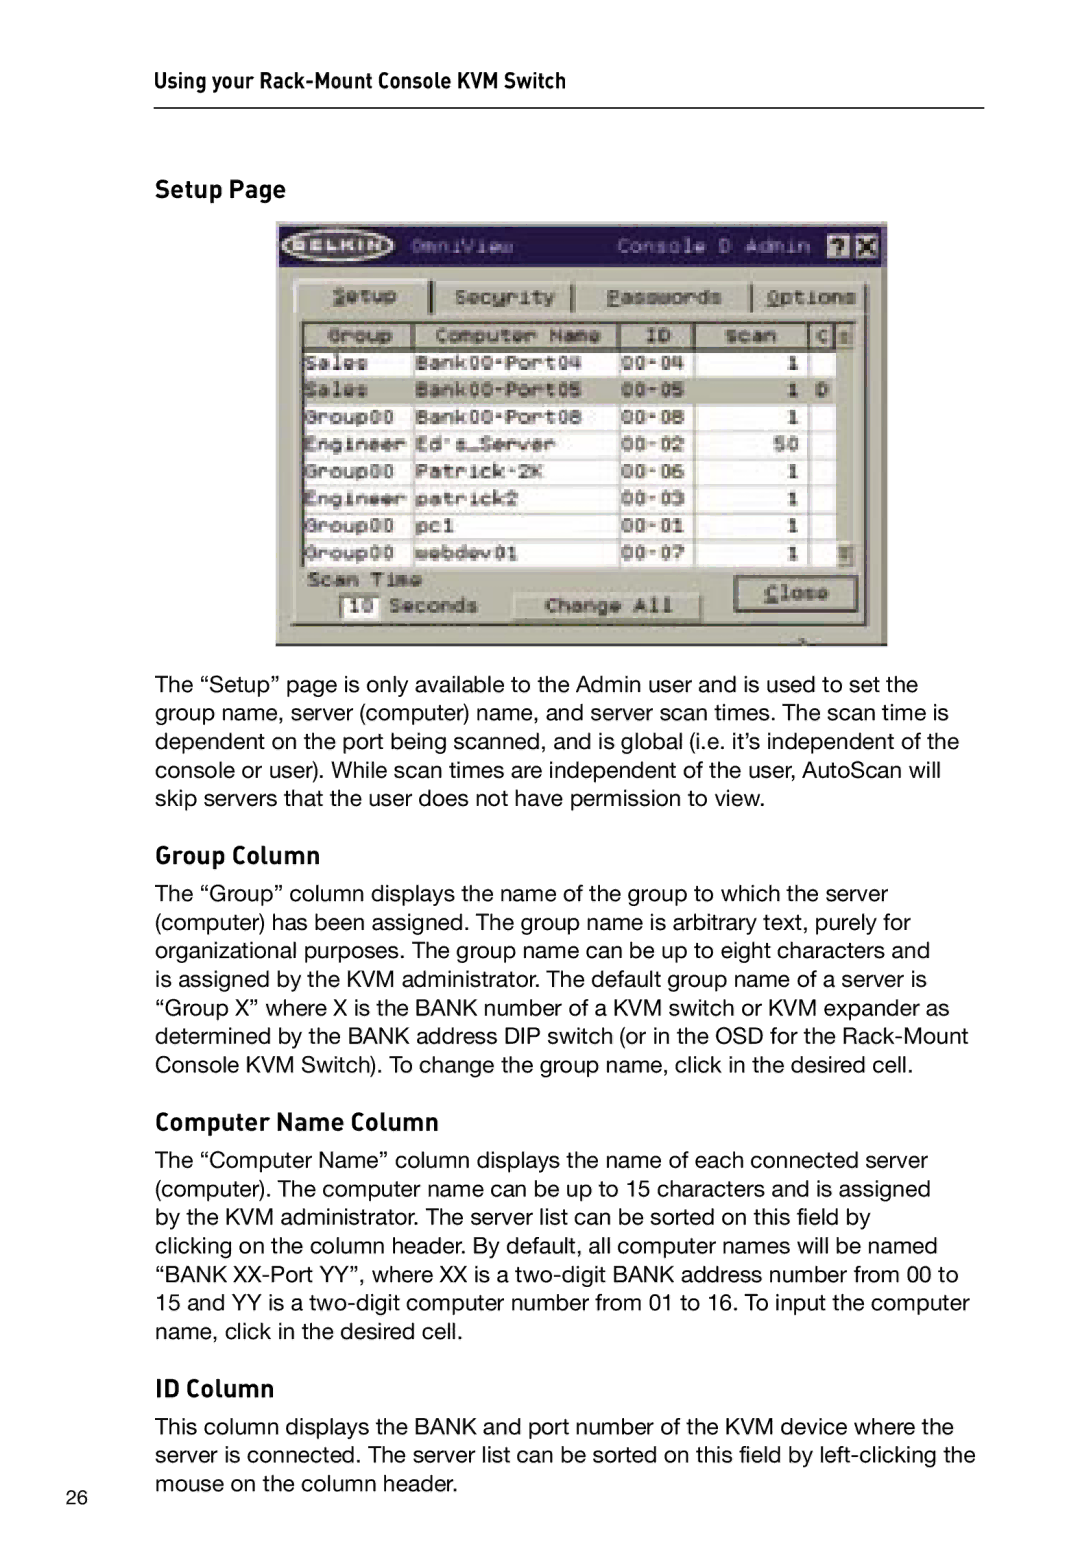
OmniView ENTERPRISE
1U Rack-Mount Console with Built-In 8-Port KVM Switch
Control your rack servers Control from a compact 1U
rack-mount console
1U Rack-Mount Console with Built-In 8-Port KVM Switch
User Manual
Table of Contents
section
Package Contents
AutoUpdate
Feature Overview
Quad-Bus Technology
IntelliView Graphical On-Screen Display OSD with Mouse Support
Hot Keys
Video Resolution
Reprogrammable Hot Key Initiator Sequence
AutoScan
Cables
Equipment Requirements
section
Operating System Requirements
Windows 98, 2000, Me, NT, XP Red Hat Linux 7.0, 7.1 Mandrake Linspire
Novell NetWare 5.x MAC OS X
LCD Display Buttons
Unit Display Diagrams
section
LCD Display Buttons
Switches in Daisy-Chain
Specifications
Max. LCD Resolution
Dimensions
Cable Length Recommendations
Pre-Configuration
Installing the Rack-Mount Console KVM Switch into a Server Rack
Step
Installing the Rack-Mount Console KVM Switch into a Server Rack
Remove the contents from the box
Step
section
Mount the Rack-Mount Console KVM Switch to your rack or cabinet
Step
Step
Installation
Unlock your Rack-Mount Console KVM Switch with keys provided
Installing the Rack-Mount Console KVM Switch into a Server Rack
Step
Step
section
Step
Step
Step
Step
Step
USB Connection
section
NOTE For USB Installation
Step
Step
Connecting Multiple KVM Devices Daisy-Chaining
Installation
DIP Switch Configuration Chart
Before you begin
DIP SWITCH #
Example of Daisy-Chain Configuration
Connecting the Daisy-Chain Cable
Adding additional units
Connecting the Daisy-Chain Cable
section
Connecting the servers
Connecting the Servers
Powering up the Systems
Selecting a Server Using Keyboard Hot Key Commands
Using your Rack-Mount Console KVM Switch
AutoScan Mode
section
IntelliView Graphical On-Screen Display Menu Control
Using the MultiView Feature
IntelliView OSD Features
section
Input and Navigation Features
Group Column
Main Page
Computer Name Column
ID Column
Mouse Column
Setup Button
Security Column
Console Column
Group Column
Setup Page
Computer Name Column
ID Column
Scan Column
Admin
Scan Time and “Change All” Button
Security Page
Guest
User
User Columns 1, 2, 3, G
Group Column
Password Entry Fields
Passwords Page
Enable Check Boxes
section
Options Page
AutoLogout Enable and Time
Broadcast Passwords
Display Inactive Ports
Display Banner
Display Restricted Ports
Alternate Attention Key
Daisy-Chain this KVM Switch
Disable Viewing
Advanced Dialog Page
Unit ID Assign BANK Address
Error Messages and Dialogs
Restore Factory Defaults
Login Dialog
Steal Control of this Host
Splash Screen
Banner
Installing the AutoUpdate application
The AutoUpdate Firmware Update Utility
Updating Firmware
section
Connecting the server to the Rack-Mount Console KVM Switch
section
Updating Devices via the Web
user needs to acquire the correct update file manually
be updated one at a time when you click “Next”
section
device is selected and a valid file has been selected
Using your Rack-Mount Console KVM Switch
Completing a Standalone Rack-Mount Console KVM Switch Firmware Update
Completing the Firmware Update
Completing a Firmware Update on Multiple KVM Devices Daisy-Chained
On Mac OS X v10.1 and up, press F12 to eject the CD
section
The following definitions are used throughout this User Manual
section
KVM Expander A device that allows users to expand the number of servers connected to their existing KVM configuration. It does not have a console port, so it must be daisy-chained to a KVM switch or Rack-Mount Console KVM Switch for a user to access the servers
Declaration of Conformity with FCC Rules
FCC Statement
for Electromagnetic Compatibility
Belkin Corporation Limited Two-Year Product Warranty