| .plat du poignée |
| la enclencheretAbaisser .poignéesa |
| parhautleverstirantleenplatleSortir |
| .cuissondechambreladearrière |
R | paroiladedéverrouillagedeflèche |
E | |
L | lasurs’aligneplatdul’encochequece |
L |
I | jusqu’àgauchelaversplatletourner |
O |
U | |
R | faireetmainsdeuxdesmétallique |
R |
E | poignéelasaisirEn .l’appareil |
V |
É |
D | decuissondeplatlesortir |
|
pourpoignéesdesprendreoumitainesdesMettre 10 |
| .cuisondecyclelependantdisparaître |
devraientvapeurdegouttelettesLes .paindul’effondrement |
d’éviterafinrapide)supercuissondemodeaurégléest |
l'appareillorsquenidernièrelaenviron(pendantCUISSON |
DECYCLELEPENDANTCOUVERCLELEOUVRIR |
PASTOUTEFOISFAUTNEIL .pétrissagedeetmélangede |
étapeslessurveillerpourcouvercleleouvrirpeutonéchéant, |
casLe .processuslependanthublotlesurformentsevapeur |
degouttelettesdesqueparfoisarriveIl .paindupréparation |
ladeétapeslessuivredepermettantpratiques |
plusdesd’observationhublotd’undotéestL’appareil 9 |
.cuisson la à et levage façonnage,au au relatives |
recette la de directives les suivre et préparation la de fin la à pâte |
la rendement,retirer le d’optimiser Afin .médiocres résultats |
des donner et lever trop peut l’appareil,elle dans longtemps |
trop pâte la de laisse on Si .cuisson aucune comporte ne cycle ce |
car ALIMENTAIRES PÂTES des ou PÂTE la de lorsqu’onprépare |
pas fonctionne nechaudaumaintiende cycle :LeNOTE |
.disparaisseaffichagel’quecejusqu’àenfoncée |
maintenirladeet(RESET)démarragedetouchelad’enfoncer |
suffitil60minutes,depériodeladefinlaavantchaud |
aumaintiendecyclelearrêterPour .chaudaumaintien |
decyclelependanttempstoutenl’appareildecuissondeplat |
leretirerpeutOn .pâteuxdeviennenequ’ild’éviterafindélais |
meilleurslesdanspainlesortiralorsfaudraitIl .branchéjours |
-touestl’appareilqueindiquerpouralluméresteilet clignoter |
dearrêtetémoinLe .finprendchaudaumaintiendecycle |
lel’heure,deboutAu .tempscependantchaudaugardéest |
painleetcuissonladefinlaaprès60minutesdemaximum |
unpendantclignoterdecontinuerougetémoinLe .cuisson |
ladefinlaàautomatiquementdémarrequichaud |
aumaintiendefonctiond’unedotéestL’appareil 8 |
| .clignoteràremetse |
AM""12:00l'affichageplus,De .clignoterougetémoinle |
etprêtestpainlequeindiquerpoursonoressignaux |
plusieursémetl'appareilcuisson,ladefinlaÀ .).etc3:48, |
(3:49,minuteunedeintervallesàcuissondetempsdurebours
àcompteunfaitL'affichage .foncée)ouordinairesoitcroûte laqueimporte(peubasedepainunpourréglagelechoisit onsiexemple,par"3:50",parremplacéalorsestclignotant AM""12:00L'affichage .s'allumefonctionnementderouge
témoinlequeetsonoresignalunémettel'appareil 7 quecejusqu'àdémarragedetouchelaEnfoncer
.foncée) ou (pâle voulue
couleur la indique l'affichage de flèche la que ce jusqu'à croûte de couleur la de touche la enfonçant en voulue croûte de couleur la choisir
sucrés, ou rapide super cuisson à base, de pains les Pour .autres) entre sucré, pain rapide, super (cuisson suivant choix
au alors déplace se l'affichage de flèche La .pain de type du touche la sur appuyant en choisie recette la de fonction en réglage autre un choisir toutefois peut On .démarrage de touche la d'enfoncer suffit il ordinaire, croûte 6 une avec base de pain de miche une préparer Pour
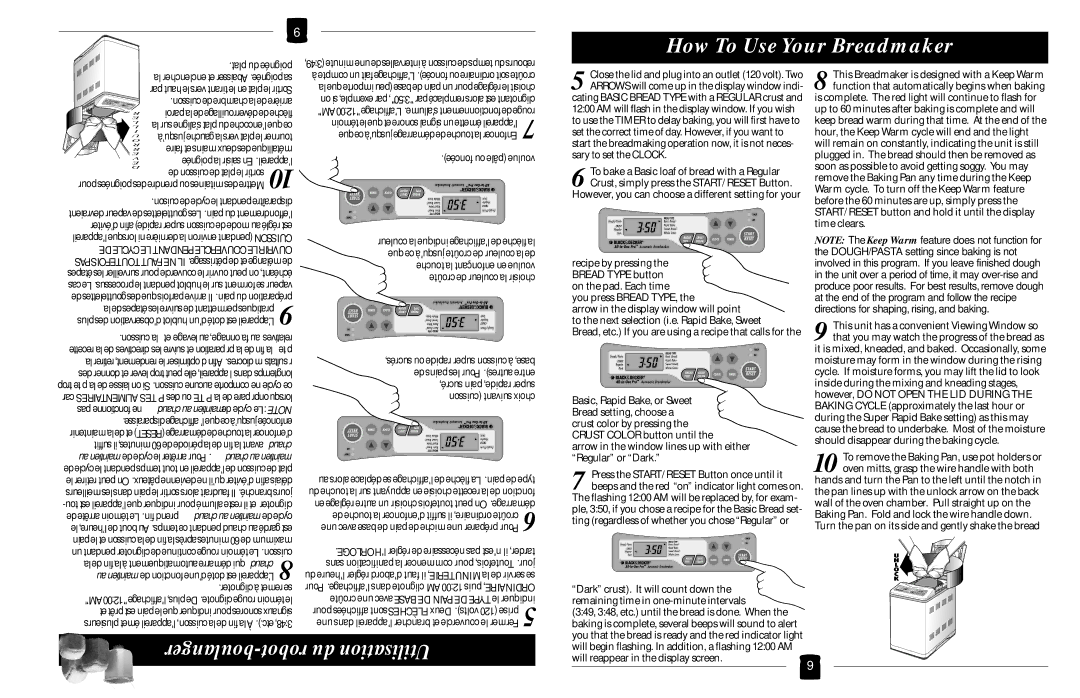
.l'HORLOGE régler de nécessaire pas n'est il tarder, sans panification la commencer pour Toutefois, .jour du l'heure régler d'abord faut il MINUTERIE, la de servir se Pour .l'affichage dans clignote AM 12:00 puis ORDINAIRE, croûte une avec BASE DE PAIN DE TYPE le indiquer pour affichées sont FLÈCHES Deux .volts) (120 prise 5 une dans l'appareil brancher et couvercle le Fermer
5 Close the lid and plug into an outlet (120 volt). Two ARROWS will come up in the display window indi- cating BASIC BREAD TYPE with a REGULAR crust and
12:00 AM will flash in the display window. If you wish to use the TIMER to delay baking, you will first have to set the correct time of day. However, if you want to start the breadmaking operation now, it is not neces- sary to set the CLOCK.
6 To bake a Basic loaf of bread with a Regular Crust, simply press the START/RESET Button.
However, you can choose a different setting for your
recipe by pressing the BREAD TYPE button on the pad. Each time you press BREAD TYPE, the
arrow in the display window will point
to the next selection (i.e. Rapid Bake, Sweet
Bread, etc.) If you are using a recipe that calls for the
Basic, Rapid Bake, or Sweet Bread setting, choose a crust color by pressing the CRUST COLOR button until the
arrow in the window lines up with either “Regular” or “Dark.”
7 Press the START/RESET Button once until it beeps and the red “on” indicator light comes on.
The flashing 12:00 AM will be replaced by, for exam- ple, 3:50, if you chose a recipe for the Basic Bread set- ting (regardless of whether you chose “Regular” or
“Dark” crust). It will count down the remaining time in one-minute intervals
(3:49, 3:48, etc.) until the bread is done. When the baking is complete, several beeps will sound to alert you that the bread is ready and the red indicator light
8 This Breadmaker is designed with a KeepWarm function that automatically begins when baking
is complete. The red light will continue to flash for up to 60 minutes after baking is complete and will keep bread warm during that time. At the end of the hour, the KeepWarm cycle will end and the light will remain on constantly, indicating the unit is still plugged in. The bread should then be removed as soon as possible to avoid getting soggy. You may remove the Baking Pan any time during the Keep Warm cycle. To turn off the KeepWarm feature before the 60 minutes are up, simply press the START/RESET button and hold it until the display time clears.
NOTE: The Keep Warm feature does not function for the DOUGH/PASTA setting since baking is not involved in this program. If you leave finished dough in the unit over a period of time, it may over-rise and produce poor results. For best results, remove dough at the end of the program and follow the recipe directions for shaping, rising, and baking.
9 This unit has a convenient Viewing Window so that you may watch the progress of the bread as
it is mixed, kneaded, and baked. Occasionally, some moisture may form in the window during the rising cycle. If moisture forms, you may lift the lid to look inside during the mixing and kneading stages, however, DO NOT OPEN THE LID DURING THE BAKING CYCLE (approximately the last hour or during the Super Rapid Bake setting) as this may cause the bread to underbake. Most of the moisture should disappear during the baking cycle.
10 To remove the Baking Pan, use pot holders or oven mitts, grasp the wire handle with both
hands and turn the Pan to the left until the notch in the pan lines up with the unlock arrow on the back wall of the oven chamber. Pull straight up on the Baking Pan. Fold and lock the wire handle down. Turn the pan on its side and gently shake the bread