Manuals
/
Black Box
/
Computer Equipment
/
Network Hardware
Black Box
EME149D-60 manual Frequently Asked Questions FAQs, Page, 3. LED patterns in Safe mode
Models:
servsensor v4e lite with 20 or 60 vac or vdc dry contacts
EME149A-20
EME149A-60
EME149D-60
EME149D-20
1
80
88
88
Download
88 pages
44.51 Kb
77
78
79
80
81
82
83
84
<
>
Specifications
Install
FAQ
Maintenance
Select the status you want to issue the alert for
ServSensor with 20 or 60 Extra Dry Contact Web Interface Setup
Testing the New IP Address with the “Ping” Command
14. Advanced settings screen
4. LED patterns in Recovery mode
Safety
Page 80
Image 80
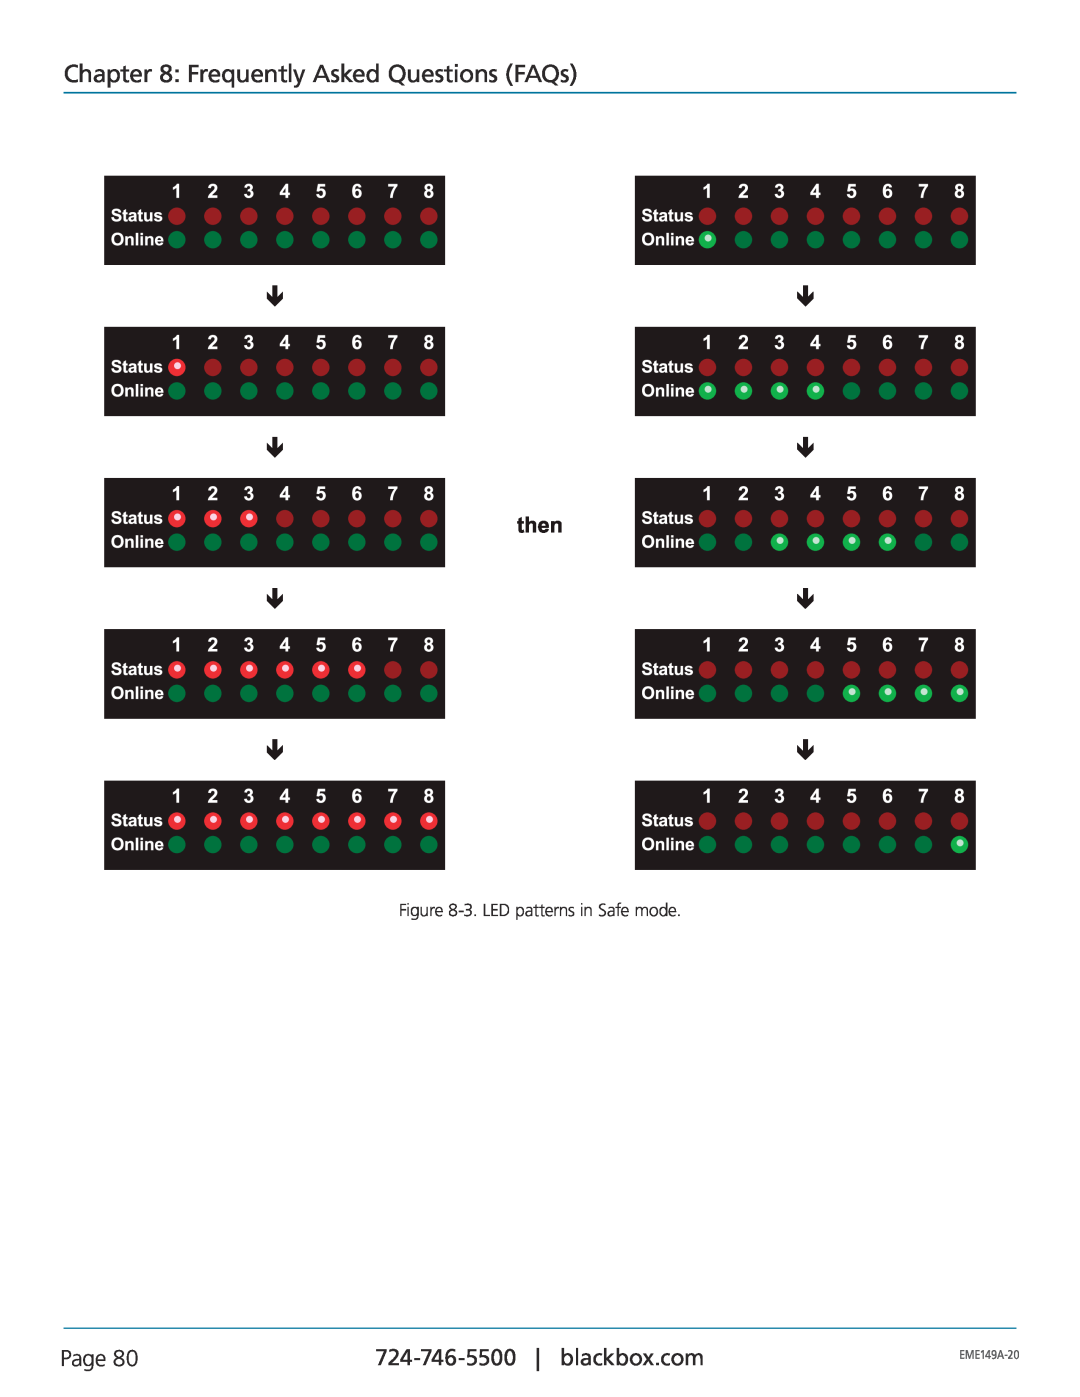
Chapter 8: Frequently Asked Questions (FAQs)
Figure
8-3.
LED patterns in Safe mode.
Page 80
724-746-5500
blackbox.com
EME149A-20
Page 79
Page 81
Page 80
Image 80
Page 79
Page 81
Contents
Features an embedded Web server and Linux operating system
ServSensor V4E Lite with 20 or 60 VAC or VDC Dry Contacts
EME149A-20 EME149A-60 EME149D-20 EME149D-60
Customer Support Information
Trademarks Used in this Manual
Trademarks Used in this Manual
Page
FCC and IC RFI Statements
Page
Normas Oficiales Mexicanas Electrical Safety Statement
NOM Statement
Instrucciones de Seguridad
Page
Page
Table of Contents
Table of Contents
Page
Chapter 1 Specifications
1. Specifications
Chapter 2 Overview
2. Overview 2.1 Introduction
2.2 What’s Included
Page
2.3 Hardware Description
2.3.1 EME149A-20 Front Panel
Chapter 2 Overview
Page
2.3.2 EME149A-20 Back Panel
Chapter 2 Overview
Page
Expansion ports E1-E4
2.3.3 EME149A-60 Front Panel
Chapter 2 Overview
Page
sound sensor or use an external mic
Page
2.3.4 EME149A-60 Back Panel
Chapter 2 Overview
Page
2.3.5 EME149D-20 Front Panel
Chapter 2 Overview
Page
2.3.6 EME149D-20 Back Panel
Chapter 2 Overview
Page
2.3.7 EME149D-60 Front Panel
Chapter 2 Overview
Page
2.3.8 EME149D-60 Back Panel
Chapter 2 Overview
2.4 ServSensor with 20 or 60 Extra Dry Contact Inputs, VAC, or VDC
2.4.1 Extra Dry Contact Input Practical Applications
Chapter 2 Overview
Page
Page
2.4.2 ServSensor with 20 or 60 Extra Dry Contact Web Interface Setup
Chapter 2 Overview
Chapter 2 Overview
Page
Figure 2-12. Critical status screen
Figure 2-13. Online selected
Page
Figure 2-14. Advanced settings screen
Chapter 2 Overview
Page
Chapter 3 Installation
3. Installation 3.1 Setting Up the IP Address
Chapter 3 Installation
Figure 3-2. User Type/Password screen
Figure 3-3. Settings tab
Page
Page
3.2 Testing the New IP Address with the “Ping” Command
Chapter 3 Installation
Page
3.3 Firmware Upgrade
Chapter 3 Installation
Page
Chapter 3 Installation
1. Click “System Administrator” and then “System Maintenance.”
Page
3.4 Multi-users and Groups Setup 3.4.1 Group Setup
Chapter 3 Installation
Chapter 3 Installation
Figure 3-13. Group Setup screen
Page
Figure 3-14. Groups page
4. Click on the “Add” button to add your groups as shown in Figure
Chapter 3 Installation
Page
Page
3.4.2 User Setup
Chapter 3 Installation
Figure 3-19. Enter user details
Chapter 3 Installation
Page
3.5 Services and Security 3.5.1 Active Services Application Disabling
Chapter 3 Installation
Figure 3-22. Services and Security screen
Page
Page
3.5.2 Closing or Changing Ports Disabling HTTP and Enabling HTTPS
Chapter 3 Installation
Page
3.5.3 The SNMPv3 SSL Security Feature
Chapter 3 Installation
Page
3.5.4 Active Security
Chapter 3 Installation
3.5.5 The NAC or Network Access Control Security Feature
3.6 Setting Up a Sensor
Chapter 3 Installation
Page
Figure 3-29. Summary page
Chapter 3 Installation
Page
Page
3.6.1 Notification Thresholds
Chapter 3 Installation
Figure 3-32. Normal status indicated
Chapter 3 Installation
Page
3.6.2 Advanced Sensor Settings
Chapter 3 Installation
Click on the Advanced Settings tab to get the options shown in Figure
Figure 3-36. Advanced Sensor Settings screen
Page
Chapter 3 Installation
Advanced Mode Functions FIgure 3-37. Advanced mode functions, units
Figure 3-39. Advanced setings, reading offset
Chapter 3 Installation
Page
Data Collection Type
Chapter 3 Installation
Page
Chapter 3 Installation
Page
Figure 3-42. Gauge Style screen
EME149A-20
Chapter 3 Installation
Page
Figure 3-43. Sensor threshold levels
EME149A-20
Chapter 3 Installation
Figure 3-44. Advanced Settings Text and Colors screen
Figure 3-45. Advanced Settings, Check Rate of Change screen
Page
Check rate of change
Chapter 3 Installation
Page
Page
3.7 Using an Internal Mic as a Sound Detection Sensor
Chapter 3 Installation
Chapter 3 Installation
Page
Figure 3-48. Sound Detector tab
EME149A-20
Figure 3-49. Advanced options
Chapter 3 Installation
Page
Page
3.8 Expansion Ports
Chapter 3 Installation
Figure 3-52. Extended Port1 selection
Chapter 3 Installation
Page
Chapter 3 Installation
Page
Figure 3-54. Notification Thresholds page
EME149A-20
Chapter 4 Notifications
4. Notifications
4.1 Adding a Notification
Page
Page
4.2 SNMP Trap
Chapter 4 Notifications
Figure 4-4. Notification parameters
Chapter 4 Notifications
Page
Figure 4-6. Parameter Selection, screen #2
Chapter 4 Notifications
Page
Figure 4-8. Select the sensor
Chapter 4 Notifications
Page
Page
4.3 E-mail
Chapter 4 Notifications
Figure 4-12. Input e-mail name and message Figure 4-13. Attach graph
Chapter 4 Notifications
Page
Figure 4-14. Input SMTP server address
Chapter 4 Notifications
Page
Chapter 4 Notifications
Page
Figure 4-17. Select status and action type
11. Click on “Create.” Figure 4-18. Create notification link
Figure 4-19. Create notification tab select board, select termperature
Chapter 4 Notifications
Page
Page
4.4 SMS Notification
Chapter 4 Notifications
Figure 4-23. SMTP Action Wizard, screen #2
Chapter 4 Notifications
Page
Figure 4-25. Macro script message
Chapter 4 Notifications
Page
Chapter 4 Notifications
Page
Figure 4-27. Select number of times to resend and intervals
9. Select the sensor that you want to bind this notification to
Figure 4-29. Link sensor to action tab
Chapter 4 Notifications
Page
Page
4. Select the status you want to issue the alert for
Chapter 4 Notifications
Chapter 5 Mapping
5. Mapping
5.1 Adding a Map
NOTE The maximum map file size is 512 KB
Figure 5-3. Enter map name
Chapter 5 Mapping
Page
Chapter 5 Mapping
Page
Figure 5-6. Sensor map
Figure 5-7. Add sensors to map
Chapter 5 Mapping
Page
Figure 5-8. Position sensor icons on map
Figure 5-9. Click “Lock.”
Page
5.2 Monitoring via the Map Interface
Chapter 5 Mapping
Page
Chapter 6 Filters
6. Filters 6.1 Sensor Filters
Page
6.2 Syslog Filters
Chapter 6 Filters
Figure 6-6. Drop-down menu
Chapter 6 Filters
Page
You can alter your reload interval by using the options shown below
Chapter 6 Filters
Page
Figure 6-8. Change reload interval
Page
Chapter 7 Making the ServSensor Visible on the Internet
7. Making the ServSensor Visible on the Internet
Page
Chapter 8 Frequently Asked Questions FAQs
8. Frequently Asked Questions FAQs
Chapter 8 Frequently Asked Questions FAQs
Figure 8-2. LED patterns in Normal mode
Page
EME149A-20
Chapter 8 Frequently Asked Questions FAQs
Figure 8-3. LED patterns in Safe mode
Page
EME149A-20
Chapter 8 Frequently Asked Questions FAQs
Figure 8-4. LED patterns in Recovery mode
LEDs run clockwise after the power is connected
From left to right, each LED indicates 1st LED U-Boot init
Question I forgot my unit’s IP address
Chapter 8 Frequently Asked Questions FAQs
Page
Page
Chapter 8 Frequently Asked Questions FAQs
Question How do I set up my routing table?
E-Mail This sends a notification via e-mail
Chapter 8 Frequently Asked Questions FAQs
Page
Figure 8-8. Win Network screen
Chapter 8 Frequently Asked Questions FAQs
Page
2. Initiate connection from a ServSensor to OpenPhone PC
Chapter 8 Frequently Asked Questions FAQs
Page
Page
EME149A-20
Tech support the way it should be
About Black Box
Black Box Tech Support FREE! Live. 24/7