Assembly
Installation And Removal Of The Blade
Disconnect plug from power source before performing any assembly,
adjustment or repair to avoid possible injury.
1. The miter saw is equipped with a lock pin used to lock the miter saw in the lowered position. To release, push the handle down slightly and pull the lock pin to its full out position and rotate 90°.
NOTE: If there is difficulty in pulling the lock pin out, you may need to adjust the depth stop bolt so the handle can be pushed down.
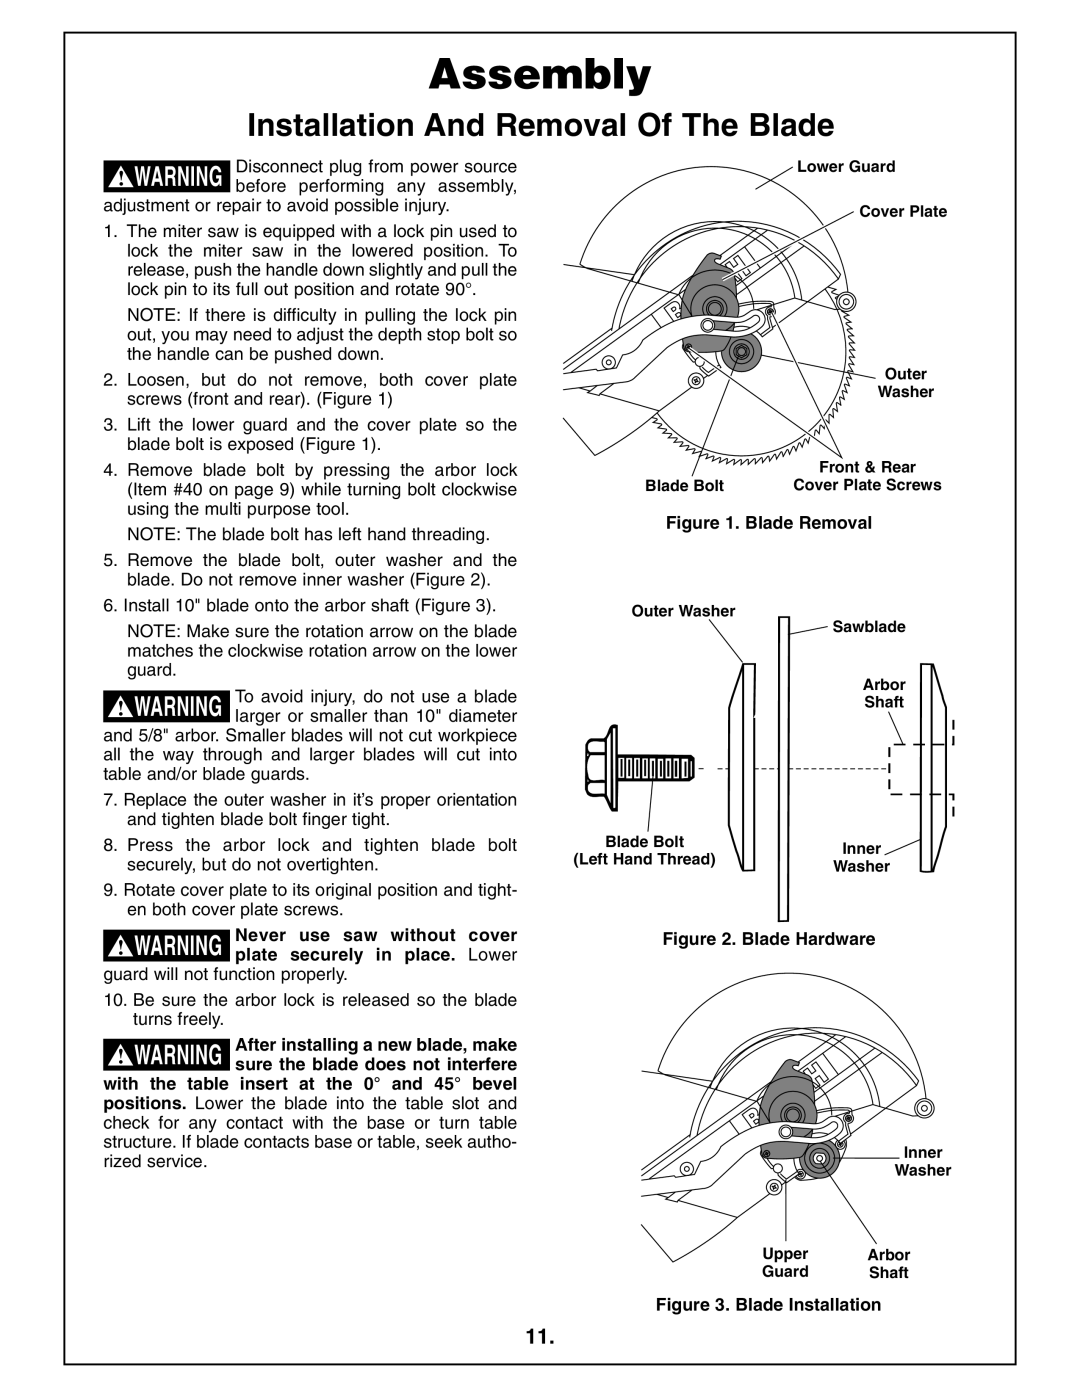
2. Loosen, but do not remove, both cover plate screws (front and rear). (Figure 1)
3. Lift the lower guard and the cover plate so the blade bolt is exposed (Figure 1).
4. Remove blade bolt by pressing the arbor lock (Item #40 on page 9) while turning bolt clockwise using the multi purpose tool.
NOTE: The blade bolt has left hand threading.
5. Remove the blade bolt, outer washer and the blade. Do not remove inner washer (Figure 2).
6. Install 10" blade onto the arbor shaft (Figure 3).
NOTE: Make sure the rotation arrow on the blade matches the clockwise rotation arrow on the lower guard.
To avoid injury, do not use a blade ! WARNING larger or smaller than 10" diameter
and 5/8" arbor. Smaller blades will not cut workpiece all the way through and larger blades will cut into table and/or blade guards.
7. Replace the outer washer in it’s proper orientation and tighten blade bolt finger tight.
8. Press the arbor lock and tighten blade bolt securely, but do not overtighten.
9. Rotate cover plate to its original position and tight- en both cover plate screws.
Never use saw without cover ! WARNING plate securely in place. Lower
guard will not function properly.
10.Be sure the arbor lock is released so the blade turns freely.
After installing a new blade, make ! WARNING sure the blade does not interfere
with the table insert at the 0° and 45° bevel positions. Lower the blade into the table slot and check for any contact with the base or turn table structure. If blade contacts base or table, seek autho- rized service.
Lower Guard
Cover Plate
Outer
Washer
| Front & Rear |
Blade Bolt | Cover Plate Screws |
Figure 1. Blade Removal
Outer Washer
![]() Sawblade
Sawblade
Arbor
Shaft
Blade Bolt | Inner | |
(Left Hand Thread) | ||
Washer | ||
|
Figure 2. Blade Hardware
Inner
Washer
Upper Arbor
Guard Shaft
Figure 3. Blade Installation
11.