Read before use
Important Safety Instructions
For a longer service life
For Users in the UK, EIRE, Malta and Cyprus only
Contents
Sewing
Adjusting the Thread Tension
Adjusting the Stitch Width and Length
Useful Functions
Troubleshooting
Stitch Settings
Care and Maintenance
Appliqué, Patchwork and Quilt Stitching
Sewing Machine Features
Introduction
Included accessories
Accessories
Attaching the stitch pattern plate
Optional accessories
Following are available as optional accessories
Names of Machine Parts and Their Functions
Front view
Needle and presser foot section
Right-side/rear view
Operation buttons
Start/Stop button
Operation panel
LCD liquid crystal display
Page
Getting Ready
Power supply precautions
Turning the Machine On/Off
Turning off the machine
Turning on the machine
Make sure that the machine is not sewing
Understanding the LCD Screens
BPresspanel. Settings key in the operation
Changing the Machine Settings
Changing the settings
EPresskey. OK key or Cancel/clear
List of stitch or machine attributes
Attribute Icon Details Reference
CPresskey. OK key or Cancel/clear
Adjusting the brightness of the LCD
Changing the screen language
Bobbin precautions
Winding/Installing the Bobbin
Winding the bobbin
Place the spool of thread for the bobbin onto the spool pin
Make sure that the thread passes under the pretension disk
NPress Start/Stop button once
Remove the bobbin from the shaft
Installing the bobbin
Slide the bobbin cover latch to the right
Correctly, reinsert the thread
GReattach the bobbin cover
Upper Threading
Threading the upper thread
Upper Threading
DOpen the top cover
Needle bar thread guide
Threading the needle
CLower the presser foot lever to lower the presser foot
Needle threader lever
BLower the presser foot lever
Using the twin needle
AThreadguide. the machine to the needle bar thread
Threadeye. the upper thread for the left needle
DInsert the extra spool pin onto the bobbin winder shaft
Attach zigzag foot J
KSelect a stitch
LPress Needle mode selection key
Start sewing
Pulling up the bobbin thread
Insert the bobbin into the bobbin case
Replacing the Needle
Needle precautions
This section provides information on sewing machine needles
Needle types and their uses
Fabrics
Correct needle
Checking the needle
Replacing the needle
Incorrect needle
DLower the presser foot lever
Replacing the presser foot
Presser foot precautions
Replacing the Presser Foot
Presser foot presses down on the fabric
Presser foot holder releases the presser foot
Removing the presser foot holder
Adjusting the pressure of the presser foot
When you are finished sewing, reset the dial to 3 standard
Lower the presser foot lever
Attaching the walking foot ARemove the presser foot holder
Using the walking foot
BTurn off the sewing machine CRaise the presser foot lever
EAttach the presser foot holder
Sewing large pieces of fabric
Sewing Cylindrical or Large Pieces
Stitching cylindrical pieces
Pull the flat bed attachment off to the left
CInstall the wide table
Getting Ready
Saving stitch settings
Sewing Basics
General sewing procedure
Sewing
Positioning the fabric
CPlace the fabric under the presser foot
Starting to sew
Using the operation buttons
Using the foot controller
BPress Start/Stop button once
Machine stops sewing with the needle lowered in the fabric
Securing the stitching
Sewing reinforcement stitches
Cutting the thread
BRaise the presser foot lever
Using the manual thread cutter
Correct thread tension
Adjusting the Thread Tension
Changing the tension of the upper thread
Upper thread is too tight
BSelect a stitch
Adjusting the Stitch Width and Length
Adjusting the stitch width
Wider, press Stitch width key
Adjusting the stitch length
Changing the needle stop position
Useful Functions
BPress Needle stop position key
Useful Functions
Automatically cutting the thread
CPress Automatic thread cutting key
Saving stitch settings
Hands-free raising Lowering of the presser foot
Changing the sewing direction
Useful Sewing Tips
Trial sewing
Sewing curves
Sewing thin fabrics
Sewing thick fabrics
Sewing stretch fabrics
Sewing an even seam allowance
Sewing leathers or vinyl fabrics
Aligning the fabric with the presser foot
Sewing Basics
Satin stitching using the sewing Speed controller
Using overcasting foot G
Using zigzag foot J
Selecting stitching Overcasting Stitches
Selecting stitch types
Selecting Stitching
Patterns
Decorative stitches No.01-31
Selecting stitching
Decorative stitches
Character stitches
To select a different stitch
Memo
Overcasting Stitches
Sewing overcasting stitches using overcasting foot G
Attach overcasting foot G
Sewing overcasting stitches using zigzag foot J
Sewing overcasting stitches using the optional side cutter
Remove the presser foot
Position the fabric in the side cutter
Lower the presser foot lever, and then start Ksewing
CStart sewing
Basic Stitching
Basting
AAttach zigzag foot J
CSelect a stitch
When sewing is finished, cut the thread
Basic stitching
Changing the needle position
CAttach blind hem foot R
Sew a blind hem according to the following procedure
Blind Hem Stitching
DSelect a stitch
If the needle catches too much of the hem fold
Buttonhole Stitching/Button Sewing
Buttonhole sewing
Buttonhole Stitching/Button Sewing
CAttach buttonhole foot a
If the button does not fit in the button guide plate
Pullpossible.down the buttonhole lever as far as
Seam ripper
Sewing buttonholes on stretch fabrics
DSelect stitch
Button sewing
Attach button-sewing foot M
Place the button into button-sewing foot M
Attaching a shank to a button
CCut off any excess thread
Inserting a centered zipper
Zipper Insertion
Zipper can be sewn in place
FSelect stitch
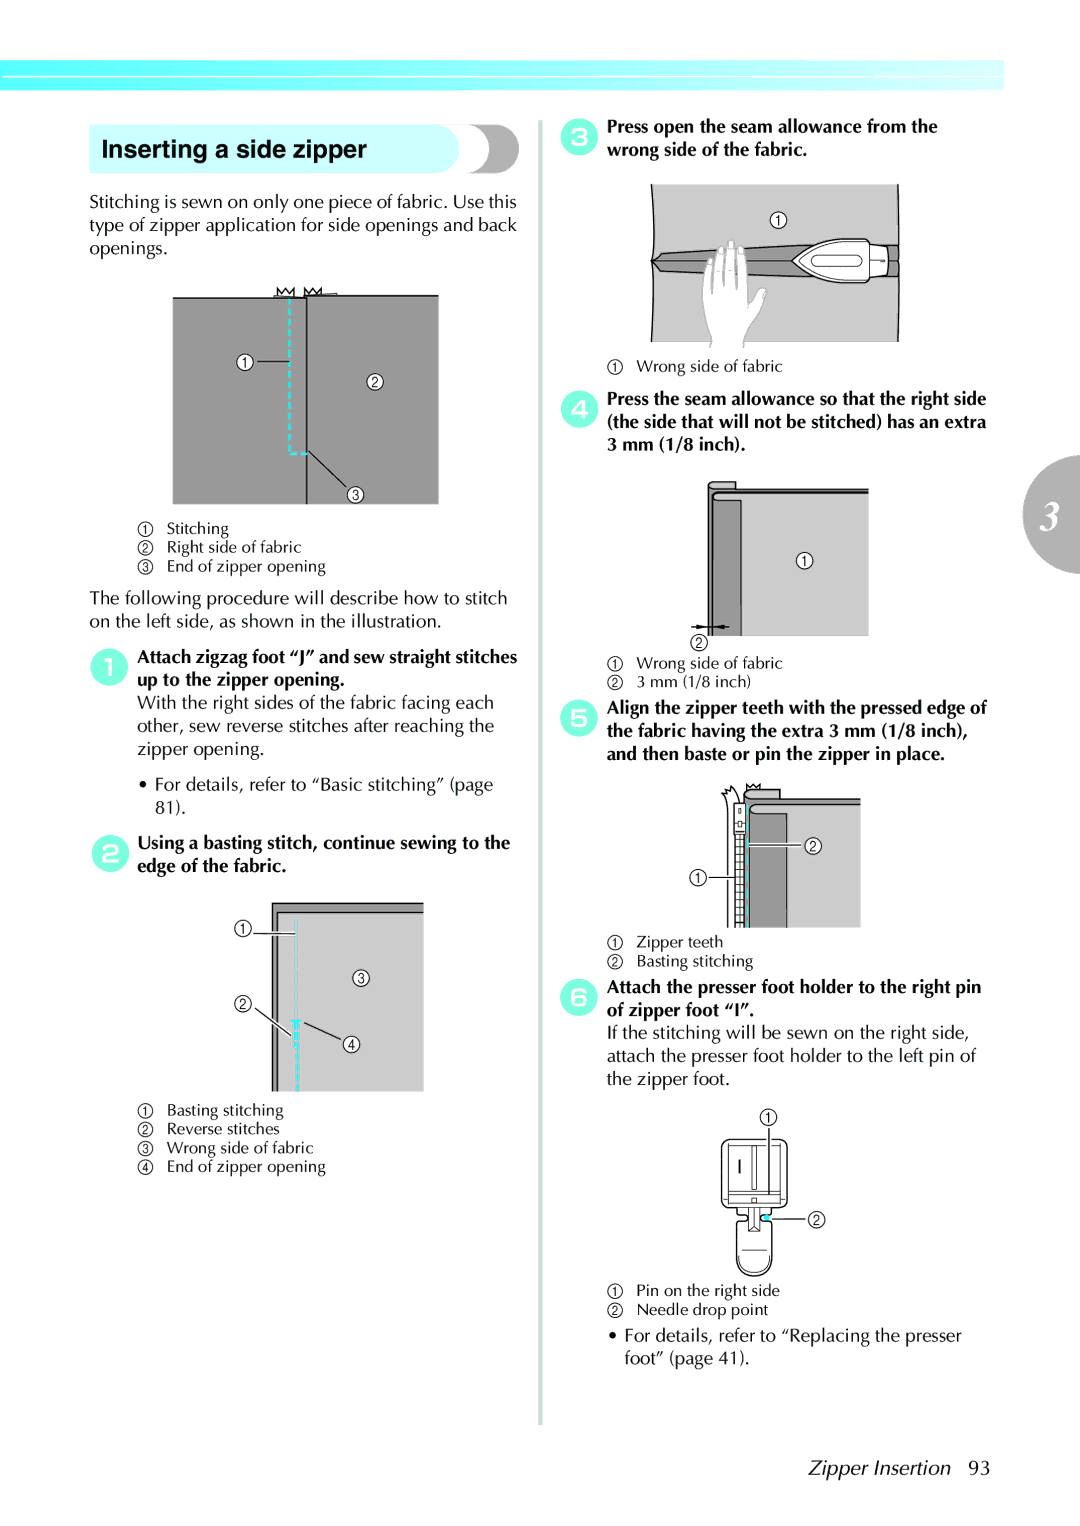
Inserting a side zipper
GSelect stitch
Topstitch around the zipper
Zipper Insertion
Zipper/piping Insertion
Zipper and piping can be sewn in place
Inserting a piping
HTopstitch around the zipper
Elastic attaching
Sewing Stretch Fabrics and Elastic Tape
Stretch stitching
CSew the fabric without stretching it
BAttach zigzag foot J
100
Appliqué, Patchwork and Quilt Stitching
Stitch
Appliqué stitching
Select a stitch
102
Patchwork crazy quilt stitching
Piecing
CSelect stitch
Quilting
ABaste the fabric to be quilted. bAttach the walking foot
Free-motion quilting
104
AConnect the foot controller
Satin stitching using the sewing speed controller
DPressis displayed.or Stitch length keys until
106
FPresskey. OK key or Cancel/clear
EPress. or Stitch width keys to select
Triple stretch stitching
Reinforcement Stitching
Bar tack stitching
108
Darning
CSelect stitch 58 or
110
EPullpossible.down the buttonhole lever as far as
Attach monogramming foot N
Eyelet Stitching
Select stitch
Decorative Stitching
112
ESet the stitch width to 7.0 mm 1/4 inch
Fagoting
CAttach zigzag foot J DSelect stitch 32 or
GAfter sewing is finished, remove the paper
Smocking
Scallop stitching
114
Shell tuck stitching
ESelect stitch 31 , 32 or
Heirloom stitching
Install the wing needle
Joining
116
DStart sewing
FPress or Stitch length keys until is displayed
GPress. or Stitch width keys to select
HPresskey. OK key or Cancel/clear
118
DSew along the center of the unfrayed section
Sewing beautiful patterns
Sewing the Various Built-In Decorative Patterns
Sewing patterns
Select the first pattern
Combining patterns
120
Select the next pattern
Repeat sewing patterns
Checking the selected pattern
122
DPresskey. OK key or Cancel/clear
Changing the pattern size
CPress or Stitch length keys until is displayed
Select a decorative satin stitch No -62 Selected with Press
Changing the stitch density
Repeat steps a through e
Bpanel
Changing the pattern length
EPress OK key or Cancel/clear key
124
Press or Stitch length keys until is displayed
Select a stitch Presspanel. Settings key in the operation
Mirror imaging the pattern
DPress. or Stitch width keys to select
Retrieving a pattern
Saving patterns
126
BSelect
Realigning the pattern
Check the sewn pattern
128
GPress or Stitch width keys
Drawing a sketch of the pattern
Designing a Pattern
ADrawset. a sketch of the pattern on the grid sheet
130
Entering the pattern data
BTurn on the sewing machine CSelect No of , selected with
GSelect , and then press OK key
To delete a point
132
Examples of designs
Point
Error messages
Cleaning the machine surface
Cleaning the race
Cancelling the operation beep
Utility stitches
Stitch Settings
134
Stitch Settings
136
Auto Manual
Reinforcement
138
Other stitches
Stitches
Utility
Character
140
Gothic font
Stitches Script font
Stitches Outline style
Cleaning the race
Care and Maintenance
Cleaning the machine surface
142
Installposition.the flat bed attachment in its original
HInstall the needle plate cover
Remove the bobbin case
144
Troubleshooting
Operate
Troubleshooting
146
Skipped
LCD
Error messages
148
Operation beep
Cancelling the operation beep
Nothing appears in the LCD
CPressdisplayed.or Stitch length keys until is
EPress Cancel/clear key or OK key
150
Index
152
LCD
Index
English 885-U22 XE0403-001