SERVICE (cont.)

FROTHER AND WHIPPER MOTOR - FMD-4 (shown) & FMD-5 (cont.)

4.Disconnect vacuum hose (12) from fan baffle (13).

5.Remove the steam collector (1) by pulling it for- ward and at the same time twisting it clockwise.

6.Pull the mixing chamber (2) out of the whipper chamber (4).

7.Remove the two #4-40 x .25" screws securing the fan baffle (13) to the whipper motor mounting panel and remove fan baffle. Set aside for reas- sembly.

8.Remove dispense tip (3) and twist the whipper chamber (4) clockwise and pull it off the whipper chamber receptacle (7).

9.Pull the frother (6) off the motor shaft. Notice the flat side on the shaft and the matching flat inside the frother. It is important that these two flats are lined up when reassembling.

10.Slip the O-ring (5) off the whipper chamber recep- tacle (7).

11.Slide the receptacle w/seal off of the motor shaft.

12.Slide the slinger (9) off of the motor shaft.

13.Remove the two nuts (8) securing whipper cham-

ber receptacle (7) and whipper motor (10) to the front panel.

NOTE: To remove the receptacle only rotate clockwise until the receptacle clears the nuts (8) and slide off of the motor shaft.

14.Disconnect the black leads on the motor (10) from the main wiring harness.

15.Remove motor and discard.

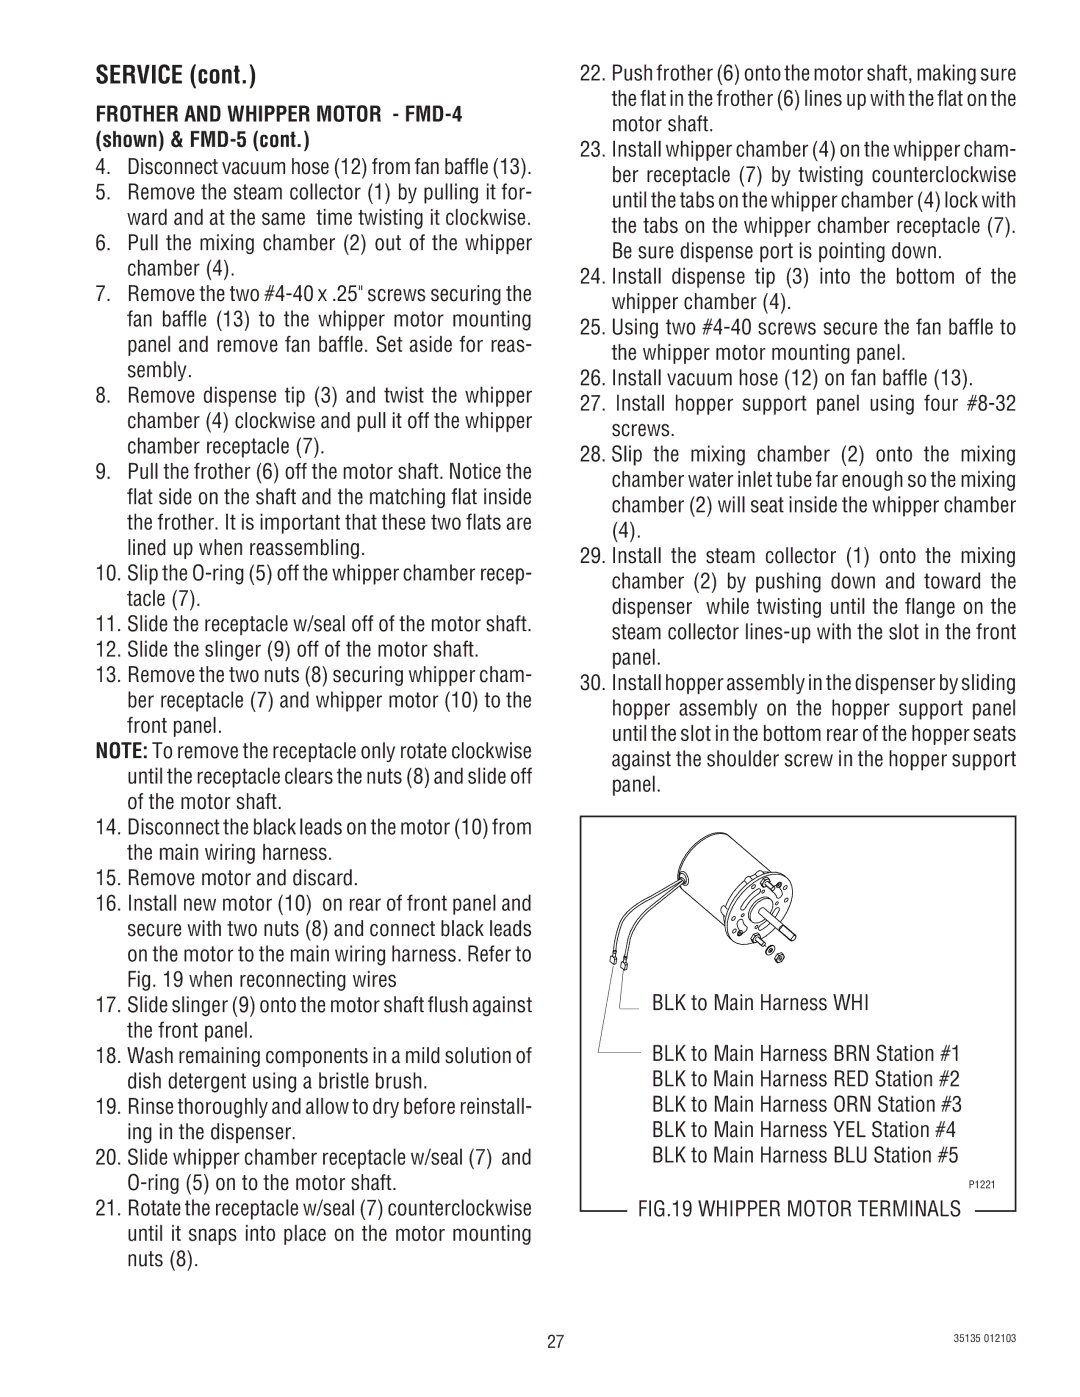
16.Install new motor (10) on rear of front panel and secure with two nuts (8) and connect black leads on the motor to the main wiring harness. Refer to Fig. 19 when reconnecting wires

17.Slide slinger (9) onto the motor shaft flush against the front panel.

18.Wash remaining components in a mild solution of dish detergent using a bristle brush.

19.Rinse thoroughly and allow to dry before reinstall- ing in the dispenser.

20.Slide whipper chamber receptacle w/seal (7) and O-ring (5) on to the motor shaft.

21.Rotate the receptacle w/seal (7) counterclockwise until it snaps into place on the motor mounting nuts (8).

22.Push frother (6) onto the motor shaft, making sure the flat in the frother (6) lines up with the flat on the motor shaft.

23.Install whipper chamber (4) on the whipper cham- ber receptacle (7) by twisting counterclockwise until the tabs on the whipper chamber (4) lock with the tabs on the whipper chamber receptacle (7). Be sure dispense port is pointing down.

24.Install dispense tip (3) into the bottom of the whipper chamber (4).

25.Using two #4-40 screws secure the fan baffle to the whipper motor mounting panel.

26.Install vacuum hose (12) on fan baffle (13).

27.Install hopper support panel using four #8-32 screws.

28.Slip the mixing chamber (2) onto the mixing chamber water inlet tube far enough so the mixing chamber (2) will seat inside the whipper chamber

(4).

29.Install the steam collector (1) onto the mixing chamber (2) by pushing down and toward the dispenser while twisting until the flange on the steam collector lines-up with the slot in the front panel.

30.Install hopper assembly in the dispenser by sliding hopper assembly on the hopper support panel until the slot in the bottom rear of the hopper seats against the shoulder screw in the hopper support panel.

BLK to Main Harness WHI

BLK to Main Harness BRN Station #1

BLK to Main Harness RED Station #2

BLK to Main Harness ORN Station #3

BLK to Main Harness YEL Station #4

BLK to Main Harness BLU Station #5

P1221

FIG.19 WHIPPER MOTOR TERMINALS

27

35135 012103


Page 27
Image 27
Bunn FMD-4, FMD-5 service manual Whipper Motor Terminals

FMD-4, FMD-5 specifications

The Bunn FMD-5 is a state-of-the-art coffee dispenser designed specifically for high-volume coffee brewing situations. This machine is ideal for restaurants, convenience stores, and other establishments that require an efficient and reliable coffee dispensing solution.

One of the primary features of the Bunn FMD-5 is its ability to brew and serve fresh, hot coffee with exceptional speed. The unit is capable of dispensing up to five gallons of coffee per hour, making it an ideal choice for busy environments where customer demand is high. The system utilizes a digital brewer control that allows for precise brewing temperatures and times, ensuring consistency in flavor and quality.

The FMD-5 also incorporates advanced technologies to streamline the brewing process. It features a programmable control panel that allows users to adjust settings based on their specific needs. This includes the ability to set brew cycles, control brew levels, and even program different brew strengths. The easy-to-read digital display shows real-time information, making it simple for operators to monitor the brewing process.

Another notable characteristic of the Bunn FMD-5 is its compact and space-saving design. Despite its robust brewing capacity, the unit is designed to fit easily in various retail and foodservice environments. The machine is also built with durable materials, ensuring longevity and reliability under heavy usage.

For maintenance, the FMD-5 is designed with user convenience in mind. It features removable components and accessible areas for easy cleaning and routine maintenance. Users can also benefit from preventative maintenance features that monitor the machine’s performance, alerting operators to any potential issues before they escalate.

In terms of versatility, the Bunn FMD-5 can accommodate different brewing systems and coffee types, allowing users to customize their offerings based on customer preferences. It supports pre-ground coffee and can also be adapted for different brewing styles, enhancing its usability in various coffee service environments.

Overall, the Bunn FMD-5 is an impressive combination of speed, efficiency, and flexibility, making it an excellent choice for any operation that demands high-quality coffee with minimal wait time. Whether you are serving a morning rush of customers or maintaining a steady stream of coffee through the day, the Bunn FMD-5 stands out as a reliable and efficient coffee dispensing solution.