Tank Heater Relay Control Circuitry (Control Board #2)(120V dispensers only):

1.Disconnect the dispenser from the power source.

2.Disconnect the six pin connector from J3 of con- trol board #2.

3.Check the voltage across pins 5 & 6 of the six pin connector on the wwiring harness with a voltme- ter. Connect the dispenser to the power source. the indication must be 24 volts ac.

4.disconnect the dispenser from the power source.

If voltage is present as described, proceed to step 5. If voltage is not present as described, refer to the wiring diagram and check the dispenser wiring har- ness.

5.Reconnect the six-pin connector of the wiring harness to J3 of control board #2.

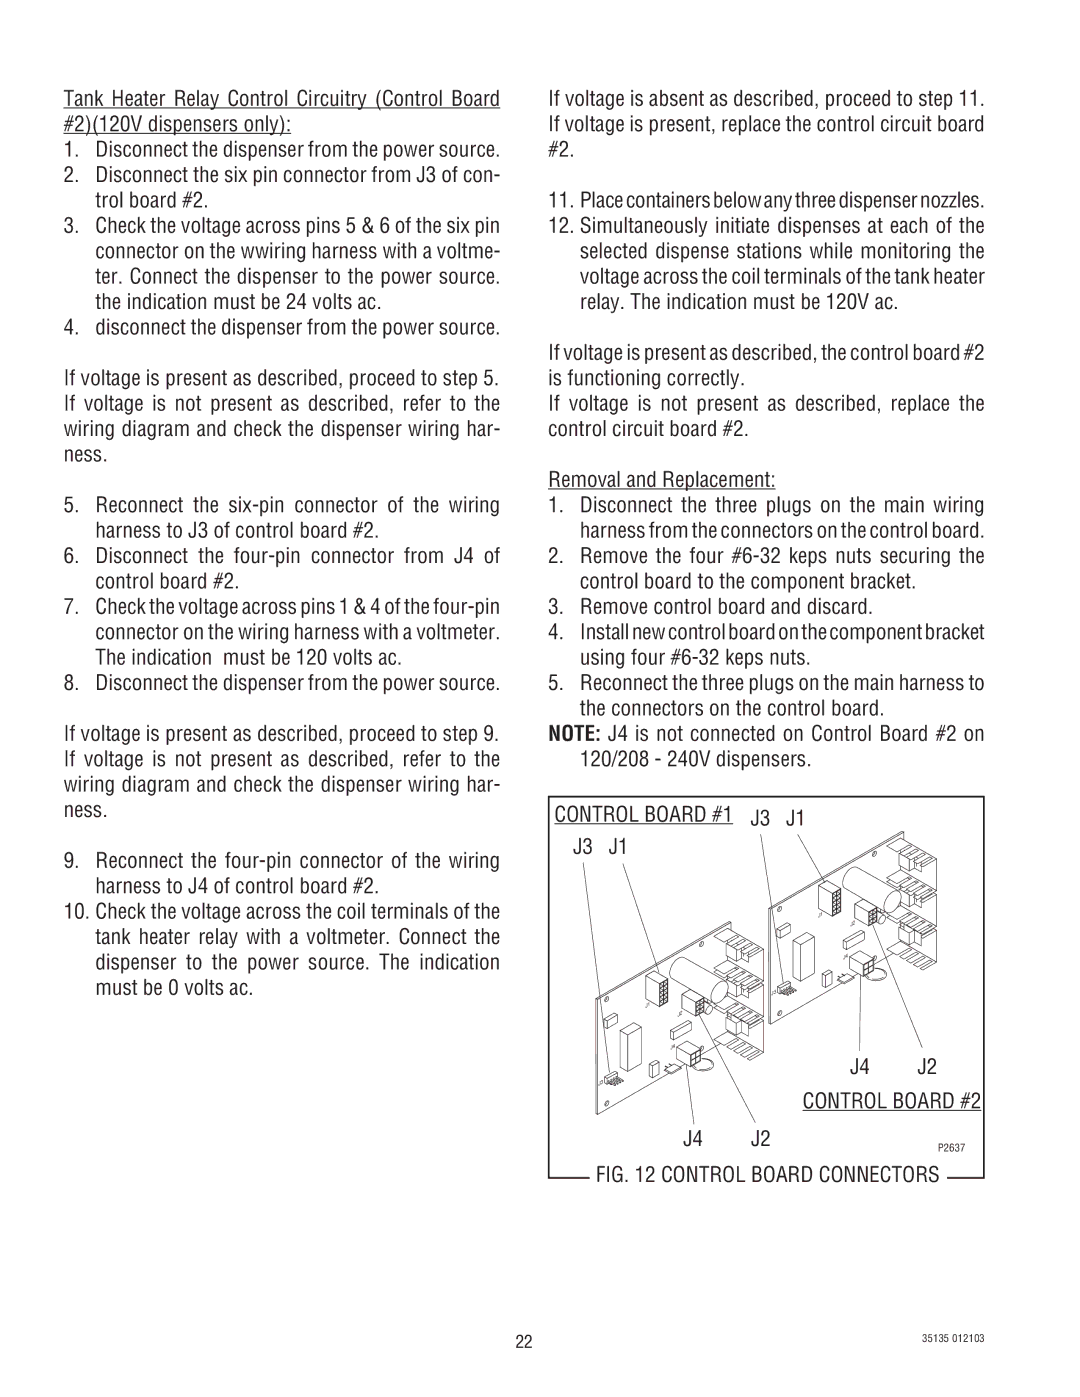
6.Disconnect the four-pin connector from J4 of control board #2.

7.Check the voltage across pins 1 & 4 of the four-pin connector on the wiring harness with a voltmeter. The indication must be 120 volts ac.

8.Disconnect the dispenser from the power source.

If voltage is present as described, proceed to step 9. If voltage is not present as described, refer to the wiring diagram and check the dispenser wiring har- ness.

9.Reconnect the four-pin connector of the wiring harness to J4 of control board #2.

10.Check the voltage across the coil terminals of the tank heater relay with a voltmeter. Connect the dispenser to the power source. The indication must be 0 volts ac.

If voltage is absent as described, proceed to step 11. If voltage is present, replace the control circuit board #2.

11.Place containers below any three dispenser nozzles.

12.Simultaneously initiate dispenses at each of the selected dispense stations while monitoring the voltage across the coil terminals of the tank heater relay. The indication must be 120V ac.

If voltage is present as described, the control board #2 is functioning correctly.

If voltage is not present as described, replace the control circuit board #2.

Removal and Replacement:

1.Disconnect the three plugs on the main wiring harness from the connectors on the control board.

2.Remove the four #6-32 keps nuts securing the control board to the component bracket.

3.Remove control board and discard.

4.Install new control board on the component bracket using four #6-32 keps nuts.

5.Reconnect the three plugs on the main harness to the connectors on the control board.

NOTE: J4 is not connected on Control Board #2 on 120/208 - 240V dispensers.

CONTROL BOARD #1

J3

J1


J3

J1


J1


J2


J4


J3


J1


J2


J4


J4

J2


J3


CONTROL BOARD #2


J4

J2


P2637


FIG. 12 CONTROL BOARD CONNECTORS

22

35135 012103


Page 22
Image 22
Bunn FMD-5, FMD-4 service manual Control Board Connectors

FMD-4, FMD-5 specifications

The Bunn FMD-5 is a state-of-the-art coffee dispenser designed specifically for high-volume coffee brewing situations. This machine is ideal for restaurants, convenience stores, and other establishments that require an efficient and reliable coffee dispensing solution.

One of the primary features of the Bunn FMD-5 is its ability to brew and serve fresh, hot coffee with exceptional speed. The unit is capable of dispensing up to five gallons of coffee per hour, making it an ideal choice for busy environments where customer demand is high. The system utilizes a digital brewer control that allows for precise brewing temperatures and times, ensuring consistency in flavor and quality.

The FMD-5 also incorporates advanced technologies to streamline the brewing process. It features a programmable control panel that allows users to adjust settings based on their specific needs. This includes the ability to set brew cycles, control brew levels, and even program different brew strengths. The easy-to-read digital display shows real-time information, making it simple for operators to monitor the brewing process.

Another notable characteristic of the Bunn FMD-5 is its compact and space-saving design. Despite its robust brewing capacity, the unit is designed to fit easily in various retail and foodservice environments. The machine is also built with durable materials, ensuring longevity and reliability under heavy usage.

For maintenance, the FMD-5 is designed with user convenience in mind. It features removable components and accessible areas for easy cleaning and routine maintenance. Users can also benefit from preventative maintenance features that monitor the machine’s performance, alerting operators to any potential issues before they escalate.

In terms of versatility, the Bunn FMD-5 can accommodate different brewing systems and coffee types, allowing users to customize their offerings based on customer preferences. It supports pre-ground coffee and can also be adapted for different brewing styles, enhancing its usability in various coffee service environments.

Overall, the Bunn FMD-5 is an impressive combination of speed, efficiency, and flexibility, making it an excellent choice for any operation that demands high-quality coffee with minimal wait time. Whether you are serving a morning rush of customers or maintaining a steady stream of coffee through the day, the Bunn FMD-5 stands out as a reliable and efficient coffee dispensing solution.