Manuals
/
Canon
/
Computer Equipment
/
Printer
Canon
900D
manual
Troubleshooting, A Message is Displayed on the LCD, Try This
Models:
900D
1
44
50
50
Download
50 pages
38.68 Kb
41
42
43
44
45
46
47
48
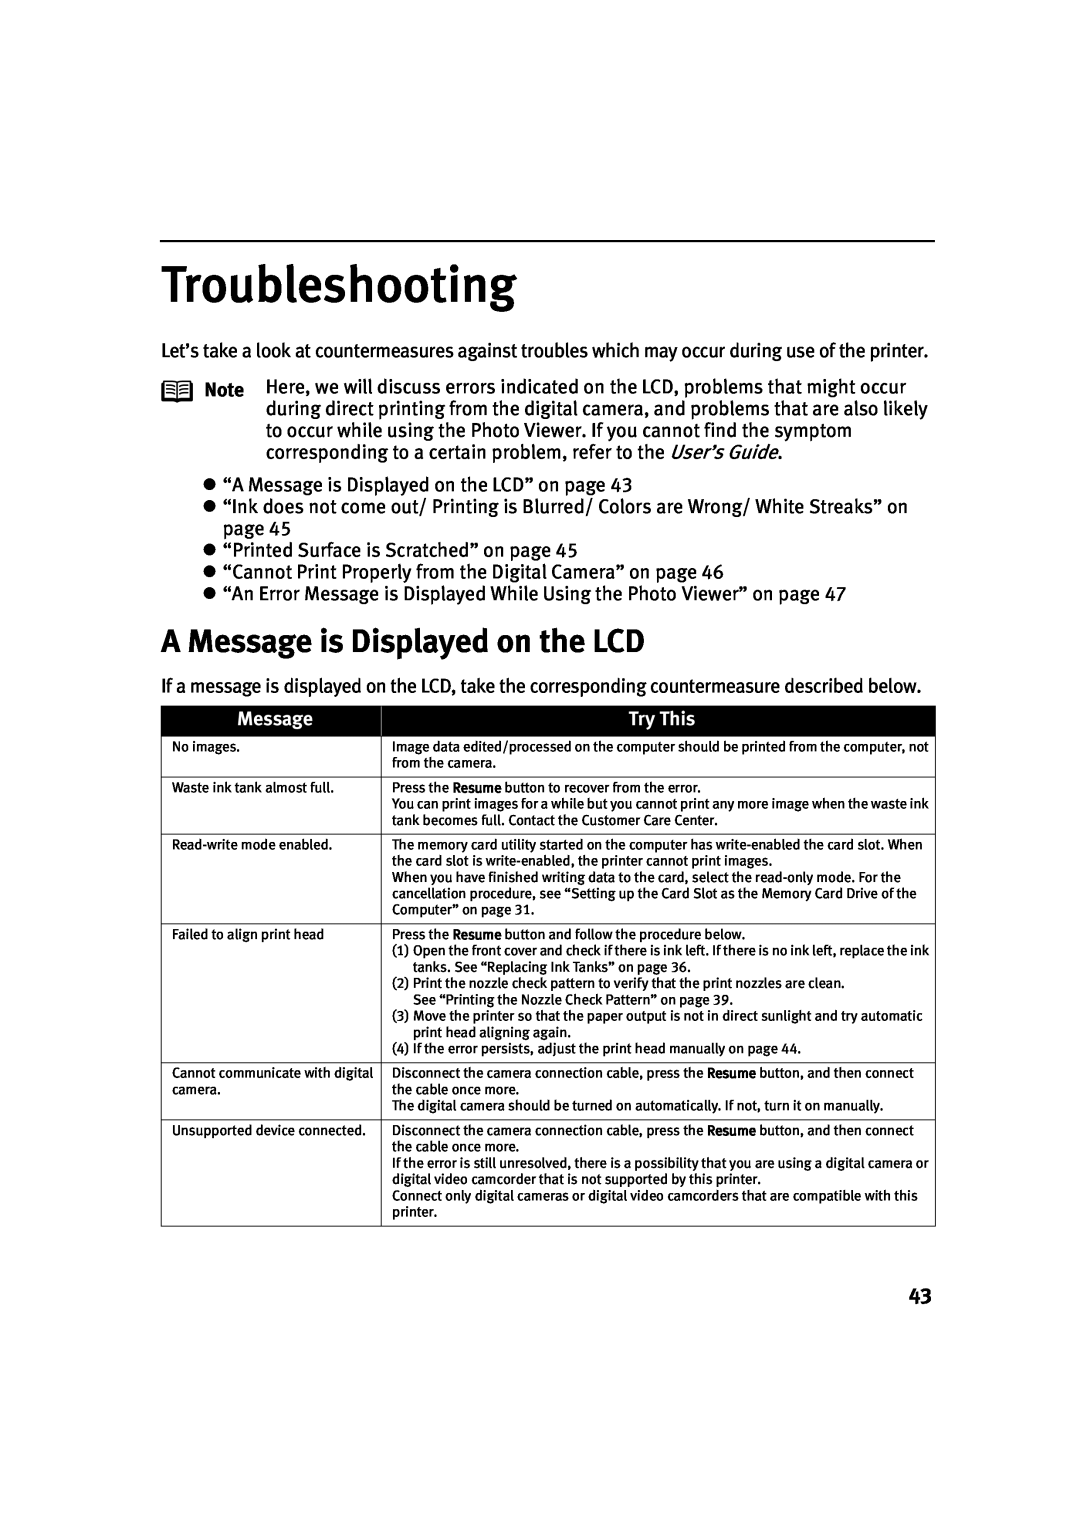
Troubleshooting
Install
Error codes
If the Same Error Persists
Indicator Lamp
Maintenance
Adjusting Contrast of the LCD
Settings Button
Head cleaning
How to
Page 44
Image 44
Page 43
Page 45
Page 44
Image 44
Page 43
Page 45
Contents
Series Photo Printer Direct Printing Guide
Contents
Contents
Printing Flow Using a Memory Card
Printing Maintenance
2 Power Lamp
5 Settings Button
Operation Panel and Menu Display
Operation Panel Names and Functions
12 Cancel Button
14 Indicator Lamp
9 Buttons
10 Photo Viewer Button
Head cleaning
Deep cleaning
Menu Displays
Print all
Step 3 Insert the memory card
Printing Flow
Step 1 Turn on the Printer Step 2 Load the paper
Step 4 Selecting the Print Mode
Step 5 Change/Confirm Print Settings and Start Printing
Change the Settings
Inserting a Memory Card
Using a Memory Card
Memory Cards Supported by this printer
3 Install the memory card in the card slot
1 Turn on the printer 2 Open the card slot cover
Removing a Memory Card
4 Confirm the settings
Printing Photograph
Printing an Image Displayed on the LCD
Turn on the printer and Load the Paper
5 Change the settings
6 Start printing
Loading Paper
„ Print Media to Avoid
„ Loading the Print Media
1 Turn on the printer
Load Limit Mark
3 Preparing to Load Paper
4 Loading the Paper
„ Media Types for Card Direct Printing
Media Type
Paper Rest Load
Paper Size
Printing Images from a Memory Card
Specifying how many copies to print for each image
„ Specifying the number of copies to print for each image
1 Prepare to print
4 Start printing
„ Printing a specified area - Trimming
3 Specify the number of copies to print
3 Finalize the trimmed area
1 Set the Trimming Mode
2 Trimming and Rotating the Sections you wish to Print
Printing all images
3 Start printing
Printing an Image List - Print Index
Specifying the layout
z Bordered
z Borderless
z Postcard
3 Specify the layout
4 Select the image to print
5 Start printing
2 Using the buttons to specify the number of copies to print
2 Set the DPOF mode
Printing According to the Settings Made on the Camera - DPOF Printing
1 Turn on the printer and load the paper
„ Settings Menu Display
Specifying the Paper and Optimizing Images
„ How to Make Settings
„ Other Setting Items
2 Finalize the Settings
1 Select an item to set
„ Borderless Printing
Borderless
„ Date
„ Print Quality
Media Types for Digital Camera
Digital Camera Setting
Printing Photographs Directly from a Digital Camera
4 Start printing using the print function of the digital camera
Printing from a Digital Camera
Ensure that the printer is turned on Load the paper
3 Connect the digital camera and the printer
Print quality setting Maintenance
1 Display the image you want to print in the Replay mode
2 Press the SET button to display the Print menu
z You can make the following prints directly from a digital camera
Using Photo Viewer
3 Choose print settings and start printing
Other Useful Functions
Ensure that the printer and the computer are turned on
The Photo Viewer is terminated in the following case
4 Exit the Photo Viewer
Notes Changing the Display Mode
Setting up the Card Slot as the Memory Card Drive of the Computer
Open the USB memory card setup window
The USB Memory Card Settings window appears
The Read/write attribute setting window appears
Start the BJ Utility
Turn on the printer Select Maintenance from the Menu
Changing the Language Displayed
3 Select Contrast
Adjusting Contrast of the LCD
3 Select a language for display
Reducing the Sound of Printer Operation
3 Select Quiet mode
Replacing an Ink Tank
Knowing When to Replace an Ink Tank
When Low Ink is Detected
3 Prepare a replacement tank
Replacing Ink Tanks
1 Ensure that the printer is on, and then open the front cover
2 Remove the empty ink tank
4 Install the ink tank
5 Close the front cover
Printing Maintenance
When Printing Becomes Faint or Colors are Incorrect
Step1
Step2
Printing the nozzle check pattern
Printing the Nozzle Check Pattern
Examining the Nozzle Check Pattern
After print head cleaning finishes
Print Head Cleaning
Ensure that the printer is on Print Head Cleaning
Print Head Deep Cleaning
Ensure that the printer is on Print Head Deep Cleaning
Align the print head automatically
Note When Automatic Print Head Aligning Cannot Execute Correctly
Aligning Print Head - Auto head align
Troubleshooting
A Message is Displayed on the LCD
Message
Try This
Note Adjusting the Print Head Manually
If the Same Error Persists
Note If the printed surface is still scratched
„ Printed Surface is Scratched
Possible Cause
„ Cannot Print Properly from the Digital Camera
An Error Message is Displayed While Using the Photo Viewer
Error Message
Index
Read/write mode
Read-only mode
SmartMedia Card
7, 8
Top
Page
Image
Contents