Digital Video Camcorder
English
Important Usage Instructions
Symbols and References Used in This Manual
Using this Manual
Camera Function can be used in this mode
Change the display language before you begin
Table of Contents
Editing
Using a Memory Card
Direct Printing
Transferring Images
Checking Supplied Accessories
MVX25i/MVX20i
Components Guide
Camera OFF Playvcr Network
Advanced Accessory shoe
E r t y u
WL-D83 Wireless Controller
Attaching the Battery Pack
Preparing the Power Supply
Charging the Battery Pack
Remove the battery pack after use
Charging, Recording and Playback Times
Using a Household Power Source
Preparations
Load/unload the cassette
Loading/Unloading a Cassette
Use only video cassettes marked with the D logo
Cassette compartment opens automatically
Installing the Backup Battery
Preparing the Camcorder
Adjusting the Viewfinder Dioptric Adjustment
Attaching the Lens Cap
Fastening the Grip Belt
Attaching the Shoulder Strap
Inserting Batteries
Using the Wireless Controller
Wireless controller operates with two AA R6 batteries
Setting the Time Zone/Daylight Saving Time
Setting the Time Zone, Date and Time
Setting the Date and Time
Year display starts to flash
16 17 18 11 12
Displaying Date and Time during Recording
Recording Movies on a Tape
Remove the lens cap Set the camcorder to Camera mode
Recording
Before You Begin Recording
Press the Menu button to open the menu
Allowing the Subject to Monitor the LCD Screen
Screen Displays during Recording
Record Review
Reviewing and Searching when Recording
Press and release the c record review button
Record Search
Optical Zoom
Zooming
Digital Zoom
Holding the Camcorder
Tips for Making Better Videos
Open the LCD panel
Set the camcorder to Play VCR mode
Playing Back a Tape
Special Playback Modes
Adjusting the Volume
Adjusting the Volume
When Using Headphones
TVs with Scart Terminal
Playing Back on a TV Screen
TVs with Audio/Video Terminals
Input
TVs with S S1-Video Input Terminal
Selecting the Audio Output Channel
Selecting Menus and Settings
Menus and Settings
Default settings are shown in boldface
Menu and Default Settings
System WL. Remote
Play VCR Menu
Submenu Menu Item
Card Camera Menu
System WL. Remote
Card Play Menu
Use this mode to record spotlit scenes or fireworks
Using the Recording Programs
Use this mode to record in dimly lit places
Easy Recording Program
Selecting the Easy Recording Program
Availability of Functions in Each Mode
Set the program selector to
Appears
Select a mode and press the SET dial
Selecting the Program AE Mode
Set the program selector to Q Press the SET dial
List of the program AE modes appears
Set the program selector to Q Press the Night Mode button
Using the Night Modes
Page
Skin Detail Function
Exposure Adjustment
Adjusting Exposure Manually
Turn the SET dial to adjust the brightness of the image
Exposure Lock
Set the program selector to Q Adjust the zoom
Adjusting the Focus Manually
Press the Focus button
MF appears
Infinity Focus
Turn the focus ring to adjust the focus
Indoor T
Setting the White Balance
Page
Close the menu
Setting the Shutter Speed
Auto Slow Shutter
Press the start/stop button
Using the Self-Timer
When recording movies Press the self-timer button
Changing the Recording Mode SP/LP
Adjust the level with the SET dial
Adjusting the Audio Recording Level
Audio Recording
Camera mode, set the program selector to Q
Microphone Attenuator
About the audio level indicator
Wind Screen
Using Headphones during Recording
Adjusting the Headphone Volume
Long microphones may appear on the screen
Recording with an External Microphone
Using Digital Effects
Pieces move around until the puzzle is
Image appears in 16 pieces.
Solved
Image is divided into 16 pieces.
Image is blurred Image becomes like a
Add flavour to your recordings
Image becomes like a
Press the Digital Effects button
Selecting a Fader
Availability of Digital Effects by Operating Modes
Selecting an Effect
Selecting an Effect in Card Camera Mode
Press the ON/OFF button
Name of the selected effect flashes
Using the Multi-Image Screen
About the multi-image screen
Move the zoom lever toward T
Magnifying the Image
Select the magnified area with the SET dial
Playback image can be magnified up to 5 times
Selecting the Data Code Display Combination
Displaying the Data Code
Selecting the Date/Time Display Combination
Press the Data Code button
Displaying the Data Code
Six-Second Auto Date
Stop mode, press the END Search button
End Search
Returning to a Pre-marked Position
When you have finished playback, rewind the tape
Press the + or button to begin searching
Date Search
Customizing the Camcorder
Changing the My Camera Settings
Select a setting option and close the menu
Changing the Date Format
Changing the Display Language
Changing the Remote Sensor Mode
Changing the Remote Sensor Mode
Selected mode appears for a few seconds
Turning the Remote Sensor Off
Recording in 169 Widescreen TV Recording
Other Camcorder Settings
Turning Off the Image Stabilizer
Adjusting the Brightness of the LCD Screen
LCD Backlight
Demonstration Mode
Connecting a VCR
Connecting the Devices
Connecting a Digital Video Device
If you are connecting via AV terminal, check the setting
Editing
Connect the camcorder to the analog video device
Recording from Analog Video Devices VCR, TV or Camcorder
Press the 3 button to stop recording
Connected device Stop playback
Make sure that AV\DV OUT is set to OFF
Recording from Digital Video Devices DV Dubbing
Connect the camcorder to the digital video device
Concerning Copyright
Copyright Precaution
Copyright Signals
You can also connect a VCR with S S1-VIDEO terminal
Turning On the Analog-Digital Converter
Headphones cannot be used during analog-digital conversion
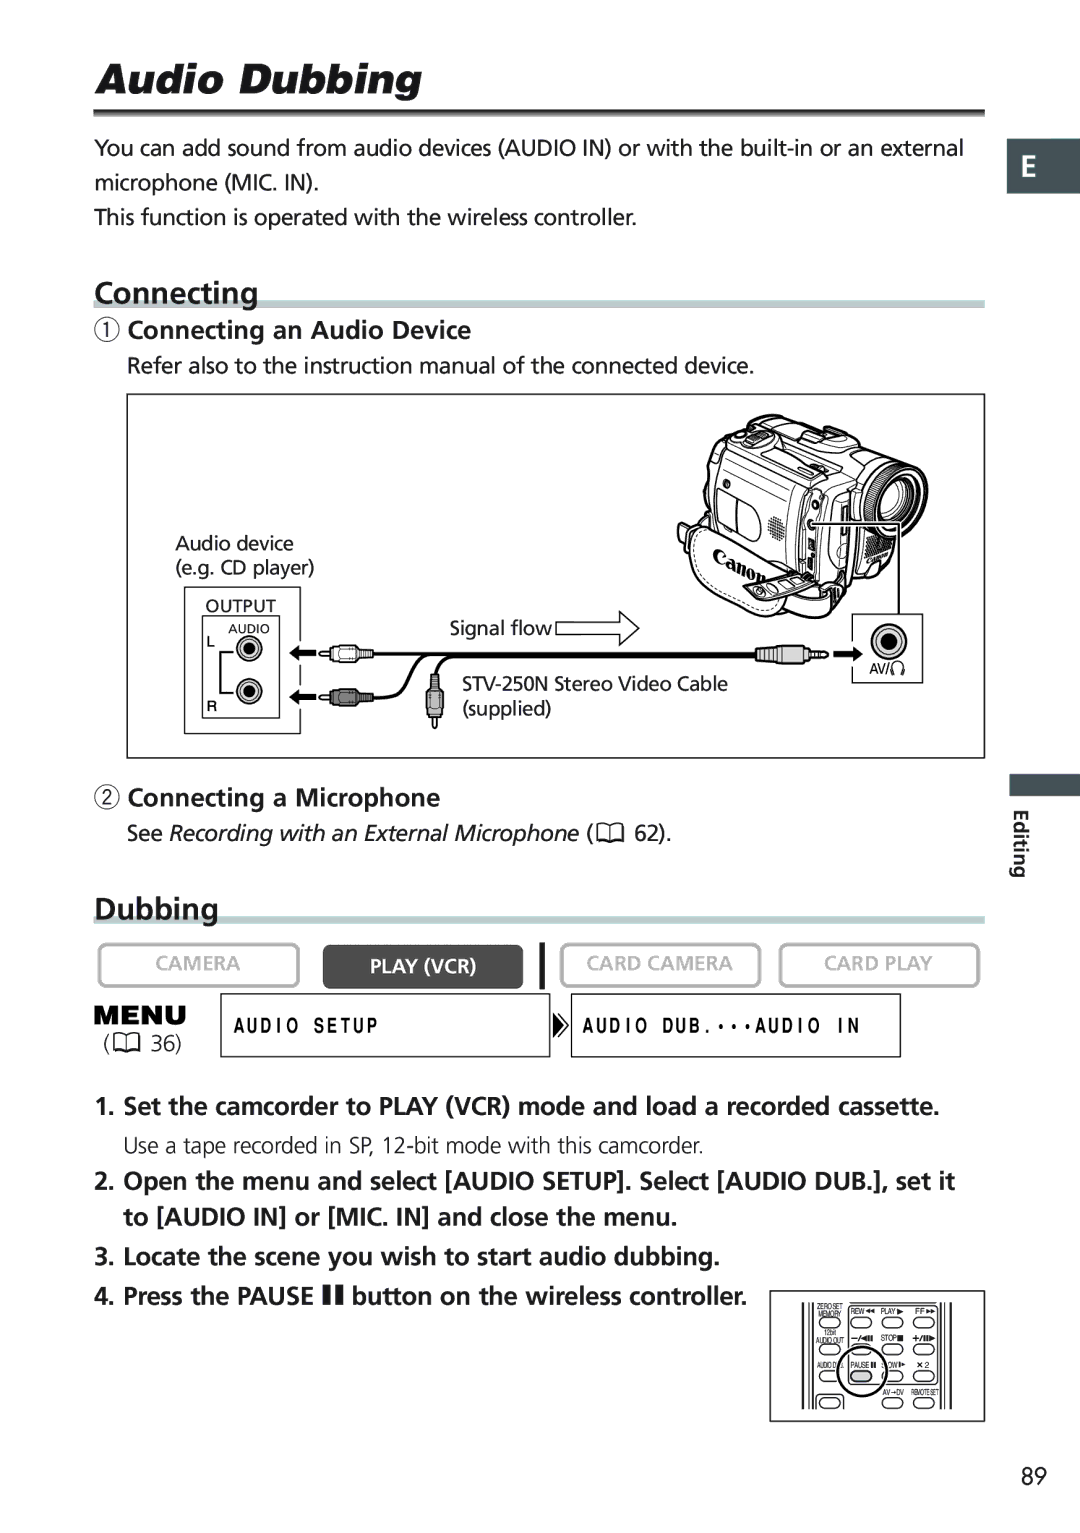
Connecting an Audio Device
Connecting
Connecting a Microphone
Audio Dubbing
Audio device Stop playback
Press the Audio DUB. button on the wireless controller
Audio DUB. and a appear
Playing Back the Added Sound
Connecting to a Computer Using a DV IEEE1394 Cable
Removing the Card
Inserting and Removing a Memory Card
Inserting the Card
Changing the Still Image Quality
Selecting the Image Quality/Size
Changing the Still Image Size
You can choose from Superfine, Fine and Normal
You can choose from 320 ⋅ 240 pixels and 160 ⋅ 120 pixels
Changing the Movie Size
File Numbers
Reset
Recording Still Images on a Memory Card
Set the camcorder to Card Camera mode
Press the Photo button halfway
Press the Photo button fully
, F turns green, and focus and exposure are locked
When the Focus-Priority mode is set to on
Recording from Other Video Devices
Recording from a Tape in the Camcorder
Screen Displays during Still Image Recording
Card Access Display
Still Image Quality
Remaining Card Capacity for Still Images
Selecting the Flash Mode
Using the Flash
Press the flash button
101
Appears in green
Recording with Flash
103
Using the Optional VFL-1 Video Flash Light
Reviewing a Still Image Right after Recording
105
Press the start/stop button to stop recording
Remaining Card Capacity for Movies
Screen Displays during Movie Recording
Movie recording time
Indicates the movie size
Turning Off the Focus-Priority Mode
Selecting the Focusing Point
Turn the SET dial to select the focusing point
107
Changing the Drive Mode
Selecting the Drive Mode
Setting changes with each press of the button
Continuous Shooting/High-Speed Continuous Shooting
109
Auto Exposure Bracketing
Press the Photo button
Select the program AE mode and zoom on the subject
When Recording in Stitch Assist Mode
Press the Photo button to record the first image
Card + button clockwise. Card button anticlockwise
111
Press the button after the last image
Playing Back a Memory Card
Index Screen
Slide Show
Press and hold the Card + or Card button
Card Jump Function
Protecting during Index Screen Display
Protecting Images
Select Protect
Select b Return to close the menu
Erasing a Single Image/All Images
Erasing Images
Erasing a Single Image
117
Mix level adjustment blue area of the live video recording
Combining Images Card Mix
Card mix menu appears
Selecting the Card Mix Effect
Press the Card MIX button
Sample Images
Card Chroma Key
Card Luminance Key
120
Camera Chroma Key Card Animation
Select Execute
Formatting a Memory Card
Open the menu and select Card Operations Select Format
Overwrite MY IMAGE?, no and YES appears
Creating a Start-up Image
SET this AS START-UP IMAGE?, YES and no appears
123
Connecting the Printer to the Camcorder
Printing Still Images
Printing with the Print/Share Button
Printing after Selecting the Print Settings
Select the print settings
125
Turn the SET dial to select Print and press the SET dial
Reconnect the cable
Selecting the Number of Copies
Selecting the Print Settings
128 129
Maximum of 99 copies can be selected for one still image
Including the Date in the Print
Paper Settings
Select the paper size of the paper set in your printer
Select the paper type of the paper set in your printer
128
Setting the Print Effect Image Optimise
Image Standard
Selecting the Image Style
Change the size of the trimming frame
Trimming Settings
Move the trimming frame
Trimming frame appears
Selecting Still Images for Printing Print Order
Printing with Print Order Settings
Open the menu and select Card OPERATIONS. Select \ Print
Up to 6 images appear Select the image you wish to print
Make sure that Print is selected and press the SET dial
Printing
Erasing All Print Orders
Connecting to a Computer Using a USB Cable
Preparations
Direct Transfer Windows OS Only
Transferring a Still Image as Wallpaper
Transferring a Selected Image
137
Erasing All Transfer Orders
Selecting Images for Transfer Transfer Order
Selecting in Index Screen Display
Install DV Messenger
About the Network Mode
Connection
139
Hiding the Displays on the LCD Screen
Screen Displays
Hiding/Showing the Displays on the TV Screen
Displays disappear from the TV screen
Screen Displays during Recording/Playback
Camera Mode
Play VCR Mode
142
Card Camera Mode
Card Play Mode
Memory Card Related Messages
List of Messages
144
Direct Print Related Messages
Message
145
Camcorder Handling Precautions
Maintenance/Others
Cleaning Camcorder Body and Lens
Storage
Condensation
Video Heads
Condensation may form in the following cases
Room
How to avoid condensation
Battery Pack Handling Precautions
When condensation is detected
Resuming use
149
Cassette Handling Precautions
About the battery terminal cover
Memory Card Handling Precautions
Power Sources
Using the Camcorder Abroad
Playback on a TV Screen
151
Power Source
Troubleshooting
153
Recording/Playback
Recording
154
Playback
155
Memory Card Operation
Printing
CB-2LTE
System Diagram Availability differs from area to area
Use of genuine Canon accessories is recommended
Optional Accessories
Battery Packs
CB-2LTE Battery Charger
TL-H34 Tele-converter
VL-10Li Battery Video Light
WD-H34 Wide-converter
FS-34U Filter Set
VFL-1 Video Flash Light
SC-2000 Soft Carrying Case
VL-3 Video Light
DM-50 Directional Stereo Microphone
160
NB-2LH Battery Pack
CA-570 Compact Power Adapter
SDC-8M SD Memory Card
161
Index
163
Canon INC