Hardware Guide
Introduction
Confirm the Contents of the Package
Try the basic camera operations p
Review Images
Erase Unwanted Images p
Save Images Load Images onto a Computer
Shoot Anew
Use and Process Images
Processing Images on a Computer See the Software Guides
Table of Contents
Replaying
Additional Functions
Erasing Appendices
Handling and Safety Precautions
Test Shots
Read This First
Safety Precautions
Read This First
Read This First
Read This First
Extended Storage
Avoid Condensation Related Problems
Avoid Strong Magnetic Fields
If Condensation Forms Inside the Camera
Front View
Guide to Components
Bottom View
Read
First
Indicators
External Terminals
Mode Dial
Control Panel
This First
Display Panel
Exposure
Low battery
Settings
Read This First Shooting Mode Settings
Ranges
LCD Monitor
Read This First
Replay
Power Save Function
Charging the Battery Pack
Using the Battery Pack
Steady green
At the top of the compact power
Cord into the electrical outlet
Adapter
Close the battery cover
Installing the Battery Pack
Recharge the battery
Checking the Battery Charge
Refreshing the Battery Pack
Low Battery replace or
Once the refresh cycle is complete,
Charging indicator will cease to flash
Using an AC Power Source
Install a 2CR5 lithium battery as shown
Using a 2CR5 Lithium Battery
Replacing the Button Battery and Setting the Date/Time
Replacing the Button Battery
Set the mode dial to lock Open the LCD monitor
Setting the Date/Time
SET
Language menu may vary among languages
Setting the Menu Language
Set the mode dial to play
Language menu will display on the LCD monitor
Installing a CF Card
FC-4M FC-8M
CF Card Types and Recording Capacities
Preparing the Camera
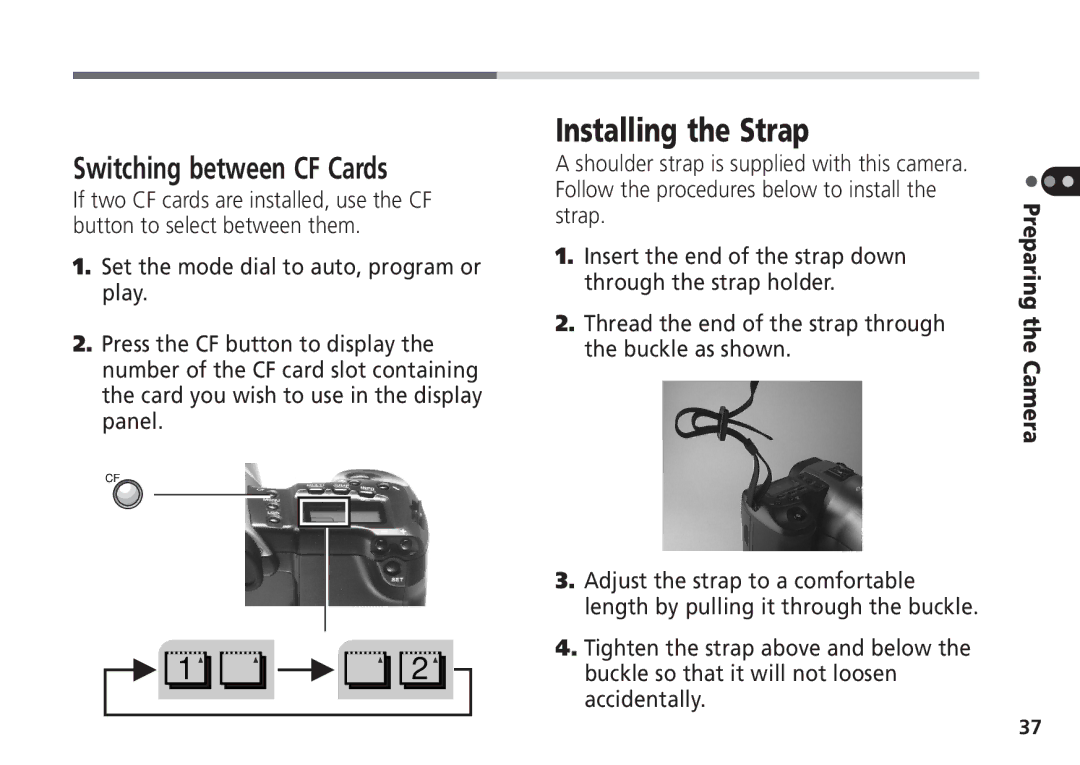
Switching between CF Cards
Installing the Strap
Set the mode dial to auto
Shooting in Auto Mode
Open the LCD monitor Set the mode dial to play
Replaying Images
After the beeps, press the shutter button all the way
Erasing Images
Quick Start Guide
Quick Start Guide
Loading Images onto a Computer
Shooting
Selecting a Shooting Mode
Select a shooting mode with the mode dial
Basic Shooting Functions
If the LCD monitor is on, the image will freeze momentarily
Shutter Button
Autofocus Target Marks
Optical Viewfinder
Focus Lock
Situations Not Suited to Autofocus Photography
Using the LCD monitor as a Viewfinder for Shooting
Using the LCD Monitor
Use the optical viewfinder to shoot an image
Changing the Image Quality and Size
Tion appears in the display panel
Telephoto 70 mm
Adjusting the Zoom
Shooting in Macro Mode
Zoom Lever Wide Angle 28 mm Mm film equivalent
LCD/VIDEO
Continuous Shooting Mode Settings
Continuous Shooting Mode
Shooting
Aperture-Priority AE Mode Settings
Shooting in Aperture-Priority AE Mode
F2.8 F8.0 The larger the value, the smaller the aperture
About Smears
Press the shutter button halfway
Exposure Compensation
Set the mode dial to program Press the +/- button
Shoot the image
Auto Mode Program Mode
Shooting with the Self-Timer
Shooting
Attaching the Remote Switch
Shooting with the EOS Remote Switch
Using a 220EX or 380EX Flash
Attach the flash to the camera’s accessory shoe as shown
Shooting with a Flash
Press the shutter button all the way and take the shot
Shine red when the flash is ready for
Using Other Flashes
Shoot an image in auto or program mode
Adding a Sound Annotation to an Image
Lift your finger to stop the recording
Listening to a Sound Annotation
Replaying
Single Image Playback
Press the multi button
Multi Image Playback
Jumping Images
To Display the Tenth Image Ahead or Behind
To Display the First or Last Image
To Display the First or Last Set of Nine Images
Press the jump button again to cancel the jump mode
Jumping in Multi Image Playback
To Display the Set of Nine Images Ahead or Behind
Standard Information
Displaying Image Information
Adding Sound Annotations during Playback
Listening to Sound Annotations
Automated Playback Slide Show
Marking Images
Mark data will be saved to the CF card with the image
Selecting the Play Time
Clearing Marks
Replaying Slide Shows
Setting a Slide Show to Repeat
Replaying
Viewing Images on a TV
Jump function is particularly
Marking Images for Automatic Printing
Clearing Marks
Erasing
Erasing
Erasing Images Singly
Press the microphone button
Erasing All Images
To Erase the Image
Press the set button
Protecting Images
Protection Mark
Setup Menu in a Recording Mode
Displaying the Setup Menu
You can display the setup menu from either
Setup Menu in Play Mode
Adjusting the LCD Monitor Brightness
Closing the Setup Menu
Closing the Setup Menu in Auto or Program Mode
Setting the Power Save Settings
Setting the Beep On/Off Settings
PC Connection
Replay
Setting the Date/Time
Setting the Language
When the settings have been adjusted, press the menu button
Standard File Number Assignment Method
Resetting the File Number
When a CF Card Contains Previously Recorded Images
When the CF Card Contains No Previously Recorded Images
Formatting a CF Card
File number will reset
Copying Images between CF Cards
Copying Images Singly
When you have finished copying, press the menu button
Copying All the Images
Press the set button to start copying
Optical Viewfinder
Camera Maintenance
Camera Body
Lens
Battery Pack NB-4H
Optional Accessories
100
Fix the case holder
Appendices 101
Hard Strap HS-PS200
102
Appendices 103
EOS Speedlite EX Series Flashes
Install the 2CR5 lithium battery
Troubleshooting
Problem Causes Solutions
Insufficient battery power
Erase all or some of the card’s
Install a CF card that contains
Wait to press the shutter button
Until the flash charges
Halfway and wait for the double
Camera to switch to TV display
Adjust the brightness setting
Appropriate for surround
Appendices 107
Problem Causes
AF auxiliary light emitter Be careful not to block the AF
Auxiliary light emitter with your
108
Capacity of battery pack
Or reflected onto camera
For an extended period
Appendices 109
Battery pack won’t charge
Is full or data is corrupted
Reset date/time
List of Message Codes a
Recording sound annotation
List of Message Codes B
112
Major Specifications
113
Appendices 114
Operating Humidity 10 90%
Appendices 115
Compact Power Adapter CA-PS200
CCD RAW
Index
Appendices 117
LCD
118
Mode
Canon Deutschland GmbH
Canon Computer Systems, Inc Canon U.S.A., Inc
Canon Canada Inc
Canon S.A.V. Photo Video France
Canon Marketing Services
Canon Marketing Malaysia Sdn. Bhd
120
121
Germany Ulead Support Center
France Center d’assistance Ulead
BIT UK Limited
IE-XXX-VXA XX98ABX.X


 1


 2