Audio Output
Selecting the Audio Channel
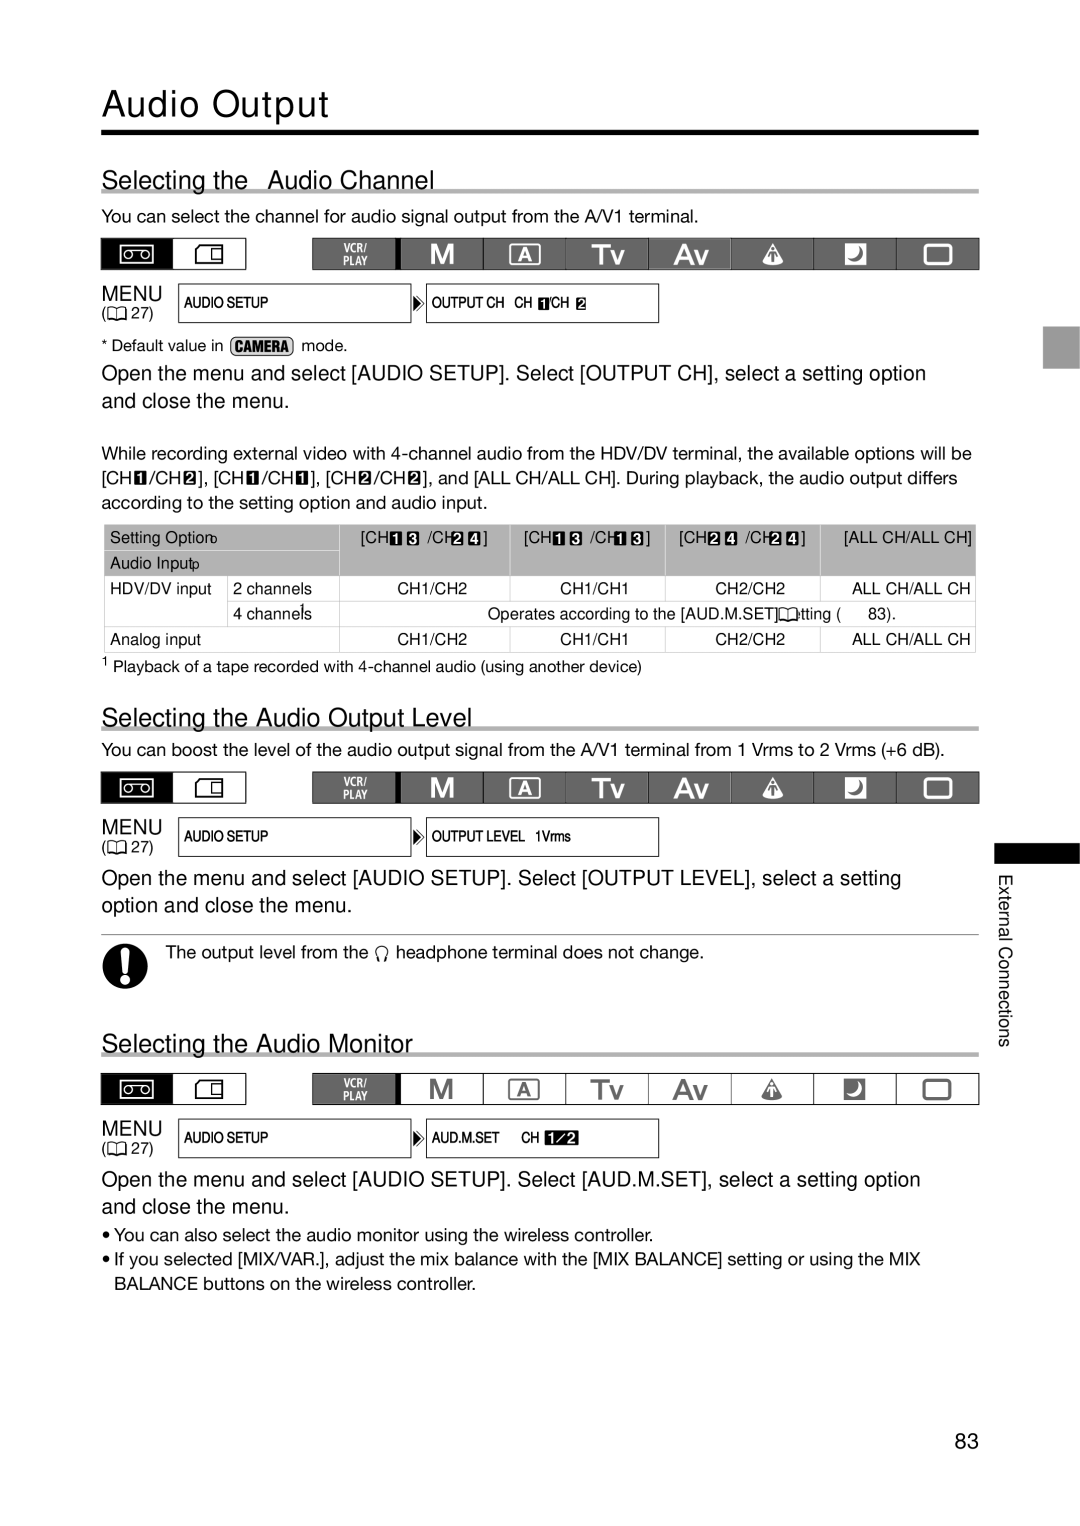
You can select the channel for audio signal output from the A/V1 terminal.
MENU | AUDIO SETUP |
( 27) |
|
* Default value in ![]() mode.
mode.
![]() OUTPUT CH•••CH
OUTPUT CH•••CH![]() /CH
/CH![]() *
*
Open the menu and select [AUDIO SETUP]. Select [OUTPUT CH], select a setting option and close the menu.
While recording external video with ![]() /CH
/CH ![]() ], [CH
], [CH ![]() /CH
/CH ![]() ], [CH
], [CH ![]() /CH
/CH ![]() ], and [ALL CH/ALL CH]. During playback, the audio output differs according to the setting option and audio input.
], and [ALL CH/ALL CH]. During playback, the audio output differs according to the setting option and audio input.
Setting Option →
Audio Input ↓
[CH ![]()
![]() /CH
/CH ![]()
![]() ]
]
[CH |
| /CH |
| ] | [CH |
| /CH |
| ] |
[ALL CH/ALL CH]
HDV/DV input | 2 channels | CH1/CH2 |
| CH1/CH1 | CH2/CH2 |
|
| ALL CH/ALL CH |
|
|
|
|
|
|
|
|
|
| 4 channels1 |
| Operates according to the [AUD.M.SET] setting ( |
| 83). | |||
|
|
| ||||||
|
|
|
|
|
|
|
|
|
Analog input |
| CH1/CH2 |
| CH1/CH1 | CH2/CH2 |
|
| ALL CH/ALL CH |
|
|
|
|
|
|
|
|
|
1Playback of a tape recorded with
Selecting the Audio Output Level
You can boost the level of the audio output signal from the A/V1 terminal from 1 Vrms to 2 Vrms (+6 dB).
MENU | AUDIO SETUP | OUTPUT LEVEL•••1Vrms |
( 27) |
|
|
Open the menu and select [AUDIO SETUP]. Select [OUTPUT LEVEL], select a setting option and close the menu.
The output level from the ![]() headphone terminal does not change.
headphone terminal does not change.
Selecting the Audio Monitor
MENU | AUDIO SETUP | AUD.M.SET•••CH |
( 27) |
|
|
Open the menu and select [AUDIO SETUP]. Select [AUD.M.SET], select a setting option and close the menu.
•You can also select the audio monitor using the wireless controller.
•If you selected [MIX/VAR.], adjust the mix balance with the [MIX BALANCE] setting or using the MIX BALANCE buttons on the wireless controller.
External Connections
83
