Use the following formula to determine the percent volt- age imbalance.

% Voltage Imbalance:

max voltage deviation from average voltage

= 100 x

average voltage EXAMPLE: Supply voltage is 460-3-60.

AB =452 v

BC =464 v

AC =455 v

Average Voltage =

452 +464 +455

3


=

1371


3


= 457

Determine maximum deviation from average voltage:

(AB) 457 −452 =5 v (BC) 464 −457 =7 v (AC) 457 −455 =2 v

Maximum deviation is 7 v. Determine percent voltage imbalance:

% Voltage Imbalance =100 x

7

457

=1.53%


This amount of phase imbalance is satisfactory as it is be- low the maximum allowable 2%.

IMPORTANT: If the supply voltage phase imbalance is more than 2%, contact your local electric utility com- pany immediately.

Unit failure as a result of operation on improper line voltage or excessive phase imbalance constitutes abuse and may cause damage to electrical components.

FIELD CONTROL WIRING Ð Install a Carrier-approved accessory thermostat assembly according to installation instructions included with accessory. Locate thermostat as- sembly on a solid interior wall in the conditioned space to sense average temperature.

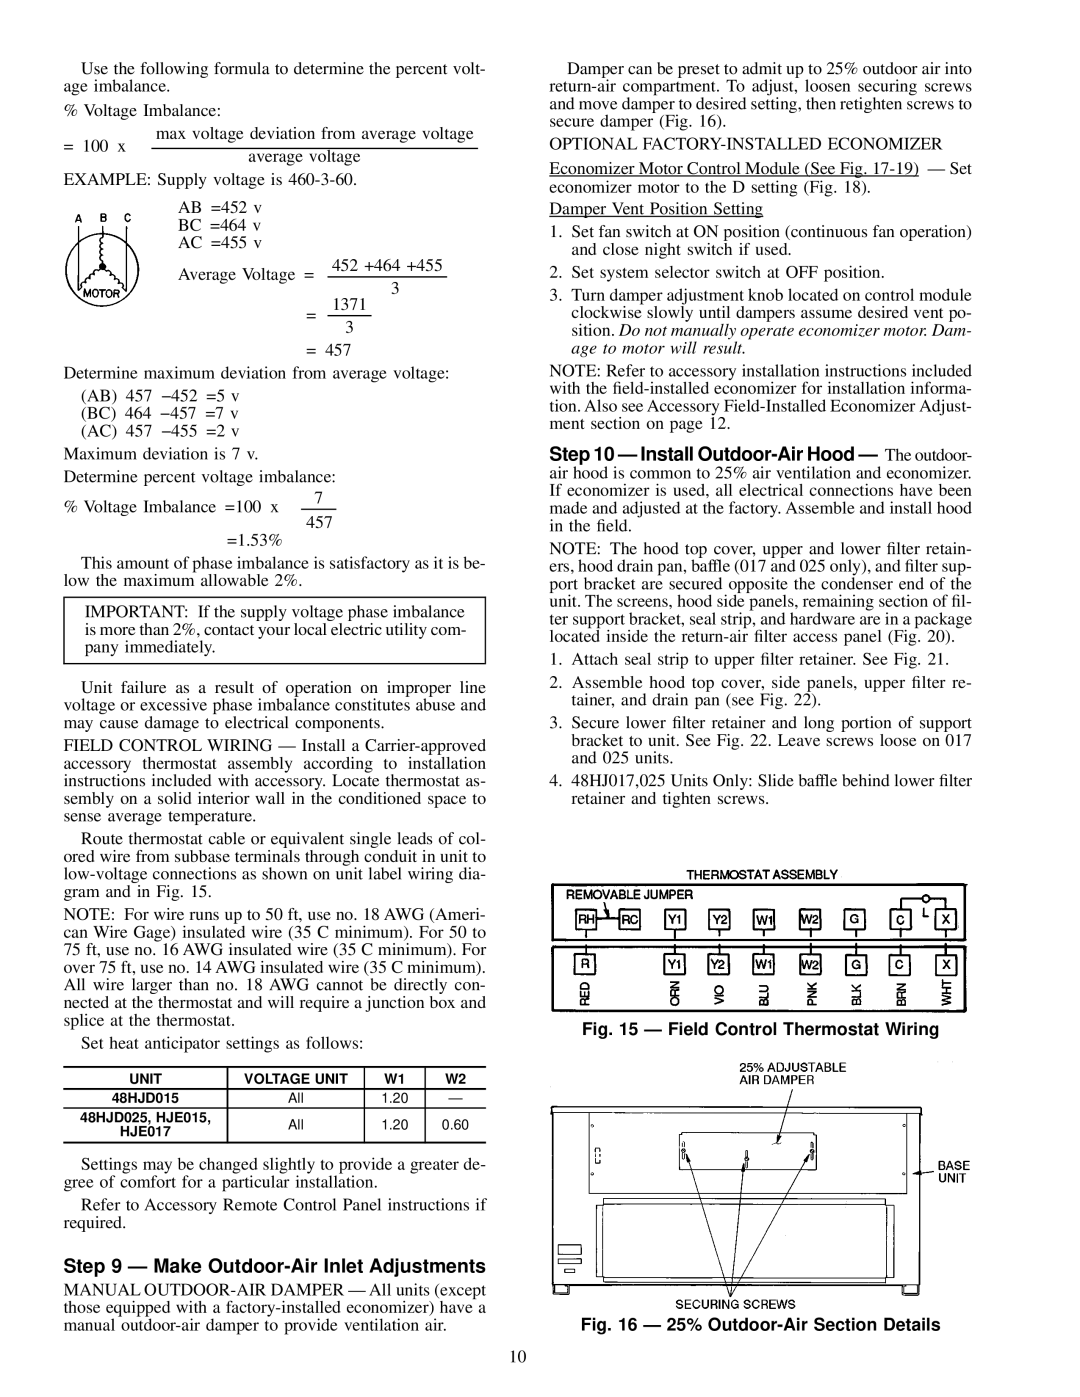
Route thermostat cable or equivalent single leads of col- ored wire from subbase terminals through conduit in unit to low-voltage connections as shown on unit label wiring dia- gram and in Fig. 15.

NOTE: For wire runs up to 50 ft, use no. 18 AWG (Ameri- can Wire Gage) insulated wire (35 C minimum). For 50 to 75 ft, use no. 16 AWG insulated wire (35 C minimum). For over 75 ft, use no. 14 AWG insulated wire (35 C minimum). All wire larger than no. 18 AWG cannot be directly con- nected at the thermostat and will require a junction box and splice at the thermostat.

Set heat anticipator settings as follows:

UNIT

VOLTAGE UNIT

W1

W2

48HJD015

All

1.20

Ð

48HJD025, HJE015,

All

1.20

0.60

HJE017


Settings may be changed slightly to provide a greater de- gree of comfort for a particular installation.

Refer to Accessory Remote Control Panel instructions if required.

Step 9 Ð Make Outdoor-Air Inlet Adjustments

MANUAL OUTDOOR-AIR DAMPER Ð All units (except those equipped with a factory-installed economizer) have a manual outdoor-air damper to provide ventilation air.

Damper can be preset to admit up to 25% outdoor air into return-air compartment. To adjust, loosen securing screws and move damper to desired setting, then retighten screws to secure damper (Fig. 16).

OPTIONAL FACTORY-INSTALLED ECONOMIZER

Economizer Motor Control Module (See Fig. 17-19) Ð Set economizer motor to the D setting (Fig. 18).

Damper Vent Position Setting

1.Set fan switch at ON position (continuous fan operation) and close night switch if used.

2.Set system selector switch at OFF position.

3.Turn damper adjustment knob located on control module clockwise slowly until dampers assume desired vent po- sition. Do not manually operate economizer motor. Dam- age to motor will result.

NOTE: Refer to accessory installation instructions included with the ®eld-installed economizer for installation informa- tion. Also see Accessory Field-Installed Economizer Adjust- ment section on page 12.

Step 10 Ð Install Outdoor-Air Hood Ð The outdoor- air hood is common to 25% air ventilation and economizer. If economizer is used, all electrical connections have been made and adjusted at the factory. Assemble and install hood in the ®eld.

NOTE: The hood top cover, upper and lower ®lter retain- ers, hood drain pan, baffle (017 and 025 only), and ®lter sup- port bracket are secured opposite the condenser end of the unit. The screens, hood side panels, remaining section of ®l- ter support bracket, seal strip, and hardware are in a package located inside the return-air ®lter access panel (Fig. 20).

1.Attach seal strip to upper ®lter retainer. See Fig. 21.

2.Assemble hood top cover, side panels, upper ®lter re- tainer, and drain pan (see Fig. 22).

3.Secure lower ®lter retainer and long portion of support bracket to unit. See Fig. 22. Leave screws loose on 017 and 025 units.

4.48HJ017,025 Units Only: Slide baffle behind lower ®lter retainer and tighten screws.

Fig. 15 Ð Field Control Thermostat Wiring

Fig. 16 Ð 25% Outdoor-Air Section Details

10

Page 10
Image 10
Carrier 48HJ015-025 Make Outdoor-Air Inlet Adjustments, Unit Voltage Unit, 48HJD015 All 48HJD025, HJE015 HJE017

48HJ015-025 specifications

The Carrier 48HJ015-025 is a distinguished series of rooftop packaged units renowned for their efficient performance and reliability in light commercial applications. Designed for a variety of indoor environments, these units are engineered to provide efficient heating and cooling solutions, making them suitable for retail spaces, offices, and other commercial buildings.

One of the main features of the Carrier 48HJ series is its advanced scroll compressor technology, which enhances the overall efficiency of the systems. This type of compressor is known for its durability and quiet operation, providing consistent temperature control while minimizing energy consumption. The use of a scroll compressor contributes to a higher Seasonal Energy Efficiency Ratio (SEER) and Heating Seasonal Performance Factor (HSPF), making these units a smart choice for energy-conscious businesses.

Additionally, the 48HJ series incorporates a multi-speed indoor blower that allows for precise airflow control. This feature ensures optimal indoor comfort by adjusting the air distribution based on the specific heating or cooling needs of the space. The ability to adapt to varying load conditions enhances efficiency and reduces energy wastage.

Another noteworthy characteristic of the Carrier 48HJ015-025 is its robust construction. Built with galvanized steel, the units are designed to withstand harsh environmental conditions, ensuring longevity and minimal maintenance requirements. The powder-painted finish offers corrosion resistance, contributing to the unit’s durability over time.

The series also integrates advanced controls for ease of operation. The user-friendly thermostat enables precise temperature management and can be programmed according to the specific needs of the facility. Moreover, compatibility with Building Management Systems (BMS) facilitates seamless integration into existing infrastructure, enabling remote monitoring and enhanced operational efficiency.

In terms of environmental considerations, the Carrier 48HJ series utilizes R-410A refrigerant, which is known for its reduced impact on the ozone layer compared to older refrigerants. This commitment to sustainability aligns with modern environmental standards and regulations.

Overall, the Carrier 48HJ015-025 stands out as a versatile and efficient rooftop packaged unit, perfect for varying commercial applications. Its combination of advanced technology, reliability, and user-focused design makes it a prominent choice for businesses seeking optimized climate control solutions while ensuring sustainability and energy efficiency.