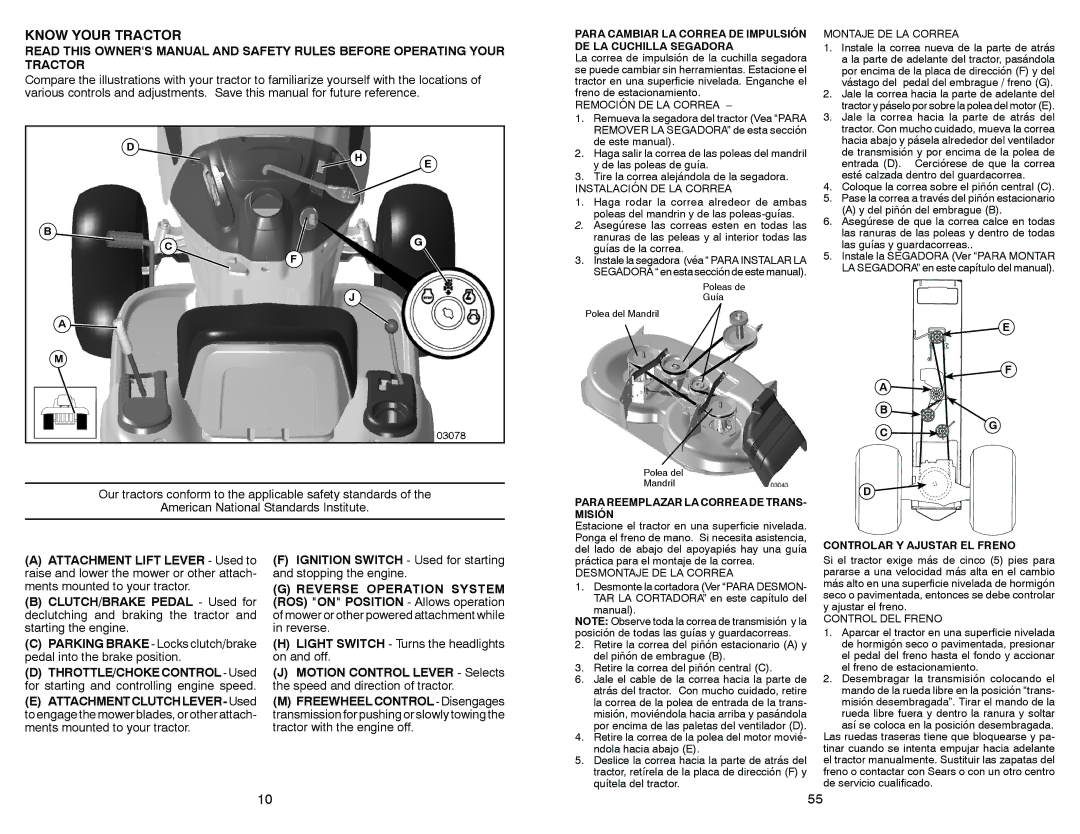
KNOW YOUR TRACTOR
READ THIS OWNER'S MANUAL AND SAFETY RULES BEFORE OPERATING YOUR TRACTOR
Compare the illustrations with your tractor to familiarize yourself with the locations of various controls and adjustments. Save this manual for future reference.
D
 HE
HE
B
CG
F
J
A
M
Our tractors conform to the applicable safety standards of the
American National Standards Institute.
PARA CAMBIAR LA CORREA DE IMPULSIÓN DE LA CUCHILLA SEGADORA
La correa de impulsión de la cuchilla segadora se puede cambiar sin herramientas. Estacione el tractor en una superficie nivelada. Enganche el freno de estacionamiento.
REMOCIÓN DE LA CORREA –
1.Remueva la segadora del tractor (Vea “PARA REMOVER LA SEGADORA” de esta sección de este manual).
2.Haga salir la correa de las poleas del mandril y de las poleas de guía.
3.Tire la correa alejándola de la segadora.
INSTALACIÓN DE LA CORREA
1.Haga rodar la correa alredeor de ambas poleas del mandrin y de las poleas-guías.
2.Asegúrese las correas esten en todas las ranuras de las peleas y al interior todas las guías de la correa.
3.Instale la segadora (véa “ PARA INSTALAR LA SEGADORA “ en esta sección de este manual).
Poleas de
Guía
Polea del Mandril
Polea del
Mandril
PARA REEMPLAZAR LA CORREA DE TRANS- MISIÓN
MONTAJE DE LA CORREA
1.Instale la correa nueva de la parte de atrás a la parte de adelante del tractor, pasándola por encima de la placa de dirección (F) y del vástago del pedal del embrague / freno (G).
2.Jale la correa hacia la parte de adelante del tractor y páselo por sobre la polea del motor (E).
3.Jale la correa hacia la parte de atrás del tractor. Con mucho cuidado, mueva la correa hacia abajo y pásela alrededor del ventilador de transmisión y por encima de la polea de entrada (D). Cerciórese de que la correa esté calzada dentro del guardacorrea.
4.Coloque la correa sobre el piñón central (C).
5.Pase la correa a través del piñón estacionario
(A) y del piñón del embrague (B).
6.Asegúrese de que la correa calce en todas las ranuras de las poleas y dentro de todas las guías y guardacorreas..
5.Instale la SEGADORA (Ver “PARA MONTAR LA SEGADORA” en este capítulo del manual).
D 


(A)ATTACHMENT LIFT LEVER - Used to raise and lower the mower or other attach- ments mounted to your tractor.
(B)CLUTCH/BRAKE PEDAL - Used for declutching and braking the tractor and starting the engine.
(C)PARKING BRAKE - Locks clutch/brake pedal into the brake position.
(D)THROTTLE/CHOKE CONTROL - Used for starting and controlling engine speed.
(E)ATTACHMENTCLUTCHLEVER-Used to engage the mower blades, or other attach- ments mounted to your tractor.
(F)IGNITION SWITCH - Used for starting and stopping the engine.
(G)REVERSE OPERATION SYSTEM (ROS) "ON" POSITION - Allows operation of mower or other powered attachment while in reverse.
(H)LIGHT SWITCH - Turns the headlights on and off.
(J)MOTION CONTROL LEVER - Selects the speed and direction of tractor.
(M)FREEWHEEL CONTROL - Disengages transmission for pushing or slowly towing the tractor with the engine off.
Estacione el tractor en una superficie nivelada. Ponga el freno de mano. Si necesita asistencia, del lado de abajo del apoyapiés hay una guía práctica para el montaje de la correa.
DESMONTAJE DE LA CORREA
1.Desmonte la cortadora (Ver “PARA DESMON- TAR LA CORTADORA” en este capítulo del manual).
NOTE: Observe toda la correa de transmisión y la posición de todas las guías y guardacorreas.
2.Retire la correa del piñón estacionario (A) y del piñón de embrague (B).
3.Retire la correa del piñón central (C).
6.Jale el cable de la correa hacia la parte de atrás del tractor. Con mucho cuidado, retire la correa de la polea de entrada de la trans- misión, moviéndola hacia arriba y pasándola por encima de las paletas del ventilador (D).
4.Retire la correa de la polea del motor movié- ndola hacia abajo (E).
5.Deslice la correa hacia la parte de atrás del tractor, retírela de la placa de dirección (F) y quítela del tractor.
CONTROLAR Y AJUSTAR EL FRENO
Si el tractor exige más de cinco (5) pies para pararse a una velocidad más alta en el cambio más alto en una superficie nivelada de hormigón seco o pavimentada, entonces se debe controlar y ajustar el freno.
CONTROL DEL FRENO
1.Aparcar el tractor en una superficie nivelada de hormigón seco o pavimentada, presionar el pedal del freno hasta el fondo y accionar el freno de estacionamiento.
2.Desembragar la transmisión colocando el mando de la rueda libre en la posición “trans- misión desembragada”. Tirar el mando de la rueda libre fuera y dentro la ranura y soltar así se coloca en la posición desembragada.
Las ruedas traseras tiene que bloquearse y pa- tinar cuando se intenta empujar hacia adelante el tractor manualmente. Sustituir las zapatas del freno o contactar con Sears o con un otro centro de servicio cualificado.

