Digital Audio System
MU Japan
MU Digital Audio System
Table of Contents
PatchMix DSP Mixer
Effects
Appendix
Using High Sample Rates
Index 115
Welcome
Introduction
All Systems Include
MU Digital Audio System Components MU 1212M MU 1820M
MU 1820 System
MU 1212M System
MU 1820M System
Setting Up the Digital Audio System
Installation
Safety First
Connector Types
Name Description Connects
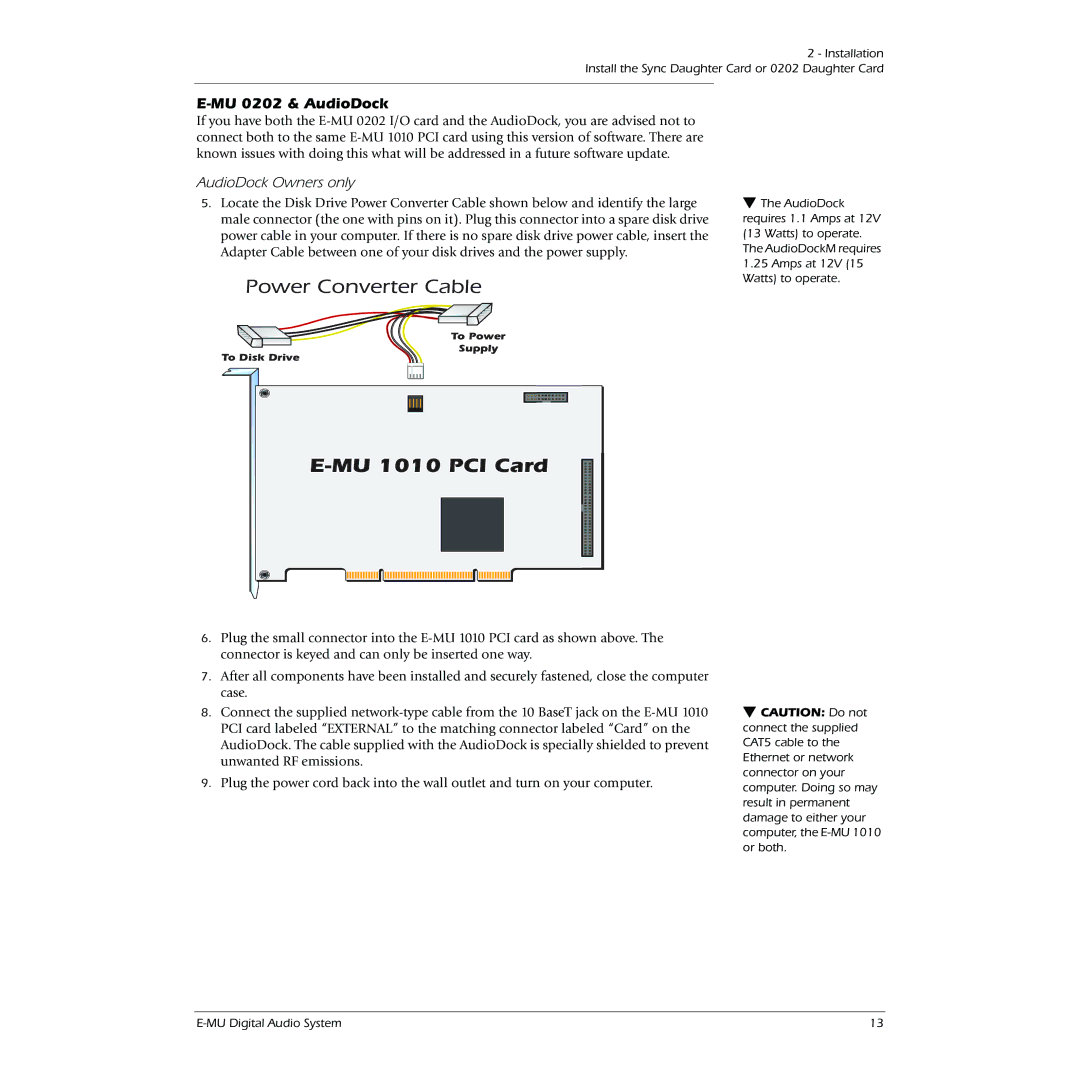
To install the 1010 PCI card into your computer
Installing the E-MU 1010 PCI Card
Slo ts
Sync Daughter Card
Install the Sync Daughter Card or 0202 Daughter Card
MU 0202 & AudioDock
MU 1010 PCI Card
Rubber Feet
Rack Mounting the AudioDock
Rubber Foot Rack-shelf Mount
Installing the E-MU 1010 Drivers
Software Installation
Uninstalling all Audio Drivers and Applications
Windows 2000 or Windows XP
Installation Software Installation
E-MU 1010 PCI Card
PCI Card & Interfaces
Connections
0202 Daughter Card
IEEE1394 Firewire
Analog Inputs and Outputs
Midi In/Out
Inputs are configured as follows
AudioDock
Front Panel Connections
Headphone Output & Volume Control
Preamp Section
Midi 1 In/Out
Midi Input Indicators
AudioDock Front Panel Indicators
Clock Source and Sample Rate Indicators
Sample Rate Indicators
Line Level Analog Inputs
Rear Panel Connections
Turntable Inputs & Ground Lug
Line Level Analog Outputs
Computer Speaker Analog Outputs
EDI Connector Card
Midi 2 In/Out
Computer Speaker Output Duplicates Line Level Output
Sync Daughter Card
PatchMix DSP
PatchMix DSP Mixer
Overview of the Mixer
To Invoke the PatchMix DSP Mixer
Monitor
Mixer Window
Out
Main
Toolbar
MU Icon in the Windows Taskbar
Right-Click Here
New Session
Session
System Settings
Session Settings
Open Session
Save Session
Midi Settings
Using External Clock
Input too weak? Use -10 Input setting Output too weak?
Settings
Headroom
Outputs +4 or
Inputs +4 or
PCI Card Optical Input
PCI Card Optical Output
Input Mixer Strips
To Add a New Strip
Mixer Strip Creation
Windows Media Player/DVD/Surround Sound Playback
Multichannel Wave Files
To Delete a Mixer Strip
Multichannel Wave to Surround Sound Speaker Channels
Working with Inserts
Insert Section
To Add an Effect to an Insert Location
To Add a Send Insert
Insert Menu
To Add a Send/Return Insert
Input
To Insert an External Signal Processing Device
Using External Sends & Returns
Outboard Signal Processor
To Add an Asio Direct Monitor Send/Return
Asio Direct Monitor Send/Return
RecordingPlayback
Meter Inserts
To Set the Input Levels of a Strip
60 50 40 30 20
To Insert a Meter
Making the Best Possible Recording
Trim Pot Insert
Test Tone/Signal Generator Insert
To Delete an Insert
Managing Your Inserts
To Bypass an Insert
To Bypass All Inserts
Pan Fader
Aux Section
Aux Bus
Amount
Output
Input
Pre-Fader Aux Send
Post-Fader Aux Send
Level, Pan, Solo & Mute Controls
Main Section
Effect
TV Screen & Selectors
Output
Input
Auxiliary Effects & Returns
Sync/Sample Rate Indicators
Input Input
Output
Output Section
PatchMix DSP Mixer Main Section
Overview
Effects
Effects Palette
Core Effects Multi-Effects
To Select an Effect
FX Insert Chains
To Edit an Effect
To Delete an Effect
To Create a New Preset Category
Creating, Renaming & Deleting Categories or Presets
To Delete an Effect Category or Preset
To Rename an Effects Category
To Export your Core FX Presets
To Import Core FX Presets
To Import FX Category Folders
To Export your FX Category Folders
FX Edit Screen
To Select a User Preset
User Preset Section
To Create a New User Preset
To Bypass ALL
To Delete a User Preset
Core Effects and Effects Presets
To Rename a User Preset
To Overwrite or Save a User Preset
DSP Resource Usage
List of Core Effects
Example
Total Effects
Band Para EQ
Core Effects Descriptions
Band Shelf EQ
Low Shelf Or… High Shelf
Band EQ
Setting up a Parametric EQ
Mid Band High Shelf
Low-Shelf Mid 1-Band Mid 2-Band High-Shelf
Auto-Wah Filter
Auto-Wah
Chorus
VCA Out
Compressor
Basic Controls
Distortion
Distortion
Input Meter
Flanger
Flanger
Freq Shifter
Post Gain
Leveling Amp
Early Reflections ReverberationTime
Lite Reverb
Delay
Mono Delays 100, 250, 500, 750, 1500
Rolloff
Rotary
Phase Shifter
Speaker Type Description
Speaker Simulator
Stereo Delays 100, 250, 500, 750
Delay
Rolloff
Early Reflections Late Reverb
Stereo Reverb
Frequency
Vocal Morpher
List of Available Phonemes
Phoneme B
MU PowerFX
To Setup & Use E-MU PowerFX
Setup Cubase LE
MU PowerFX Resource Availability
Automating E-MU PowerFX
To Record PowerFX parameter changes in Cubase LE
Application Name Compatible? Render Extra Buffers
MU PowerFX Compatibility Chart
Using E-MU PowerFX with WaveLab and SoundForge
Rendering Audio with E-MU PowerFX
General Tips for Rendering using PowerFX
Tips for using Freeze Mode on Cubase LE
Wire VST plug-in
MU E-Wire VST
PatchMix DSP Strip configured for E-Wire
To Setup and use E-Wire
Delay Compensator
Delay Units Parameter
Delay Compensator Use
Cubase VST or Cubasis
PatchMix
Track
Grouping Tracks
MU 1820 System at 88.2k/96k 1010 PCI Card & AudioDock
Using High Sample Rates
MU 1820 Inputs/Outputs at 88.2kHz or 96kHz Source
Total
Line In 2 & 3 enabled
Adat enabled
MU 1212M System at 88.2k or 96k 1010 PCI Card & I/O Card
MU 1212M Inputs/Outputs at 88.2kHz or 96kHz Source
MU 1212 System at 176.4k/192k 1010 PCI Card & I/O Card
MU 1820 System at 176.4kHz or 192kHz
MU 1820 Inputs/Outputs at 176.4kHz or 192kHz Source Total
Outputs
Microphone & Adat Input enabled
Microphone & Line 3 Input enabled
Line Input 1 & Adat Input enabled
Line Inputs 1 & 3 enabled
WDM Recording and Playback Behavior
Using High Sample Rates Overview
Appendix
Smpte Features
Sync Daughter Card Supplement
Smpte Conversion
External Mode
Host Mode
Flywheel Mode
Smpte Modes of Operation
Smpte Background
Stripe Mode
Time Code
Types of Smpte
Avoiding Smpte problems
Why use SMPTE?
Smpte Subframe Resolution
Frames-per-second Resolution
Example Smpte Connection
Other Tips for using Smpte
Duplicating Smpte time code
Sync
Midi Time Code MTC
To Enable MTC
Word Clock In/Out
To Synchronize PatchMix DSP to an External Clock Source
Digital Mixer
House Sync Generator Digital Device
Adat Optical
MU 1010 Card
External Device supplies Master Clock
Getting in Sync
PatchMix DSP supplies Master Clock
Via Adat
Useful Information
Balanced 1/4 TRS Connectors Unbalanced 1/4
AES/EBU to S/PDIF Cable Adapter
Cables balanced or unbalanced?
Appearance Settings in Windows
Phantom Power
Digital Cables
Grounding
Specifications 1820M System
Technical Specifications
Type
Frequency Response THD + N
Gain Range Max Level
Type Frequency Response Stereo Crosstalk
Dynamic Range
Microphone Preamp Gain Range Max Level
Frequency Response THD+N
Firewire
Internal Crystal Sync
Frame Rates Modes Input Level Output Level Input Impedance
Specifications 1820 System
MIC PREAMP/LINE Input
RMS Jitter @ 44.1K
Specifications 1212 System
Weight 30lb / 0.14kg Dimensions 7 / 170.2mm
Dimensions & Weight
Weight 25lb / 0.10kg Dimensions 04 / 128mm
PCI Card
Synth
Internet References
Forums
Trade Name
Declaration of Conformity
Model No
Responsible Party
Compliance Information
Appendix Internet References 114
Numerics
Index
Index
Adat
118
MU Digital Audio System 119
Index 120