Installing your DVD recorder
Initial installation
After successfully connecting your DVD recorder to the TV set and other additional devices, this chapter will show you how to start the initial installation.
The DVD recorder automatically seeks out and stores all available TV channels.
Installing your DVD recorder
On screen menu?
The
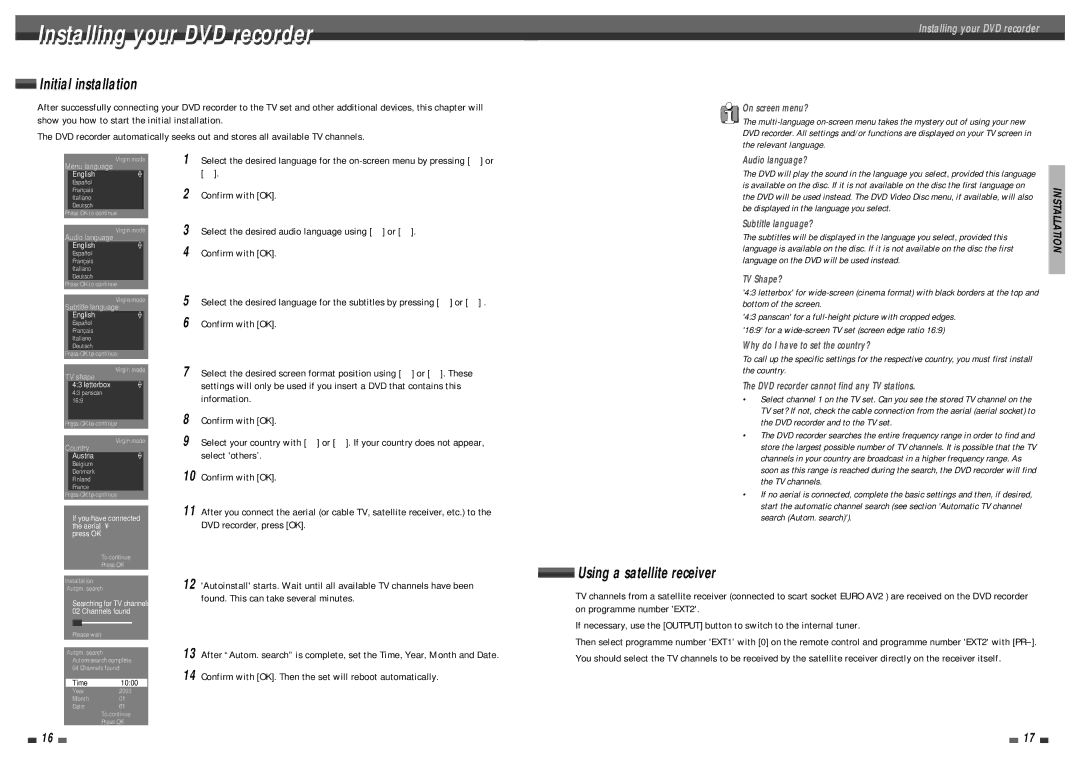
Virgin mode
Menu language
English Español
Français
Italiano
Deutsch
Press OK to continue
Virgin mode
Audio language English Español Français Italiano Deutsch
Press OK to continue
Virgin mode
Subtitle language English Español Français Italiano Deutsch
Press OK to continue
Virgin mode
TV shape
4:3 letterbox
4:3 panscan 16:9
Press OK to continue
Virgin mode
Country
Austria
Belgium
Denmark
Finland
France
Press OK to continue
If you have connected the aerial •
press OK
To continue
Press OK
Installation
Autom. search
Searching for TV channels 02 Channels found
Please wait
Autom. search Autom.search complete 04 Channels found
… |
|
◆ Time | 10:00 |
†Year | 2003 |
Month | 01 |
Date | 01 |
| To continue |
| Press OK |
1Select the desired language for the
2Confirm with [OK].
3Select the desired audio language using […] or [†].
4Confirm with [OK].
5Select the desired language for the subtitles by pressing […] or [†] .
6Confirm with [OK].
7Select the desired screen format position using […] or [†]. These settings will only be used if you insert a DVD that contains this information.
8Confirm with [OK].
9Select your country with […] or [†]. If your country does not appear, select 'others’.
10Confirm with [OK].
11After you connect the aerial (or cable TV, satellite receiver, etc.) to the DVD recorder, press [OK].
12'Autoinstall' starts. Wait until all available TV channels have been found. This can take several minutes.
13After “Autom. search” is complete, set the Time, Year, Month and Date.
14Confirm with [OK]. Then the set will reboot automatically.
Audio language? |
|
The DVD will play the sound in the language you select, provided this language |
|
is available on the disc. If it is not available on the disc the first language on | INSTALLATION |
language is available on the disc. If it is not available on the disc the first | |
the DVD will be used instead. The DVD Video Disc menu, if available, will also |
|
be displayed in the language you select. |
|
Subtitle language? |
|
The subtitles will be displayed in the language you select, provided this |
|
language on the DVD will be used instead. |
|
TV Shape? |
|
| |
'4:3 letterbox' for |
|
bottom of the screen. |
|
'4:3 panscan' for a |
|
'16:9' for a |
|
Why do I have to set the country? |
|
To call up the specific settings for the respective country, you must first install |
|
the country. |
|
The DVD recorder cannot find any TV stations. |
|
• Select channel 1 on the TV set. Can you see the stored TV channel on the |
|
TV set? If not, check the cable connection from the aerial (aerial socket) to |
|
the DVD recorder and to the TV set. |
|
• The DVD recorder searches the entire frequency range in order to find and |
|
store the largest possible number of TV channels. It is possible that the TV |
|
channels in your country are broadcast in a higher frequency range. As |
|
soon as this range is reached during the search, the DVD recorder will find |
|
the TV channels. |
|
• If no aerial is connected, complete the basic settings and then, if desired, |
|
start the automatic channel search (see section 'Automatic TV channel |
|
search (Autom. search)'). |
|
 Using a satellite receiver
TV channels from a satellite receiver (connected to scart socket EURO AV2 ) are received on the DVD recorder on programme number 'EXT2'.
If necessary, use the [OUTPUT] button to switch to the internal tuner.
Then select programme number 'EXT1’ with [0] on the remote control and programme number 'EXT2' with
16 |
|
|
| 17 |
|
|